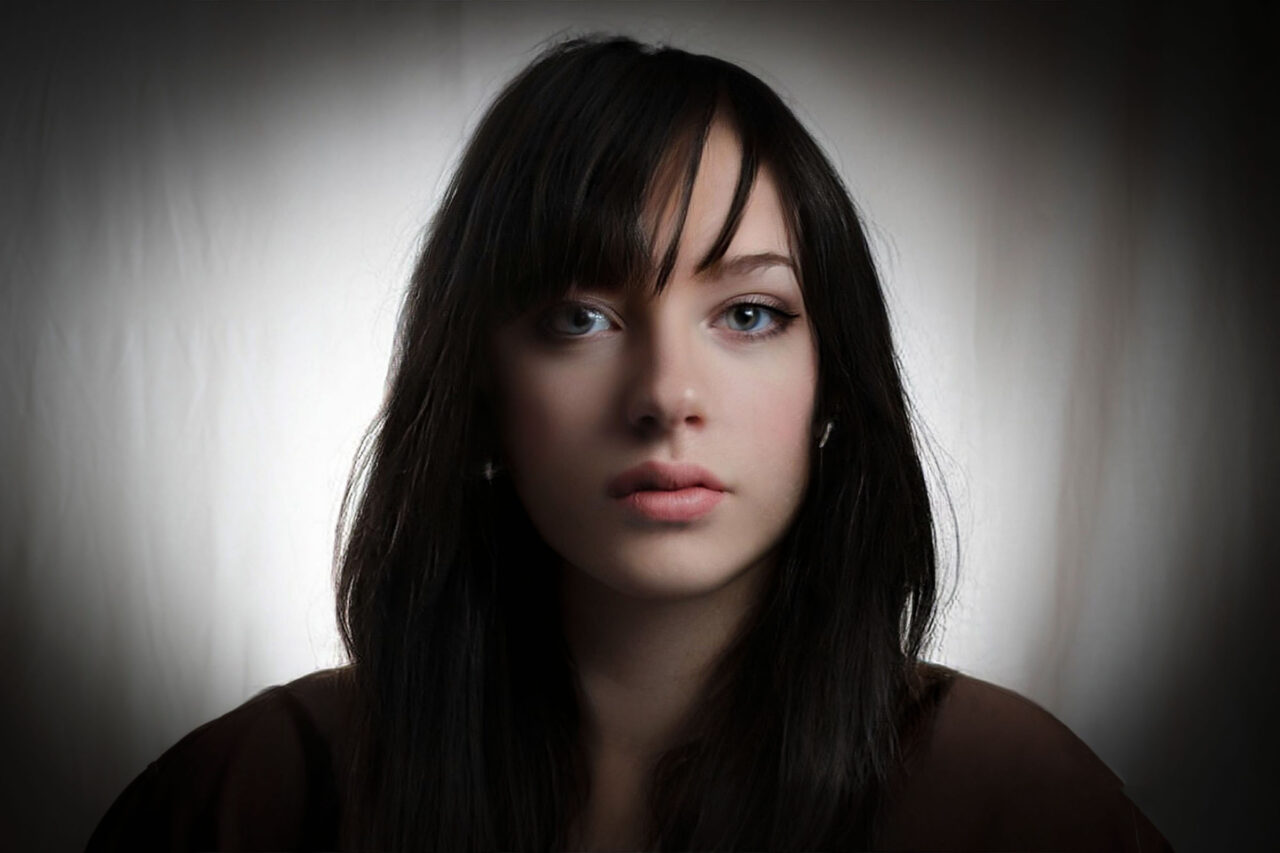
Setting up studio lights, (Speedlites or Strobes), for portrait photography may seem a little daunting but there are some tried and tested arrangements that produce great results. They are not difficult to achieve once you have been shown how. Many of them only require one light source.
The following illustrated article breaks down the main lighting setups into simple descriptions that will quickly have you taking more professional looking studio portraits. For most of the different setups, we will have examples of soft light (80cm x 80cm softbox) and hard light (7-inch reflector with a grid).
- TABLE OF SUBJECTS

What Are The Principal Types Of Light Positions For Studio Lighting Setups?
- Key Light
- Fill Light
- Hair Light
- Separation Light – Kicker Light
- Backdrop Light – Spray light – Halo Light
What is The Key Light in Studio Photography?

The key light is the principal light of a group in a studio setup and is used to define the main form and shadows of the composition. It is usually the most powerful light in a multi-light setup but if it is the only light required to achieve the desired outcome it is usually not called the Key Light.
The key light has no fixed position as it can be placed at virtually any angle around the subject provided that it is still the most prominent, form-defining light source. It is also not limited in height as it could be elevated above, level with or below the main subject. The defining attribute of the key light is that it is the main light that creates the composition with any other lights providing supplementary supporting illumination.
The key light can be modified in a variety of ways to define the type of light that is most suitable for the photograph:
- Soft box/ Umbrella (for soft shadows and a gentle fall-off of light)
- Beauty Dish (for a harder but wrapped-around higher contrast look from reflected light of a wider dish)
- Reflector (for very hard-lined shadows from direct but shrouded flash light, the Hollywood look)
- Snoot (for a constrained beam of light to pick out a particular area of the subject)
- Gobo (to add texture or story to the subject or backdrop with a “Go Between” object)
- Barn Doors (to add drama and control the shape and size of the light output)
Take a Deeper Dive into Key Light here in Photography Skool
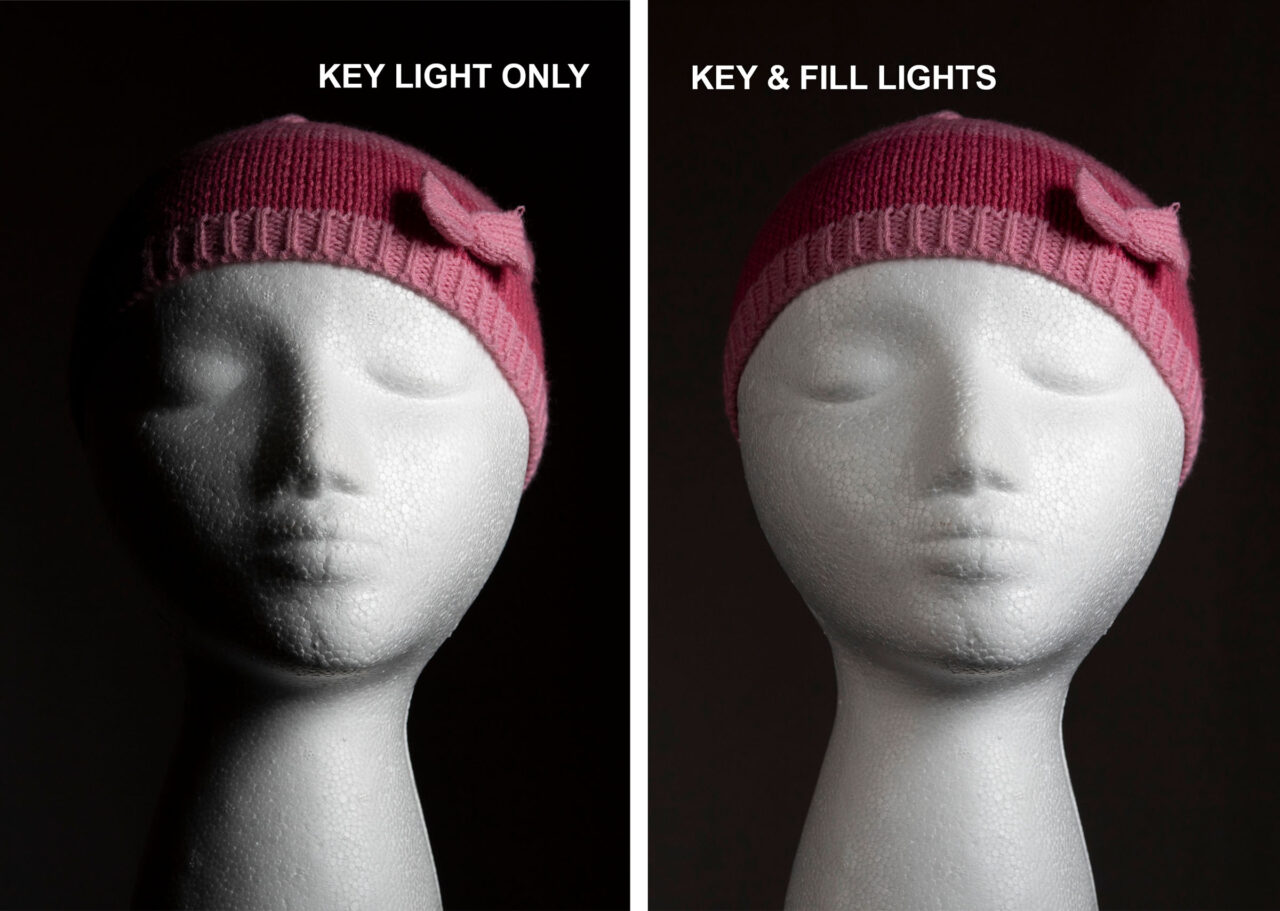
What is The Fill Light in Studio Photography?

The Fill Light is often used in conjunction with a Key Light. It assists in reducing the contrast/ drama and helps to reveal details in the shadows. It improves the balance of an image by softening the harsh differences between the bright and shadowy areas of the photograph.
It is usually placed on the opposite side of the subject and angled towards it. The Fill Light should not compete with the Key Light in intensity and therefore should be of less power or further away from the subject. The Fill should also be secondary enough not to cast a second shadow that could cause confusion in the image.
It could even be a reflector on the opposite side that picks up some illumination from the Key Light and bounces light of a reduced power into the shadow side of the subject. You can moderate the Fill Light from a reflector by adjusting its size or distance from the subject.
The lighting ratio between the Key and Fill is important to consider. As the Key Light should always be brighter than the Fill, a common ratio that produces a pleasing soft shadow on the darker side is 2:1, where the Key is twice as bright as the Fill. For an increasingly dramatic effect experiment with increasing the Lighting Ratio up to 8:1, 16:1, 32:1, 64:1 or higher (which most flash Speedlites can achieve).
The light power is very easy to control if you are using studio strobes or Speedlite flashes. You can simply double or half the flash power by notching up or down one step which is equivalent to one Stop.
Retaining some level of shadow on the dark side helps the image to maintain some depth and three-dimensional volume. If the Fill Light is too closely matched to the Key Light it can result in a flat and uninteresting result.
What is a Separation / Kicker Light in Studio Photography?

Unless you want the subject to melt into the backdrop, (which is a valid compositional idea), you will want to separate its form from the backdrop by defining the edges with strategically placed lights. These are known as Separation Lights or Kickers (as they kick beneficial light onto the subject from outside of the frame).
They are generally placed behind and to the side of the subject and help to describe the edge forms and separate them from the background which may be a similar tone or colour. They help to create a more 3-dimensional shape but beware of unwanted lens flares in your images. To avoid this problem, use a light source modified with a snoot, a grid or some barn doors.
What is The Hair Light in Studio Photography?

The Hair Light is a particular type of separation light that targets the top and back of the head to add shine and detail to the edge and top of the subject’s hair. It is particularly effective if the subject has dark hair against a dark background. It has the effect of preventing the subject from merging with the dark gloom of the backdrop and adding full definition to the shape of the subjects head.
It should best be placed above and behind the subject and not cast extra shadows from the subject’s facial features. As the Hair Light is generally pointing in the direction of the camera there is a possibility of lens flare so consider adding a modifier to the light.
You can laser-focus the Hair Light to highlight a particular portion of the hair using a snoot or 7-inch reflector with a tight grid. Alternatively, you may want the whole top of the head and shoulders to be picked out. This can be achieved with a wider softbox or umbrella modifier.
What is a Backdrop Light in Studio Photography?

This is also a Separation Light but it works in the opposite manner. Instead of defining the edges of the subject by directly illuminating them, this light illuminates the backdrop behind the subject by aiming a light backwards to effectively highlight the subject’s shape as a silhouette. The key light will then fill in light on the front of the subject to complete the lighting setup.
This technique can be used on a black background to bring it up to a shade of grey or white background to guarantee a perfectly white result.
A special version of this is the Spray Light or Halo Light. This can transform the backdrop from a boring flat plane to something more interesting by graduating from light to dark from the centre to the edges. This is achieved when you place a light quite close to and facing the back wall behind the subject.
This produces the effect of creating a circular halo behind the head and shoulders with a bright centre and gently falling off into shadow at the edges. The size and contrast of the spray halo can be adjusted by changing the distance of the light from the back wall or the size of the reflectors and grids.
Now, let’s look at the main lighting setups that can be created using the light positions described above. Sometimes they only require one Key Light and in other situations, you can use combinations of 2,3 or even 4 light positions to create the setup.
What Are The Main Types Of Lighting Setups For Indoor Studio Portrait Photography?
- Single Light Setups
- Two Light Setups
- Three Light Setups
- Four Light Setups
SINGLE LIGHT SETUPS
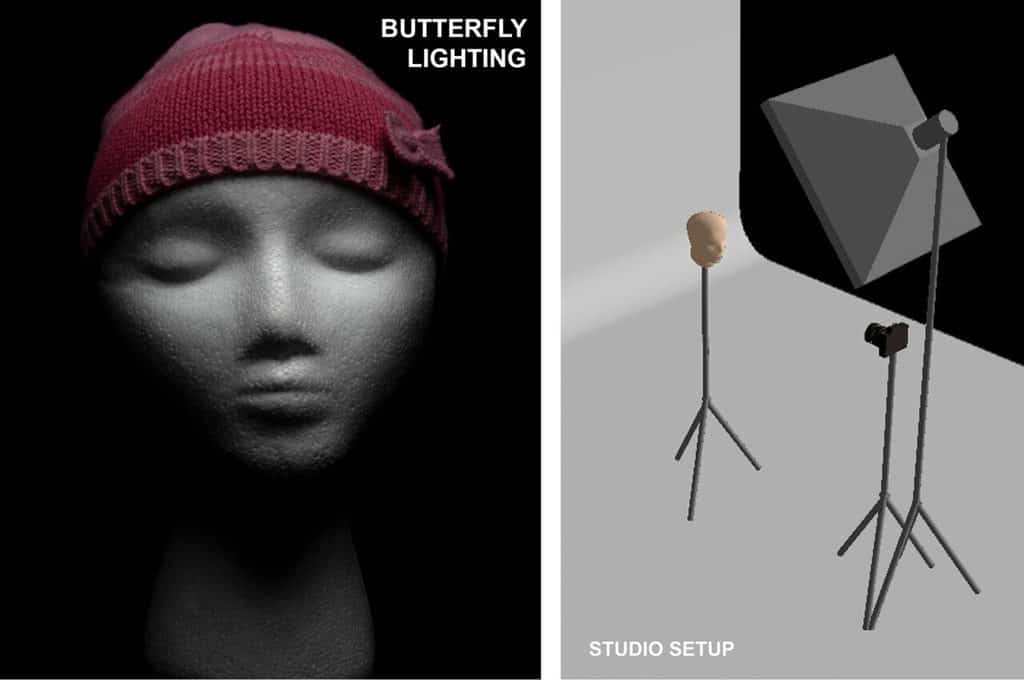
What is Butterfly Lighting in Studio Photography?

Lighting setups are often named after the shape of the shadow that they cast. Butterfly Lighting is so named after the shape of the shadow that occurs beneath the nose of the subject when the key light is precisely placed to achieve this.
The Butterfly shadow looks best when it is perfectly symmetrical and sits beneath the nose but does not extend as far down as the top lip. If it is slightly off-centre it can look lopsided. The light should be set directly in line with the face, elevated above it and pointing down at an angle of about 45 degrees or less.
The angle may vary depending on how far the nose extends out from the face. The angle shouldn’t be so steep that it casts deep shadows over the eye sockets. Ideally, the light should be placed for the perfect Butterfly shadow beneath the nose and also create catch-lights in the eyes.
If the model turns their head to the left or right, you should move the light to line up on-axis with the face to ensure a symmetrical Butterfly shadow. Depending on the subject, it also has the ability to emphasize the cheekbones, giving the face a more sculptural, slimmer impression. The direct, face-on attitude of the light also tends to fill in slight imperfections with light and therefore helps to flatter the skin texture.
This lighting setup does also produce a pronounced shadow beneath the chin. If this is too dark or distracting you can introduce a fill light of less power, set low down and pointing up and under the chin. This setup is often called Paramount Lighting but it is achieved with some subtle differences.
What is Paramount Lighting in Studio Photography?

Paramount Lighting, so-called after the famous movie studio in Hollywood, is a distinctive version of Butterfly Lighting photography that was used to advertise the top movie stars. It is sometimes characterized by very strong contrast and hard light which worked well with the flawless-skinned actors of the 1930s and 1940s.
The hard light makes the butterfly shadow shape much more distinct and easy to understand. It also sharply sculpts out the cheekbone hollows for a very striking portrait.
What is Loop Lighting in Studio Photography?

As we start to rotate the light source from the central position on the face to the left or right, the shadow pattern begins to transform. Keeping the light above the subject, the next established position is known as Loop Lighting and produces a shadow on the side of the nose that also loops around the bottom of the nose.
It is flattering in portraits because it is still relatively frontal to the subject and helps to fill blemishes with light. It adds three-dimensional shadow modelling and helps to slim down rounder faces by elongating them.
The light source shouldn’t be too high as we will lose the catchlights in the eyes and the nose shadow might overlap the top lip. The nose shadow shouldn’t connect with the cheek shadow though; that is another type of shadow pattern created by a setup known as Rembrandt Lighting that we will come on to next.
What is Rembrandt Lighting in Studio Photography?

Continuing to rotate the overhead light source in the same direction, we next come to the position known as Rembrandt Lighting. We are starting to add some drama to our portrait photographs. The light source is placed at such an angle to the face that the previously described Loop Shadow merges with the cheek shadow leaving a triangle of illumination beneath the eye on the dark side of the face.
So named after the famous painter, Rembrandt utilised this technique in some of his portraits and self-portraits to create very dramatic compositions apparently illuminated by a single, high-level window.
The setup produces undeniably dramatic shadows but retains a three-dimensional depth due to the triangle of light that penetrates the shadow on the dark side of the face. Classically the triangle patch of light should match the scale of the nose and eye in length and width but there is scope for some variation.
If the light source is hard, It can be somewhat less flattering as it can highlight flaws and blemishes in the skin. It also works well with soft light and this can temper the harsh shadows and soften the skin texture.
Don’t take the rotation of the light source too far though or we will lose the triangle and arrive in the realms of Split Lighting.
What is Split Lighting in Studio Photography?

Rotating the light source all the way around until it is perpendicular to the subject’s face takes us to the lighting setup known as Split Lighting. It is usual to lower the light to the height of the head of the subject. The result is a stark, high contrast image with half of the face illuminated from the side and the other half in deep shadow.
It produces a very dramatic portrait but can highlight imperfections in the front plane of the skin due to the extreme side angle direction of the light. It is unlikely to result in any catchlights in the eyes, even in the eye closest to the light source.
It can be achieved with only one light but if the backdrop is dark, the shadowed side of the face could merge into it. If you place the model closer to the backdrop, some of the illumination from the side light could fall on the backdrop and create some separation for the dark side of the head.
Alternatively, we could use a separation light or backdrop (halo) light to add a little separation from the shadows.
What is Rim Lighting in Studio Photography?

This is a type of separation light that works very well on dark backgrounds. It can also be used as the main light for a very dramatic glowing halo illuminating the rim of the subject leaving the main body, facing the camera, in shadow.
For this single light Rim Lighting, we simply have to place a bare bulb or 7-inch reflector flash directly behind the subject and facing towards the camera. The subject blocks the direct light from the camera so there is no danger of lens flares.
The glowing rim effect is enhanced by fluffy edges like hair, textured clothing or feathers etc. It can create an interesting minimal but easily understandable form.
The Rim Light is often used in conjunction with other lights such as a Key or Key and Fill lights. In these multi-light setups, the Rim light helps to define the edges and describe the limits of the form while the other lights illuminate the forward-facing features.
What is Flat Lighting in Studio Photography?

To achieve flat lighting on a subject we have to eliminate virtually all of the shadows that are usually cast from the facial features. This will minimise the contrast between highlights and shadows creating a flat, 2-dimensional result.
This has the advantage of producing very flattering, soft portraits that can reduce the harshness and smooth out blemishes and imperfections in the skin.
This type of lighting setup is best achieved by placing a large light source directly in front of the subject. A softbox with multiple diffusing layers and without a grid would achieve this goal. It has to be a large enough softbox for you to stand in front of, with your camera and still allow plenty of light to wrap around you.
The large light source will wrap light around the whole subject, under the chin and nose, eliminating the shadows. The photographer, in front of the softbox, becomes an interesting dark spot in the catchlight in the eyes.
This effect can also be achieved by using two lights of equal power placed on either side or above and below the subject rather like Clamshell or Cats Eye lighting (described below in “2 Light Setups”).
What is Broad Lighting in Studio Photography?

This is a setup where the models face is not directly aligned with the camera; the nose is aimed to one side of it. Broad lighting describes the width of light striking the face in a portrait. In this case, the illumination strikes the broad side of the face from nose to ear.
The light is placed to one side of the camera and points towards the subject. As the subject turns away from the light, more of the face is exposed to the light source producing a Broader patch of illumination and a narrower band of shadows caused by the projection of the nose.
It is a usually flattering lighting setup as it can help to widen naturally narrow faces because a broader section of the face is presented to the camera. It smoothes out the skin as the key light is fairly perpendicular to the broad side of the face, filling in blemishes and cavities with light.
What is Short Lighting in Studio Photography?

The opposite of Broad Lighting, Short Lighting describes the narrow (short) band of light on the face leaving deep shadows on the wider side of the face. This time the light source strikes the narrow side of the face for a much more dramatic result.
To achieve this shadow pattern, the model actually turns towards the side-light source which throws the opposite side, which is closer to the camera, into deep shadow. The nose, being closer to the light source, casts longer shadows across the side of the face that is presented towards the camera.
This can be flattering in one way as the long shadows can help to narrow the appearance of wider faces. Skin texture can look a little more rugged though as the light source is parallel to the side of the face presented to the camera causing light to skim over the surface and highlight blemishes in relief with shadows.
Broad and Short Lighting can occur in many of the other single side lighting setups including:
- Loop Lighting
- Rembrandt Lighting
- Split Lighting
What is Under Lighting in Studio Photography?

This is probably the most unflattering and unnatural form of lighting setup of them all and is probably why it is also known as Monster Lighting. It creates a ghoulish, unflattering portrait with shadows above the nose, lips, cheek bones and chin protrusion.
It looks unnerving because the light normally comes from above from the sun or ceiling house lights. We are not used to seeing light from below that casts these unnatural shadows in the wrong places. It could describe the light from the infernal fires of hell, that are from below and is an apt summary of horror lighting.
It is best used to produce horror imagery for Halloween or some other spooky event. Using a hard light really exaggerates the effect for maximum contrast and terror.
It can be achieved by placing a hard light source beneath and steeply pointing up to the subjects face. A flash with a 7-inch reflector and a grid would be perfect for this. The closer you place the light to the subject, the more dramatic will be the shadows cast above the facial features.
TWO LIGHT SETUPS
What is Key & Fill Lighting in Studio Photography?

This is the most common and very effective two-light setup. It consists of one main light, the Key Light set in front of, slightly above and to one side of the subject. The other light, the Fill Light is placed on the opposite side and is used to fill in the shadows cast by the Key Light.
The Fill Light is usually of lower power than the Key Light or it can be pulled further away from the subject. This produces a great 3-dimensional depth and a soft, asymmetric shadow balance to the composition. We can dial the power of the fill light up and down until we achieve the perfect balance.
We can vary the angles of the two lights to experiment with different effects. Subtle versions of the following setups can be achieved by softening the shadows on the dark side with the Fill Light:
- Loop Lighting
- Rembrandt Lighting
- Split Lighting
The two lights must generally be in front of the subject and pointing back towards it. Once the lights become positioned directly opposite and facing each other we get into the world of Cross Lighting.
What is Cross Lighting in Studio Photography?

This describes the two-light setup that has a pair of lights, Key & Kicker, facing each other in an orbital arrangement around the subject. The lights can be placed at almost any angle around the subject including directly face on as the Kicker would then become an effective Rim Light, directly behind the subject.
In this Setup, the light facing the front of the subject becomes the Key Light and the opposite facing light is the Separation/ Kicker Light helping to define the edge of the subject that is in the shadow side of the Key Light.
We can vary the power of each light to achieve the most pleasing balance. One arrangement where I believe this doesn’t work is if the two lights are perpendicular to the subject and of equal power. This sets up a disquieting symmetry with a darker line down the centre of the nose. It also enhances the appearance of skin blemishes as the light is perpendicular to the front face plane.

To fix this, simply dial down the power of one of the lights to create a softened version of Split Lighting.
What is Clamshell Lighting in Studio Photography?

This is a very flattering lighting setup that occurs directly in front of the model. It uses two lights, one above and one below the model’s face. The upper one is the Key Light and points down towards the subject and the lower one is a fill light of lesser power and points up, under the chin.
The pair of lights together form the shape of an open clamshell with the camera placed at roughly the position of the shell hinge.
It is a complimentary lighting setup as it is face-on and also fills in the shadows under the chin and nose. If the power of the fill light is at least half of the key light there will still be some depth and soft shadows to prevent the photograph from looking too flat.
If the power of the lower Fill Light is more than the Key light you could end up with some ghastly shadows above the nose and cheekbones reminiscent of horror movie lighting. So keep the Fill Light power a degree lower than the Key Light.
There are very few shadows with this setup and they are very soft if you use softboxes. To add a little more drama and defined shadows we can switch to hard lights delivered by 7-inch reflectors.
This setup produces two attractive catchlights in the top and bottom of the eye, making them sparkle. The catchlights will be broad rectangles with softboxes and bright points of light with hard light reflectors.
What happens if we turn the clamshell setup through 90 degrees? You get what I like to call Cats Eye lighting.
What is Cats Eye Lighting in Studio Photography?

Rotating the two light sources through 90 degrees creates a lighting setup like an open book with the model looking into the book, one light source on either side and pointing in towards the subject. The magic happens in the eyes catchlights that create a vertical line in the centre of the eye, similar to a cats pupil.
The effect is particularly pronounced if you use very large, rectangular softboxes without grids. This time we should use the same power for each light source to maintain the symmetrical catchlight. You could also use large white boards as reflectors with two flash lights bounced off them to illuminate the subject.
The light sources or boards should be placed very closely together at approx 90 degrees to each other and 45 degrees to the model then shoot through the small gap. This should guarantee a perfect, black, vertical slot in the eye catchlight.
Like Clamshell Lighting, Cats Eye lighting is also very flattering due to the all-around, front-on, shadow-free lighting setup. It also produces the pleasing, feline eye characteristic.
What is Badger Lighting/ Double Back Lighting in Studio Photography?

The result of this lighting setup is difficult to define but it loosely sets up multiple bands of dark and light across the face of the model, a little bit like the fur bands on a Badger’s face. Due to the position of the lights and the contouring of the human face, we see a darker line on the centre of the nose, lighter bands on the side of the nose, then darker bands beneath the eyes and finally light bands on the protruding cheeks.
To achieve this most unusual lighting pattern we need to place two light sources behind the model, one on either side and pointing in at the same angle and facing back towards the camera. It is best to use soft strip boxes with grids as there is a danger of lens flare at the camera.
The light sources need to be big and soft as they have to wrap around each side of the face from nose tip to ear in order to create the distinctive, multiple banding that characterises Badger lighting.
A hard light version may be achieved by replacing the softboxes with 7-inch reflectors with no grids. Some experimentation may be required with the angles of the lights to achieve the perfect light and dark banding.
What is Double Rim Lighting in Studio Photography?

If we wish to see a little more depth to the rim lights on each side of the subject then we can introduce a second rim light and place them on either side behind and angled in towards the subject, facing back towards the camera.
As the lights will be pointing towards the camera and are not blocked by the subject there is a chance of lens flare. If this is an undesirable effect it may be necessary to change the angle of the two Rim lights or move them further away from the subject. We could also use flags (solid panels) or grids to block the direct view of the light into the cameras lens and avoid flares.
Using two lights gives us the opportunity to introduce some colour contrast into the scene. Each light source could be covered in a different coloured gel of complementary hues like red and green or orange and blue for a pleasing effect.

THREE LIGHT SETUP
What is The Three Light Setup in Studio Photography?

Key, Fill & Separation Lights. This is the next stage after the Key and Fill Light setup. Once you have mastered this classic two-light setup and there still seems to be some definition missing, it may be time to introduce a third light. This will be a Separation or Kicker light.
The Key and Fill Lights take care of and shape the front of the model but if we’re shooting against a dark backdrop and the subject has dark hair or clothes the edge details may merge into the background. This is where the introduction of a third Kicker Light may pay dividends.
This is placed behind, slightly above and at an angle to the subject, usually opposite the Key light. It will add a kick of light to the hair and shoulders on the dark side helping to define the edges against the gloom of the dark backdrop.
FOUR LIGHT SETUP
What is The Four Light Setup in Studio Photography?

Key, Fill, Separation & Backdrop Lights. Building upon the three-light setup, in this classic four-light studio setup we can introduce a little drama and action into the composition by enlivening the backdrop with some selective illumination. Adding one more light to our previously described Three-Light setup, we take it as far as this article is going to go.
To add this fourth light to lift a flat, dark backdrop we place it pointing towards the background, out of frame of the camera or masked by the model. Depending on the light modifier and the power of the light, it could illuminate a selective portion or all of the backdrop. Some subtle gradation from light to dark seems to produce the most pleasing results.
The slightly lighter backdrop helps to separate the dark edges of the subject from the backdrop adding interest and definition on the shadow side of the subject.
To add texture or story to the composition, we could introduce a Gobo to the backdrop light. This is a “Go Between Object” which goes between the light source and the background. It is simply a solid object with perforations that adds contrast by projecting a shadow pattern onto the backdrop.

It could project a window, foliage or a random shadow pattern of light and dark that helps to convey or reinforce the idea behind the image.
Related Questions
What Is A Gobo In Photography And How To Use It?
As indicated above, a Gobo can be used to modify the backdrop light to create drama, contrast or story elements to your photographs. We have a comprehensive article on this subject with the added bonus of a short video that describes how to make a cheap homemade Gobo projector. You can find this article right here on Photography Skool.
How do You Set up Off-Camera Speedlites? Yongnuo YN660 Flash And YN560-TXii Trigger, Helpful Illustrated Guide.
To achieve these different studio lighting setups you will usually need off-camera Speedlites or Strobes. This useful guide describes everything you need to know about setting up and connecting the popular and affordable Yongnuo Speedlite flashes to the dedicated Yongnuo YN560-TXii radio trigger. You can read the guide right here on Photography Skool.