There is a lot of confusion about the portrait lighting setup known as “Loop Lighting” in studio photography.
There are numerous benefits to shooting in this way, but getting started appears to be difficult, especially when you are an amateur photographer, not used to the portrait lighting patterns! It takes time to get used to the different lighting patterns. How long do we set the exposure for? How to position your subject in relation to the light source, etc.
Loop Lighting Photography Definition
Loop lighting is a pattern that creates an asymmetric shadow that loops around the side and bottom of the nose. It can be achieved with one light that is placed above and to one side of the subject’s head, between 30-45°. It is flattering but not flat and adds some 3D depth to the face.

Photo by Oscar J Harper
(This post may contain affiliate links which means I may receive a commission (at no extra cost to you) for purchases made through links. Learn more on my Privacy Policy page.)
“As an Amazon Associate, I earn from qualifying purchases.”
Check out our list of affordable gear and lighting equipment featured in this article, here.
This is a type of lighting that has been a favourite among photographers for decades now, since it’s so easy to work with. In this article, you’ll learn a great way to create a dramatic effect with one main light source that will improve your work, create beautiful portraits and make them look more accomplished. Let’s dive a little deeper into the world of one of the basic lighting patterns, Loop Lighting in portrait photography.
Jump Ahead to Relevant Section
- Introduction: What is Loop Lighting?
- How do You Find the Loop Lighting Pattern in portrait photography?
- What are the Benefits of Using Loop Lighting in Portrait Photography?
- What Equipment do You Need to Create the Loop Lighting effect?
- How to Use Loop Lighting in Portrait Photography?
- Conclusion
Introduction: What is Loop Lighting?
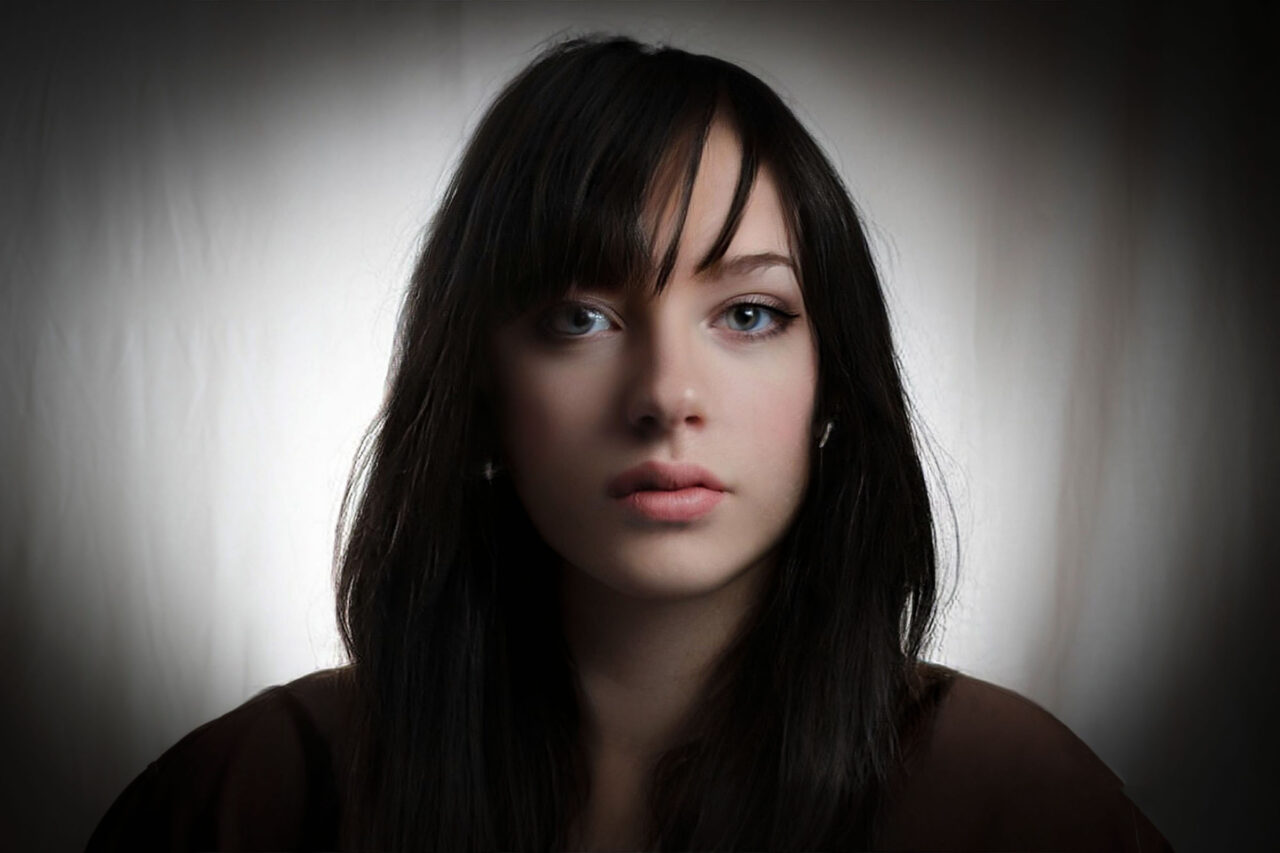
Loop lighting is a staple technique for portrait photographers as it is relatively easy to achieve, even with a single light source. It is a studio lighting method that also produces a very pleasing result that looks polished whilst flattering the subject with fairly frontal lighting that can fill in skin blemishes.
It casts a shadow on the opposite side of the nose from the light source which loops around the bottom of the nose making a kind of “L” shaped shadow that defines that facial feature. This adds some 3-dimensional interest to elevate it from simple flat lighting.

Photo by Oscar J Harper
There is also naturally, a shadow on the edge of the face on the same side as the loop shadow. This pulls in that side of the face and effectively narrows it down and sculpts out the cheekbone a little. It adds three-dimensional shadow modelling and helps to slim down rounder faces by elongating them.
The light should not be too steep as we might lose the catchlights in the eyes and we don’t want the top lip to be touched by the nose shadow.
The nose shadow and cheek shadow should not touch, however; this is a different type of shadow pattern which is created by Rembrandt lighting. We’ll talk about that in the next article.
How do You Find the Loop Lighting Pattern in portrait photography?
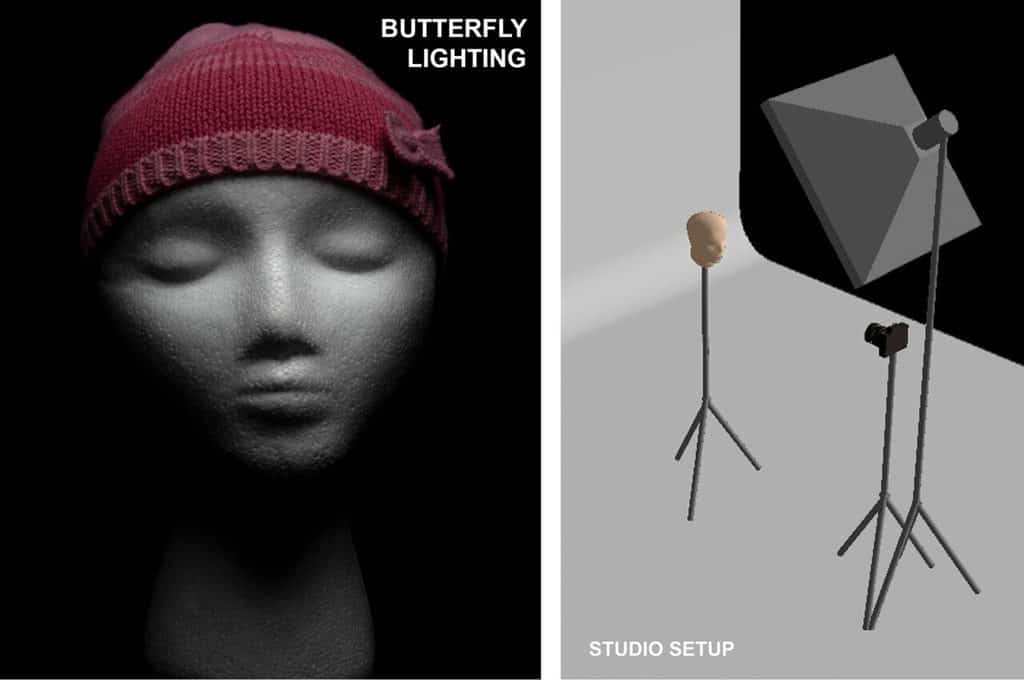
If we start with the main Key Light directly in front of and slightly above the subject (the classic Butterfly lighting position) then as the light source is rotated to the left or right around the subject, the shadow pattern begins to change.
When we reach a 30 to 45-degree angle of rotation we will begin to see the shadow pattern known as Loop lighting. We should see a distinct shadow on one side of the nose that loops around the bottom but remains unconnected to the subject’s cheek shadow or any other shadows created by facial features.

Photo by Oscar J Harper
The bottom loop will only be visible if the light source is elevated high enough above the subject to project the shadow beneath the nose. So make sure the light is higher than eye level but not so high as to lose the sparkly catchlights in the top half of the eyes.
What are the Benefits of Using Loop Lighting in Portrait Photography?
Loop lighting is a type of artificial lighting that is used in portrait photography. It can be achieved with either continuous lights or strobe lights, depending on the photographer’s preference and what they are trying to achieve. Loop lighting has many benefits to it, but most notably it can make the subject’s face pop a little with some 3D shadow modelling.
Loop lighting is a popular and flattering lighting style for portrait photography. The benefits of loop lighting are that it is inexpensive, dramatic and professional looking. It sculpts the face and makes people look more elegant. If placed correctly, the lamp should produce an attractive catch light in the eye of the subject.

Photo by Oscar J Harper
Loop lighting can be a single light technique that is easy to set up and requires minimal equipment, which makes it an ideal solution for photographers on a budget or who don’t have access to additional lights.
It’s been around for a while now and has probably regained popularity since social media has evolved. There are some new ways of using it, such as using it with hard or soft light which can help make your photos look more striking.
This effect would be great for adding a touch of glamour to your portrait shots by using affordable off-camera Speedlites or strobes. It’s an easy way to add a classic Glam vibe to any photo without having to go out and buy expensive high-end gear.
The high and rotated placement of the key light produces a distinctive looped shaped shadow to the side and beneath the nose of the subject and flat lighting on the rest of the face. When placing the light at this rotation, it causes a slimming effect on the shadow side and can create a little more depth in the shot by adding a 3-dimensional quality.

A distinctive angled shadow will be created under the chin to draw less attention to the area and if minimal fill light is used, this can hide any neck issues.
What Equipment do You Need to Create the Loop Lighting effect?
- Main light – Continuous lighting (LED or Tungsten), Strobes or Speedlites to photograph strong bursts of white light.
- Radio Trigger – To trigger the Speedlites or Strobes that are off-camera.
- Modifier – For a defined Loop shadow, choose a small, non-diffused modifier – for example, a 7-inch reflector, beauty dishes or snoots. For a soft shadow use a softbox or umbrella.
- Light Stand – This will carry the light and the modifier above the subject at the correct height and rotation.
- Camera – If you want greater creative control use a camera with manual settings. DSLR or Mirrorless are good choices.
- Lens – When taking portraits, it’s best to use a lens that is between 50-100mm.
- Tripod – This will help to stabilize the composition and framing of the image. We can use flash with fast shutter speeds (200-250) which will reduce the likelihood of motion blur. This means it might be possible to shoot hand-held. It also has a loosening effect on composition by allowing us to rapidly experiment with different positions and framing.

Photo by Oscar J Harper
How to Use Loop Lighting in Portrait Photography?
When you take your first Loop Lighting photo, the position and height of the light are very important. Putting the light source on the left or right of the camera and elevated above eye-level is ideal. If we want a face-on image, we should ensure that the subject is looking directly into the camera.
We have made a good start. Now, choose a useful portrait lens, usually between 50mm and 100mm focal length. Position the camera in front of your subject to frame the head and shoulders.
Place the light to the side of your camera (at 30-45 degrees) and slightly above the subject’s head. Have it elevated, with a downward angle of 30-45 degrees, and pointed towards your subject. This will help create the perfect Loop lighting pattern.

Photos by Oscar J Harper
To achieve a defined loop shadow, it’s best to use hard light. Let’s take a look at how to modify the light to create hard-lined shadows. We can leave the light unmodified for hard shadows, or we can clip on a 7-inch reflector to control the spread of light and prevent it from spreading to the backdrop.
For a more precise illumination, we can attach a honeycomb diffuser to the 7-inch reflector. This will typically reduce the beam of light to a few degrees in diameter. (10° – 60°).
For a softer but still defined shadow, attach a beauty dish that removes the harsh raw light by being reflected from a curved dish to produce a more diffused, but more natural appearance.

Photo by Oscar J Harper
When you use large diffusers, such as a softbox or umbrella, you might notice that their light can produce a very subtle shadow, maybe too subtle. This is due to the softer light that these large diffusers produce.
This causes the light to be flat on the subject which can obliterate any shadows. Flatter light can be a desired outcome but it is probably not a good idea when trying to capture photographs with a more dramatic Loop shadow.
To further add to the story, we may consider adding a gobo (a go-between object) to a background light. This creates a shadow and light pattern on the backdrop behind your subject. Adding interest in the form of texture, or creating the idea of a scenario like a window’s shadow, can help to make your photo more interesting.

Photo by Oscar J Harper
Camera settings:
- When you are adjusting the shutter speed on your camera, make sure it matches the flash-sync speed of your flash. The most common flash sync speeds are 60, 200 or 250.
- When photographing people, it is more appropriate to use a medium aperture of between F5.6 and F8.0
- To photograph with minimal noise, set the ISO to its lowest possible setting. 100 or 50 are the most typical settings.
Flash Settings:
- To check if our flash power is correct, we can use a flash meter. Set the power of our flash to achieve the desired F-number to optimize exposure.
- If we need do this manually, take a test shot to figure out how the flash power will affect your desired lighting, start with a low power setting and adjust from there.
- Whilst shooting, be aware of how the Loop shadow appears. When you review your test shot, consider the Loop shadow:
- The shadow around the nose is consistent and clearly visible?
- Does the Loop shadow touch the cheek shadow? (if it does we should decrease the rotation of the light and bring it closer to the camera).
- If you cannot see catchlights in the subject’s eye, it might be because the light is too steep.
Take some time right now and adjust the rotation angle, the height and then continue shooting more test photos.
Try different light setups and positions until you find something that has a certain interesting asymmetry that may start to evoke the essence of traditional portrait photography.
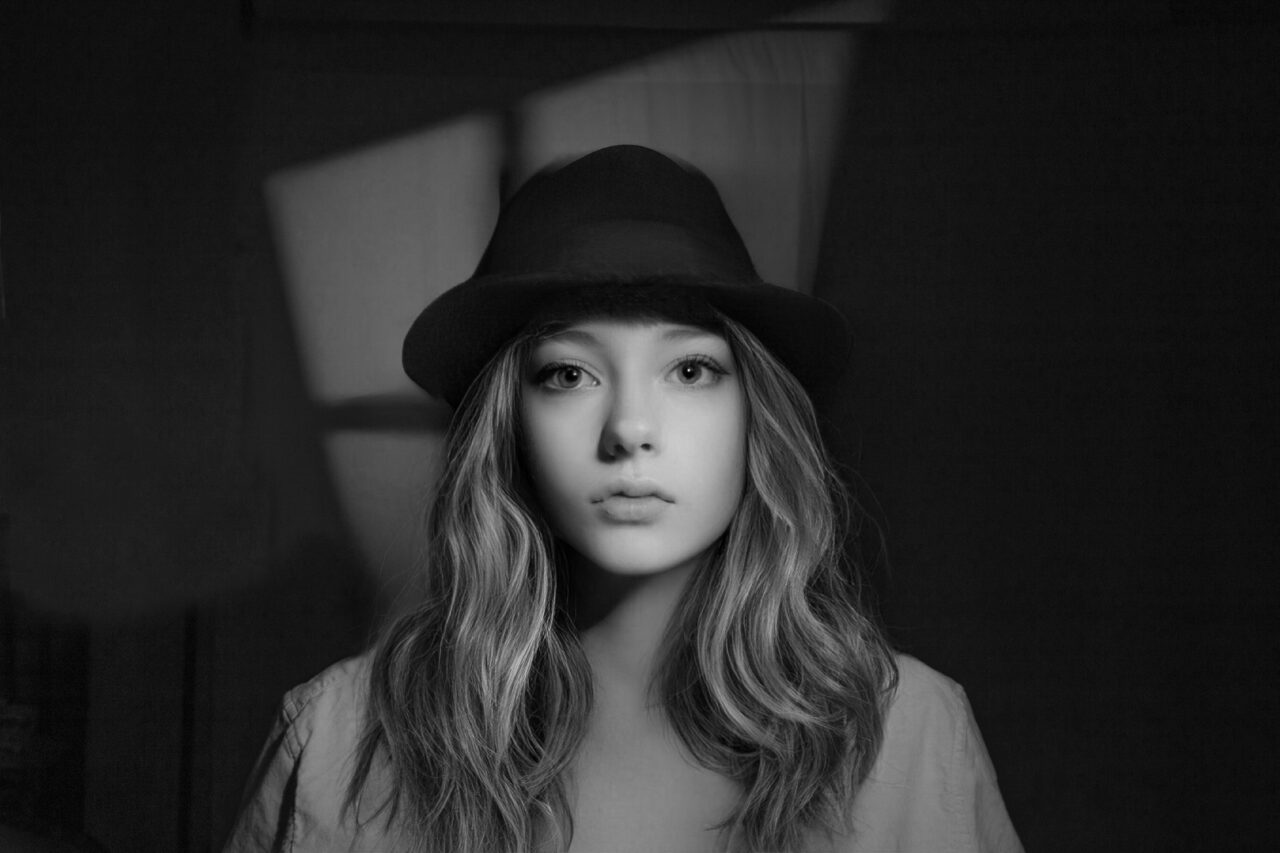
We can capture the subject’s face and create an asymmetrical Loop shadow, even if it is turned away from the camera. All we need to do is make sure that our light source is placed at an angle of 30-45 degrees to the model’s turned-head in order to maintain the perfect Loop shadow.

Photo by Oscar J Harper
By doing this the Loop shadow will remain asymmetrical around the nose, despite the model being off-axis to the camera.
Conclusion: The Importance of Using Loop Lighting in Your Portrait Photography
The conclusion of this article is to show how the use of loop lighting can be used to make your portrait photography more interesting. The simple rotation of the Key Light around to one side of the subject creates some 3-dimensional depth that lifts the composition from a dull, head-on flat lighting composition.
Loop lighting is an excellent way to achieve classy and sophisticated portraits. It also helps you avoid unflattering shadows that are present in many other types of lighting setups. It’s a great introduction to the world of off-camera flash lighting, which instantly makes your photographs look much more accomplished than using a built-in camera flash or just available light.
It’s important for photographers to know about the different types of lighting setups and how they affect their photos, but it’s equally important for them to know about different ways they can use studio lights in order to create a variety of effects.
Related Articles
Ultimate Guide To The Different Indoor Studio Lighting Setups!
For a comprehensive look at all the different types of principal lighting positions and 18 studio lighting setups, check out our illustrated guide right here in Photography Skool.