There are several supplementary lights that assist the Key Light in producing the overall lighting composition. They each have different roles but usually, the first assistant light to consider is the Fill Light.
The Fill Light is a supporting light or reflector in a studio setup. It helps to reveal details in the shadows and reduce the overall contrast of a subject. It is usually placed on the opposite side of the Key Light and is less bright to maintain some shadow modelling and 3-dimensional depth.

In its role as a supporting light in multiple light setups, it can be seen that the Fill Light has an important job in helping to define the overall mood of the photograph. Let’s dive deeper into the use of the Fill Light, the types, positions and whether we actually need a Fill or not.
Do You Need a Fill Light in Studio Photography?
The simple answer is no you don’t need a fill light to produce an awesome photo, it just depends on the final composition and mood that we want to achieve.
If you place a large Light source (like a 4-foot diameter softbox directly in front of the model you could achieve a very shadowless, flattering result without the addition of a Fill Light? This is due to the large light source wrapping around the subject’s face and eliminating any shadows being cast by the facial features.

In a way, the subject has been overwhelmed by light apparently coming from every direction all at once. This is a very complimentary technique that makes skin look smoother and would be suitable for High-Key photography.
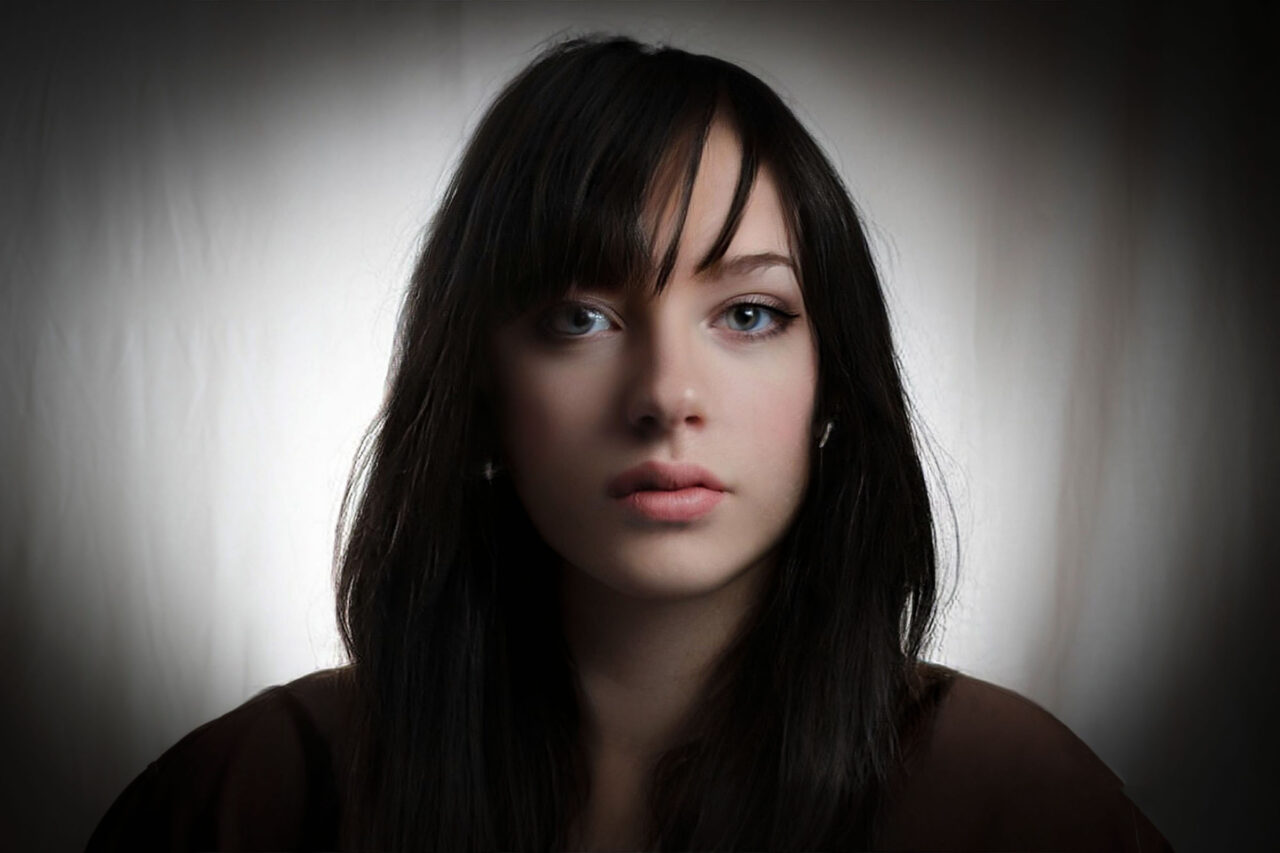
Conversely, if we place our light source in front of but to one side of the subject, the far side of the face and body would be cast into deep shadow with a patch of light below the eye. This is known as Rembrandt lighting and is a very dramatic, high contrast result which may be the mood we are looking for and would be highly suitable for Low-Key photography. This technique would not require the use of a Fill Light as we are going for maximum drama in this case.

Photo by Oscar J Harper
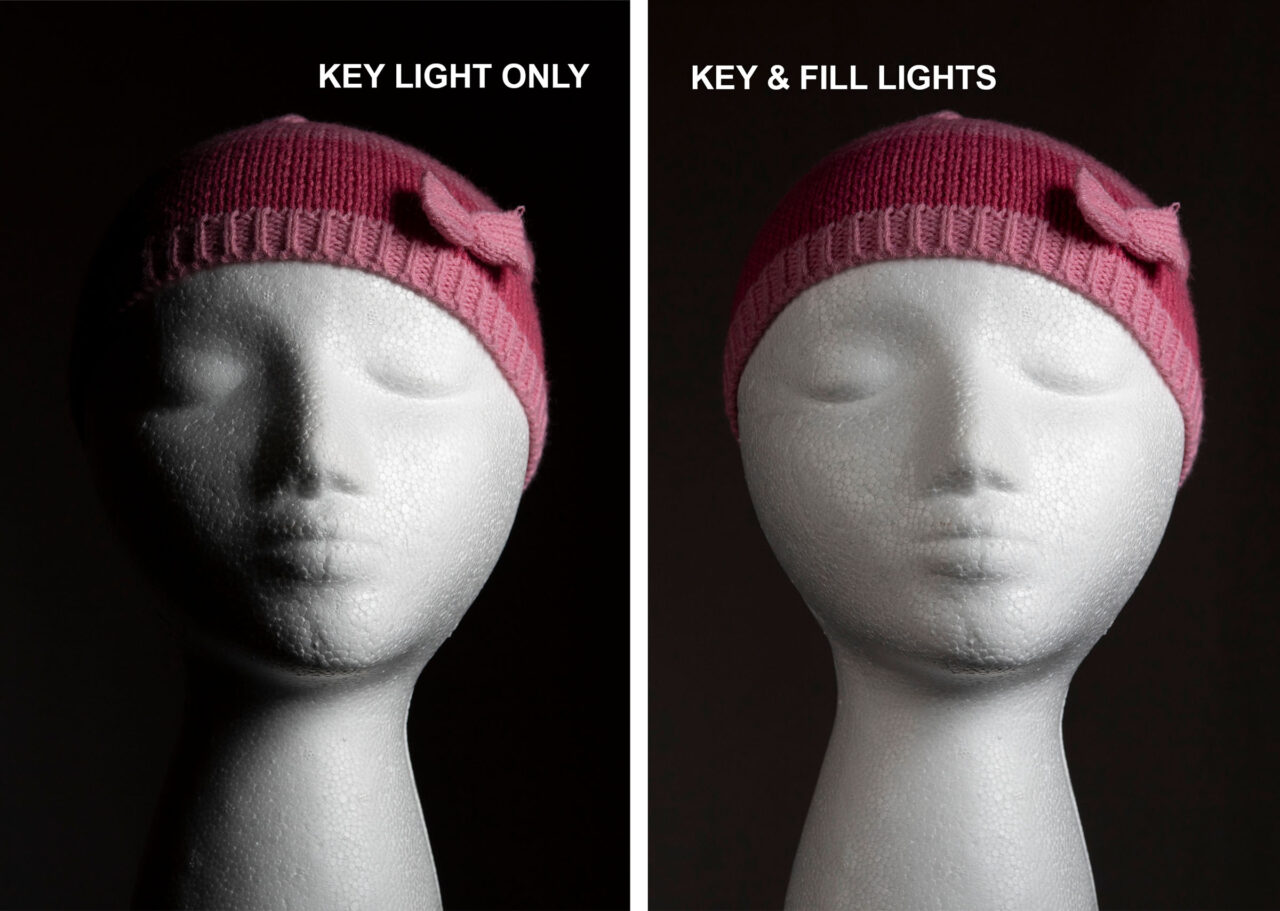
Where the Fill Light begins to add value to the composition is when it is strategically placed to lift some details out of the shadows created by the Key Light whilst still providing a degree of contrast and some 3-dimensional depth.
What Can You Use as a Fill Light in Studio Photography?
Provided that the Fill Light is the same type as the Key Light, we could use any sort of lighting solution. That could be a constant light source such as LED, tungsten or fluorescent lamps. Alternatively, we could use flash light such as a Speedlite or studio strobe.

There may be problems if we mix the Fill and Key lights with constant and flash lights as the flash power would tend to overwhelm the constant light source and render the lighting composition unbalanced. Also, the shutter speeds required for flash lights would be far faster than those required for constant lights and therefore use of the two types of lighting becomes incompatible at flash sync shutter speeds.
If the Key light happened to be the powerful Sun, streaming in through a window in the studio, then we could employ a flash as a Fill Light to lift the shadows on the dark side of the subject.

Photo by Oscar J Harper
The Fill Light doesn’t need to be a second light source, it could simply be a reflector. To provide Fill, it would be best placed on the opposite side of the Key Light and angled to bounce light into the shadows on the face created by the Key.
It will naturally be slightly dimmer than the Key as the bounced light has further to travel and some light will be absorbed by the surface of the reflector. To moderate the power of the reflector as the Fill Light, we can reduce its size or move it further away from the subject.

The degree of harshness of light from the reflector can be adjusted as they usually come with multiple colour sides that can be swapped out by unzipping and reversing them on the frame.
- The White side gives a good even soft light.
- The Silver side gives a slightly harsher and brighter reflection.
- The Gold sheet provides a warmer yellow tinge but can look unnaturally orange if its held too close.
- The Black sheet can be used for Negative Fill (More on this later).
In order to avoid a confusion of shadows from the Fill Light competing with those of the Key Light, It may useful to employ the use of soft lighting on the Fill side. This could be in the form of a Softbox, umbrella or a white reflector rather than the silver or gold versions.

Where Do You Put The Fill Light in Studio Photography?
As a general rule, the Fill Light is usually placed on the opposite side to the Key Light as its main job is to fill in the shadows created by it. It might be fair to say that the Fill Light is usually placed in front of or to the side of the model, even if the Key Light is behind the subject.

If the Key Light is directly above and facing down towards the models face, the Fill Light would be best placed below and facing up. This has the fortunate result of filling in the shadows that are created beneath the chin and nose by the Key Light.
If the Fill Light location begins to move behind the subject it may take on the role of a Separation, Rim or Backlight. In this case, the Light would be creating separation by highlighting and defining the edges rather than filling in shadow details.
If we use a reflector instead of a second flash light for the Fill, the positioning is slightly more complicated. Instead of pointing the reflector directly into the shadowy area to be filled, we have to place it at such an angle to the Key Light that it receives light from it and bounces it into the shadow side.

This will usually involve directing the reflector at some angle between the Key Light and the model. If your flashes have modelling (constant) light it will be easy to see when the reflector is correctly placed. Otherwise, we will have to take some trial shots and review the images. It would be best to set our reflector on a stand that we can incrementally adjust until the desired Fill is achieved.
How Bright Should A Fill Light be in Studio Photography?
We know that the Fill Light is a supplementary illumination and therefore it is usually of less power than the Key Light.
Except if we require very flat lighting with two lights at a ratio of 1:1 i.e., very flat Clam Shell or Cat’s Eye Lighting.
To give us a way of assessing the brightness required for Fill Light we can consider Lighting ratios. A lighting ratio is simply a way to say how many times brighter one light is over another. So for a pleasing but subtle lighting ratio, we could choose 2:1 Key to Fill, which would produce a soft contrast, a little shadow depth and plenty of detail on the Fill side.

For a stronger result, we could push the ratio up to 4:1. This would develop slightly stronger shadows on the Fill side and set the mood to be a little more dramatic. The contrast would be higher but the shadows would still reveal a good amount of detail.
A ratio of 8:1 would give a darker contrasted image suitable for a dramatic mood and also Low-Key photography.

Photos by Oscar J Harper
For the strongest contrast and the starkest results, we could keep pushing the lighting ratio up to 16:1, 32:1, 64:1 Key to Fill. In the last case, the Fill is providing very little support light and the images can become almost abstract if the angle of the Key is behind the subject.
Most Speedlites can achieve these ratios as they have power settings from 1 to 1/128th. Using the ratio of 128:1 would render the Fill light almost irrelevant as the full power of the Key light would overwhelm it. Here’s a useful guide in the form of a table to show how you can achieve the lighting ratios with different flash power settings:
Note: These settings are only relevant if the flash lights are identical, the same distance from the subject, and have identical modifiers.

One way to arrive at the overall Contrast Ratio in the table above is to divide the denominator of the Fill Light Flash Power by the denominator of the Key Light Flash Power:
64/4 = 16:1
Of course, most flash units allow us to make increments in the power of 1/3rd or 1/2 a stop and therefore the contrast ratios can be fine-tuned for precise effects.

If we are using very different light modifiers for key and fill, such as a Beauty Dish and a large softbox, it may be necessary to use a Flash Meter to help gauge the brightness of each light and therefore the contrast ratio between them.
Our shutter speed will be set to the flash sync speed and the ISO can be set to 100. We then input these settings into our flash meter. This only leaves the Aperture setting to be established by the Flash Meter. Set the flash power of the Key Light to a suitable setting, say 1/8th as a starting point. Make sure the Fill Light is turned off, hold the flash meter at the chin of the model and pointing back towards the Key Light.
Fire the flash and observe the Aperture setting that the flash meter delivers. If the Aperture shown isn’t suitable for the depth-of-field required for the image, increase or decrease the flash power to adjust the Aperture reading on the flash meter and test the flash again. Once we have the perfect Aperture for the photograph we can move on to the setting of the Fill Light.

Now we can set the lighting ratio by introducing the Fill Light. We know that the Fill Light should be less bright than the Key to achieve a degree of Contrast Ratio. If we now turn off the Key Light and turn on the Fill Light, place the Flash Meter in the same place but pointing towards the Fill and fire a test burst, we can review the Aperture reading that it delivers.
To achieve a Lighting Ratio of 2:1 we simply have to set the flash power of the Fill to achieve an Aperture that is 1 Stop below that of the Key Light. See below for a useful table of Lighting Ratios and the Stop differences as defined when using a Flash Meter:
| LIGHTING RATIO | STOP DIFFERENCE |
| 1:1 | 0 |
| 2:1 | 1 |
| 4:1 | 2 |
| 8:1 | 3 |
| 16:1 | 4 |
| 32:1 | 5 |
| 64:1 | 6 |
| 128:1 | 7 |
What is Negative Fill?
This is exactly as it sounds, the opposite of Fill. This will actually increase the depth of your shadows on the Fill side of the subject, thus increasing the contrast ratio. Why would we need negative fill? For example, you may be working in a restricted sized studio and you don’t have all the useful light modifiers such as snoots and grids to control the spread of light. The chances are that your studio flashes are bouncing light off all the surfaces in the small room, especially if they are painted white. This will have the effect of lowering the contrast by introducing bounce fill and potentially creating flat light on your subject which may not be desirable.

Photos by Oscar J Harper
The solution to this problem is to introduce some negative fill in the form of a black flag or any black, light absorbant material like fabric, card or the black side of a collapsible reflector. This has the effect of cutting the unwanted bounced light from white walls and other light sources. We will see that the shadows on the fill side will be deeper and more dramatic.
Related Articles
Ultimate Guide To The Different Indoor Studio Lighting Setups!
For a comprehensive look at all the different types of principal lighting positions and 18 studio lighting setups, check out our illustrated guide right here in Photography Skool.