Portrait photographers are always looking for new ways to improve their work. Lighting is one of the most important aspects of photography, and it can be difficult to find the perfect portrait lighting patterns for every situation.
The butterfly lighting pattern is a technique that can be used in portrait photography to create a slimming effect and beautiful, flattering light on your subject’s face. It’s perfect for a portrait photographer who wants to take their work to the next level and refine their studio lighting skills.
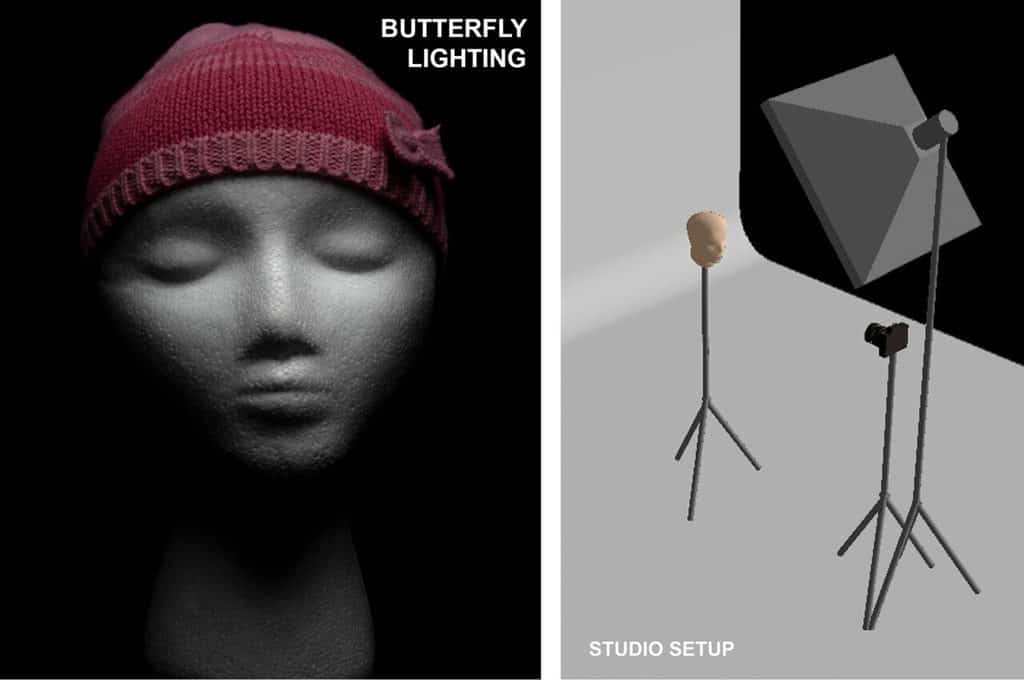
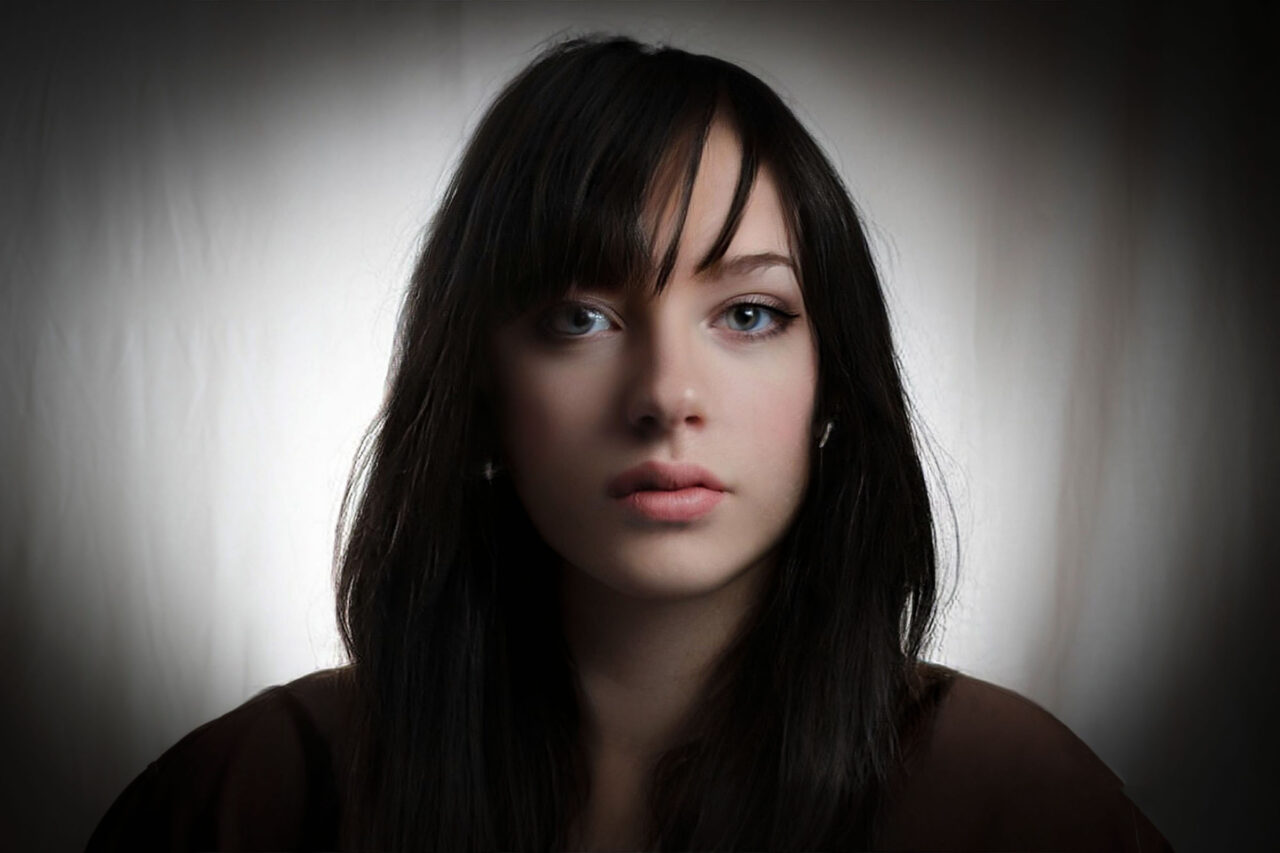
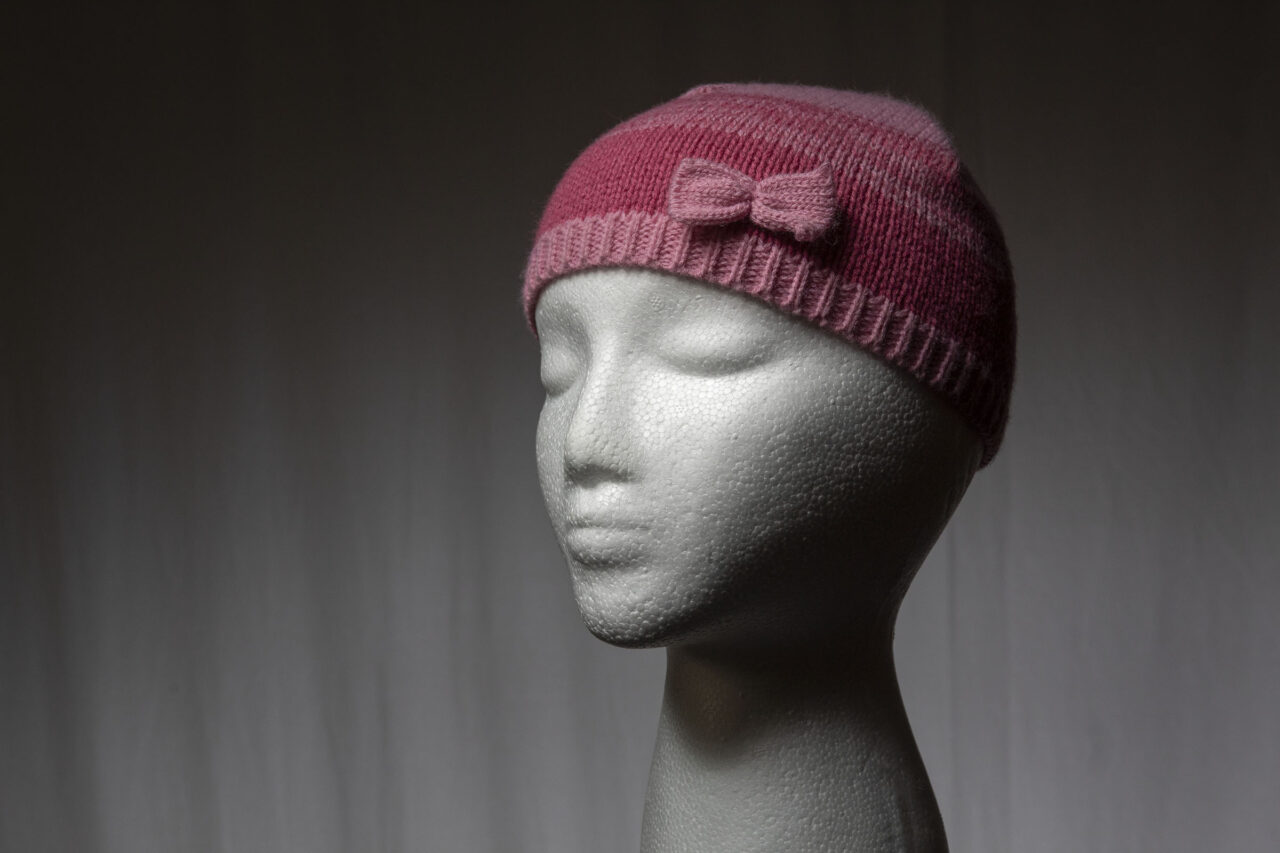
Butterfly Lighting is so-named due to the symmetrical shape of the shadow created under the nose from a high Key Light. It’s flattering as it is face-on and can fill in skin blemishes. It can emphasize the cheekbones, giving a sculptural, slimmer impression and stunning Catchlights in the eyes.
Jump Ahead to Relevant Section
- Do You Need Butterfly Lighting in Portrait Photography?
- What are the Advantages of Using Butterfly Lighting in Portrait Photography?
- What Equipment do You Need to Get the Butterfly Lighting effect?
- How to Set up For a Butterfly Lighting Portrait Photograph
- Possible Disadvantage of Butterfly Lighting

This guide will teach you everything you need to know about butterfly lighting in portrait photography. You’ll learn how to use it in different situations, how it can improve your photos, and how you can create it with a single light source and just a few affordable accessories.
Do You Need Butterfly Lighting in Portrait Photography?
The butterfly lighting technique, also known as Paramount lighting is a popular way to light a person’s head in portrait photography. It is well-known for its ability to create a flattering portrait and a beautiful look as it is also known as Beauty Lighting or Glamour Lighting.
As it is very flattering it can work well when photographing female subjects. However, for male or elderly subjects, it may be ok to use a less flattering lighting setup such as Split Lighting, Rembrandt Lighting (after the Dutch Painter) or Short Lighting. These types of lighting create very dramatic shadows and can emphasize skin texture and blemishes.
What are the Advantages of Using Butterfly Lighting in Portrait Photography?
Butterfly lighting is a technique that is used to create flattering portraits. It is a type of lighting that has been around for decades and it has been used by many famous photographers. It creates a subtle butterfly shaped nose shadow and fairly flat lighting on the rest of the face for stunning portraits.

The main advantage of using butterfly lighting in portrait photography is that it can make your photographs look more professional and pleasing. It can also be used to fill in skin blemishes, emphasize cheekbones and catchlights in the eyes creating a more flattering look. It can also disguise double chins in the shadow created beneath the chin.
What Equipment do You Need to Get the Butterfly Lighting effect?
- Camera
- Lens
- Main (or Key) Light Source
- Light Stand
- Trigger (for Flash or Strobe)
- Modifier
- Reflector
- Tripod
Camera
Different cameras suit different people so it’s important to make the right choice. If you want to take studio portraits then a DSLR or Mirrorless camera would be best.
If your budget allows, a larger sensor camera can provide sharper photos. However, it doesn’t mean you can’t take stunning photographs with smaller sensors.
Lens
The last thing we need in studio photography is an unnaturally distorted face; this can be unflattering and possibly upsetting for our sitters. Therefore we should avoid wide-angle lenses particularly if we are shooting close up to the face.
Choose a lens with a focal length of 50mm or more. An 85mm telephoto is a good choice if you have the space in your studio.
For more flexibility, we could use a zoom lens such as a 24-70mm (zoomed to between 50mm and 70mm). If there is plenty of room you could opt for a 70-200mm or even a 100-300mm.
Don’t forget that if you have a cropped sensor camera there is the crop factor to account for which is often about 1.6x. That means that an 85mm lens will behave like a 136mm lens (85 × 1.6). It also means that you could use a 35mm wide-angle lens as a perfectly usable portrait lens of 56mm (35 × 1.6).

Photo by Oscar J Harper
The longer lenses will naturally produce a more defocused background to help separate the subject from the backdrop and create a stronger bokeh effect.
Light Source
For our main light source, one of the most common types of continuous light in studio photography is the incandescent lamp, an artificial light that will produce a yellowish-white colour cast and have a very short lifespan.
Fluorescent lamps are more energy-efficient and last longer than incandescent lamps, but they also produce less intense white light with a slight colour cast in the green region.
LED lights are even more energy-efficient than fluorescent lamps and last even longer, but they can also produce a daylight balanced light output.
The constant lights can all produce a colour cast that will have to be corrected using the white balance in-camera or afterwards in post-processing. Also, they are generally less powerful than Strobes or Speedlites so shutter speeds and apertures will be more limiting to creative ideas in our photography.
A strobe light is a device that emits short bursts of intense light. It is used in many different settings, including studio photography.
Speedlite is a type of flash unit that is used in photography. It is a small, powerful light source that can be mounted on the camera or used separately off-camera.
With the variable power of Strobes and Speedlite units, we can use a wider range of shutter speeds if necessary which in turn means larger aperture openings for more blurred backgrounds and Bokeh or small apertures for pin-sharp results. We would not usually use the built-in camera flash.
Our light source could even be a natural light like the sun streaming in through the studio window. It would have to be coming from a straight-on direction to the model and elevated at the right angle to produce the Butterfly shaped shadow under the nose. That would of course depend on the time of day and season so probably not a consistent or reliable form of Butterfly Lighting.
Light Stand
If we are using a constant or flash light, we will have to mount it on a suitable stand to elevate it to the correct height to produce the distinctive Butterfly shadow just beneath the nose of the model.
Trigger (for Flash or Strobe)
A trigger is used to initiate the firing of a camera shutter or the release of a flashbulb. A flash may be triggered by pressing the shutter release button on a camera, by using an accessory such as an electronic flashgun, or by using radio waves from another device such as a wireless remote control attached to the hot shoe of the camera.
Modifiers
Modifiers are used in photography and videography to create different effects. They can be used to soften or harden the quality of light, or to change its colour temperature with a gel.
Beauty Dish – This is a type of lighting that focuses light by bouncing the raw light back towards a curved dish to soften and spread the light. This creates bright, wrap-around light with an even distribution for an image. It produces light that is between the harshness of a direct flash and the softer light of a softbox. It can also be fitted with a honeycombed grid to control the spread of light.

Softbox – This is a collapsible box with a diffuser on the inside that softens the light. It sometimes has multiple layers of diffusing material to minimise hot spots. The main purpose of it is to soften the light from the studio lights. This makes it easier for photographers to take pictures of people and objects without harsh shadows or glare. A soft fabric grid can be attached by Velcro to help direct the light.
Umbrella – This is used to soften the light from a studio light. They can be either “Shoot Through” or “Reflective”. Either way, they produce a softer more diffuse spread of light from a larger light source with indirect light.
7-Inch Reflector – This is a metal lampshade modifier that delivers hard light with sharp shadows but controls the spread of light from spilling too far sideways. It can also receive further add-on devices to constrain the spread of light further:
- Honeycombed Grids – These are metal grids that clip onto the 7-inch reflector and reduce the spread of light to a narrower beam, usually from 10° to 60°.
- Barn Doors – Modifiers that are used to control the light spill with 4 swinging doors. They can be used to create a more directional light or to reduce the amount of light spilling onto unwanted areas. They can be manipulated to produce a square or slot of hard light on the subject.
Reflector
These are a great way to add fill light to your subject. They come in different shapes and sizes and can be used in a variety of ways. They can be collapsible for ease of storage and transport.
They are typically made from a reflective material such as aluminium foil, white or shiny fabric that is placed to reflect light from the Key Light into the shadows on the subject. This helps bounce light back onto the subject, which makes it easier for the camera to capture details that would otherwise be lost in shadows or dark areas of the photo.
Tripod
This is a device that holds the camera still and steady. It is used to take pictures of stationary objects or scenes. They become necessary if we are using slower shutter speeds to prevent motion blur. This may happen if we are using constant light as these are typically lower-powered than flash or strobes.
We may not need a tripod if we are using flash lights and a fast flash-sync shutter speed of 200 or 250. In this case, we can handhold the camera without fear of motion blur. This gives more flexibility in your movements and creative framing of the subject.
How to Set up For a Butterfly Lighting Portrait Photograph
This is an axial setup for best results set the light directly in front of your main subject. Stand or sit the model facing directly into the camera which should be far enough away to capture the head and shoulders in the frame using a 50mm to 100mm lens.
The position of the light is very important. Place it just behind or in line with the camera without the stand obscuring the view. Elevate it so that it’s above and in front of the subject’s head and pointing down at an angle of approximately 45 degrees to start with.

Consider the modifier for the light. If you want to see hard-lined shadows, leave it unmodified or clip on a 7-inch reflector. Add a grid if you want to control the spread of light and prevent light from falling on the backdrop. For a softer shadow fall off, use a beauty dish that will produce smooth looking skin too.
For the softest shadows of all, clip on a softbox or umbrella. These are the largest type of modifiers and so have the ability to really wrap the light around the subject’s head for soft, flatter light and very subtle shadows.
Camera settings:
- Set your camera Shutter Speed to your flash speed; usually 60, 200 or 250.
- Set the Aperture to the desired opening – F5.6 – F8.0 is usually good for portraits.
- Set ISO as low as you can for noise-free images – 100 or 50.
Flash Settings
- Test the flash power with a flash meter (if you have one). Set the power to achieve your F stop.
- Alternatively, take a test shot and adjust flash power up or down accordingly.
Once everything is set up, take a test shot and review the result. Consider the Butterfly shadow;

Photo by Oscar J Harper
- Is it visible just beneath the nose?
- Does the shadow extend to the top lip? (if so the light is probably too high).
- Are there shadows in the eye sockets or beneath facial features? (the light is probably too high).
- Is the shadow asymmetrical? (the light is probably not centred on the face).
- Are there catchlights in the top of the eyes (if not the light is probably too high and too close)?
Go ahead and adjust the height and pitch angle of the light and take another test shot. Experiment like this until you see the perfect symmetrical Butterfly Shadow and your photos might begin to have some of the essence of the great Hollywood photographers such as George Edward Hurrell and Clarence Sinclair Bull.
If we wish to photograph the model’s face turned slightly away from the camera, just make sure that we move the light so it remains on axis with the subject’s nose. This way, the Butterfly shadow will remain symmetrical beneath the nose even though we are shooting the face obliquely from the camera.

Photo by Oscar J Harper
Disadvantage of Butterfly Lighting
One potential disadvantage of the Butterfly Lighting setup, particularly if only using one light source, is the pronounced shadow beneath the chin due to the height of the Key Light. This can appear to be quite distracting especially if we are using a hard light source.
The best way to minimise this effect is to fill in the shadows by reflecting some of the light from the key light, up and under the chin with a reflector. This will always appear weaker than the Key Light because its reflected light is slightly diminished from the origin light.
- Choose a white reflector for flat neutral light.
- Choose a silver foil reflector for a harsher, brighter fill.
- Choose a gold foil for a warmer tone of fill (not too close though as it will appear unnaturally orange).
Alternatively, we can place a second light (Fill Light) beneath the subject’s face and pointing up towards the chin. This should be of lower power and probably with a diffused modifier so it doesn’t create confusing shadows above the nose and cheekbones; it shouldn’t compete with the main Key Light.

The goal is to reduce the contrast by slightly lightening the shadows under the chin. This can also be fired by the radio trigger in unison with the Key light. Take some test shots and adjust the power accordingly.
Related Articles
Ultimate Guide To The Different Indoor Studio Lighting Setups!
For a comprehensive look at all the different types of principal lighting positions and 18 studio lighting setups, check out our illustrated guide right here in Photography Skool.