Studio Portrait Photography can appear to be a difficult and time-consuming process. It’s hard to find the right portrait lighting setup, and it’s even harder to get the perfect shot.
Portrait photography is an art form that can be used to tell a story, capture memories, or just make someone smile. But without the correct photography lighting techniques, it can be impossible to get the perfect shot.
Split Lighting Definition
Split Lighting in photography is a pattern that splits the face into equal halves. One side is fully lit and the other half is in deep shadow. It can be achieved with one light source set perpendicular to one side of the subject. Catchlights are possible but skin texture can be emphasized.

Split Lighting is one of the relatively simple light patterns that need only one key light source to create a very dramatic look. It’s perfect for dramatic portraits or any other event where you want your subject to have a dramatic effect. With one, remote light, a camera and a little practice, you can easily illuminate half of the subject and create a convincing Split Lighting portrait.
What You Will Find in this Guide
- What is Split Lighting in Portrait Photography?
- What are the Advantages of Split Lighting in Studio Portrait photography?
- What Equipment do you Need to Create the Split Lighting Effect?
- How to Create Split Lighting in your Portrait Photography!
- How High Should The Split Light Be?
- How to Get Catch Lights in One Eye with Split Lighting!
- How to Get Catch Lights in Both Eyes with Split Lighting!
- Conclusion – Summary of Split Lighting Setup
What is Split Lighting in Portrait Photography?
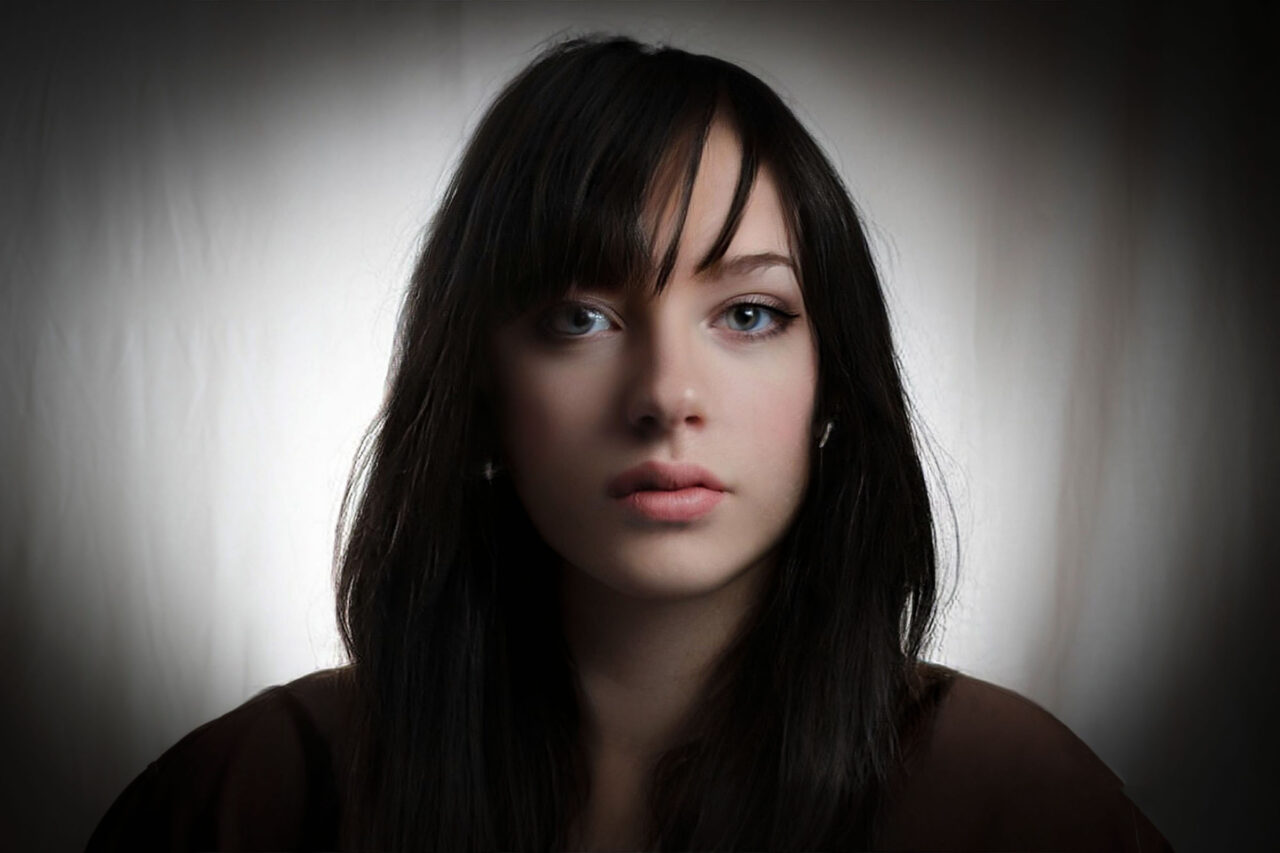
This is not one of the common lighting patterns used by portrait photographers. In the most basic setup, Split lighting portraits can be achieved with a single side lighting source placed directly to the left or right of your subject at roughly the same height as the head. When illuminated by this method the result is half of the face is lit and half is in deep shadows with the separation line exactly down the centre of the nose if the subject is staring straight ahead into the camera.

The outcome is a very high contrast image that is packed with drama and emotion. Light and shadow are equally split between the two halves of the face. If the background is very dark the shadow side of the face merges with it leaving an interesting but unbalanced half-moon shape to the face.
If the light source is very small or the position of the light sits slightly behind the subject there may be no catchlights in either eye. This has the effect of rendering them lifeless and flat looking. In this case, we should use a larger light source so at least the eye nearest the light source will reflect a sparkly catchlight.

To introduce a little more 3-dimensional depth we can introduce a second light source as a separation light in the form of background light or a kicker. These will help to define the shape of the head on the shadow side. A kicker would light the edge of the head directly and a backdrop light would reveal the far side of the face on the shadow side as a sharp silhouette.

What are the Advantages of Split Lighting in Studio Portrait photography?
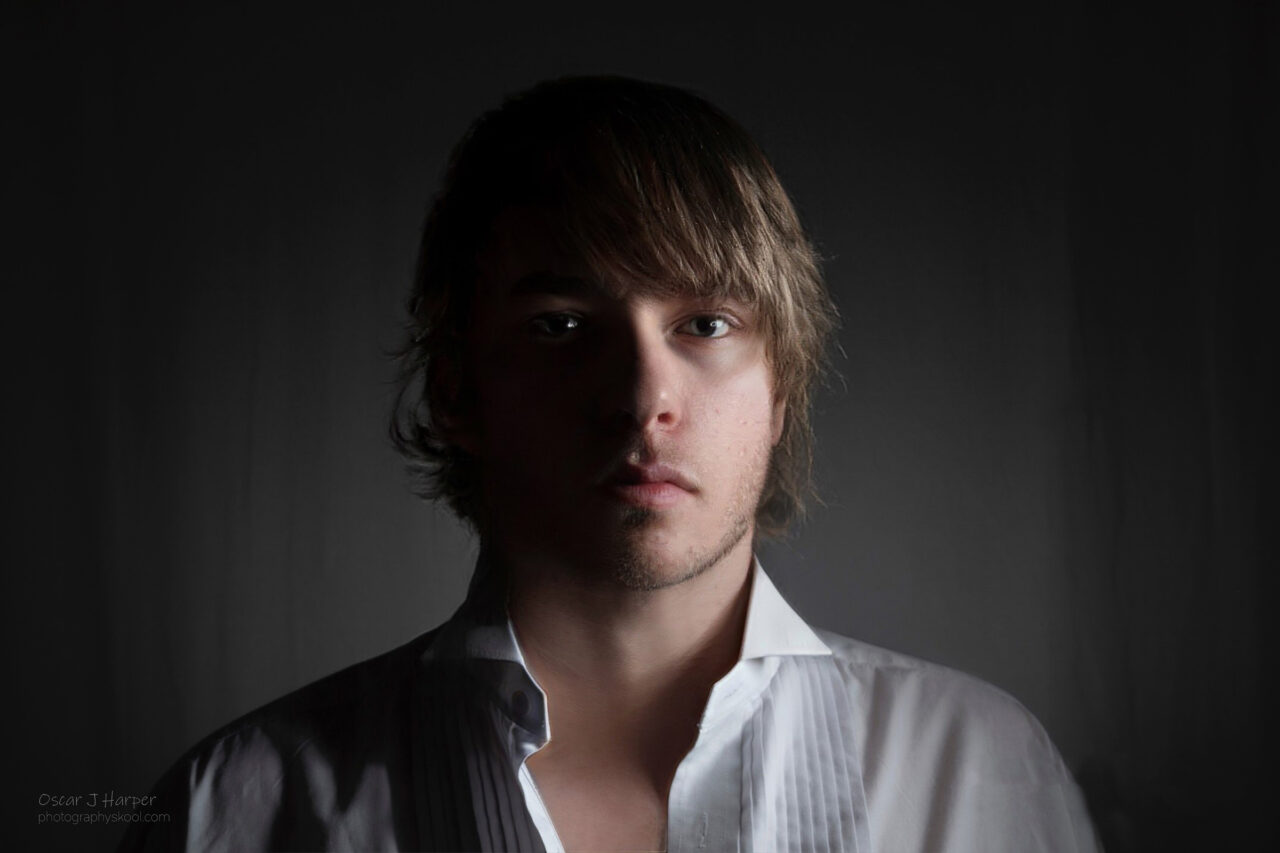
Split lighting is not for faint-hearted portrait photographers. For example, it wouldn’t be ideal for a happy family portrait or a business headshot for a corporation website. The effect would be far too menacing.
The main purpose of split lighting is to create more dramatic shadows on the subject’s face. It is a lighting style that can be easily achieved by positioning the light source at a 90-degree angle to the subject’s face, usually from one side or the other. This has the accidental effect of giving the subject a slimmer looking face.
It is not the most flattering portrait setup as the side light is streaming in at 90 degrees to the front plane of the face so any skim blemishes may be emphasised. However, it would be great for emphasizing textured skin and facial hair in older subjects.

Photo by Oscar J Harper
It can make male subjects look moody and heroic but for a softer shadow, consider applying a modifier to the light source such as a beauty dish or softbox.
It is perfect for low-key, moody shots. The result, especially in dark settings with dark backgrounds is very theatrical. This makes it potentially popular with actors as this lighting pattern can convey a sense of mystery like that created in a Film Noir scenario.
What Equipment do you Need to Create the Split Lighting Effect?

The light source can be either natural or artificial.
- Main light – An LED or Tungsten continuous light source may be used and these help you to see exactly where the shadows and catchlights will appear. Studio Strobe lights or Speedlites may be employed to produce strong bursts of white light.
- Radio Trigger – To control remote flash units or Speedlites that are away from where you’re operating the camera.
- Modifier – For a harder Split shadow, use a small, non-diffused modifier – for example, a 7-inch reflector or beauty dish. For a softer shadow, use an umbrella or softbox.
- Light Stand – The ideal accessory to hold the light, with its modifier in the right position and height to the side of the subject.
- Camera – If taking more creative control is important to you, the best choice would be a manual camera. DSLRs or Mirrorless would both be very suitable.
- Camera Lens – When you’re taking a portrait, it’s best to use a lens that’s around the 50-100mm range.
- Tripod – Will lock in the framing of the composition for consistent results.
- (You can alternatively hand-hold the camera.) To reduce the chance of motion blur you can select a fast flash shutter sync speed of say 200th or 250th of a second. It also allows us to play around with composition and framing, allowing you to make rapid changes.
How to Create Split Lighting in your Portrait Photography!
The Split Lighting technique is a type of lighting setup where one side of the face is lit and the other side is dark. In the studio, it can be achieved by positioning your subject so that they are standing in front of a window with the bright light coming from the side. Alternatively, you could use artificial lighting such as an LED panel or flash head. Outside you could use a natural light source such as a low setting sun striking your subject from the side.
Setting up a first basic Split lighting arrangement, you should make sure the main light source is coming from the side of the subject at roughly the height of the subject’s nose. If you rotate it way too far around and behind then it has a danger of becoming a Kicker or Rim light.

The lighting needs to be low-key and the model should face the camera without any other ambient light sources in the shot.
Use either a 50mm to 100mm lens when photographing a person’s head and shoulders, to frame the subject correctly in your shot.
To light your subject, place the main source to one side and facing them. It should be roughly level with the subject’s eyes and perpendicular to the direction of the camera.
You may want to shoot with hard light. For example, you can leave the light unmodified or attach a 7-inch reflector to control the spread of light.
You can create a very focused beam of light by attaching a honeycombed grid to the 7-inch reflector. This will give you the ability to have a tight 10-degree beam or a wider 60-degree beam of light.
A beauty dish can create slightly softer shadows, which work well for portraits of younger people. This moderately softer light results in a smoother skin tone.

Attaching a modifier such as a softbox to your light source can help you change the quality of light. These fixtures usually provide softer and more wrap-around coverage for subjects, making them ideal for taking portraits of younger subjects. They also make shadows soft when used close to the subject.
You can introduce a Gobo to make your backdrop more interesting. This is a type of light filter that can create different patterns on your background to improve separation of the dark side of the subject’s head.

A Gobo can help to emphasize the idea of a scenario, add some shadows or create what looks like texture with your gobo. These tactics can provide a much stronger feeling than just light and shadow alone.
Camera Settings:
- When taking shots with a flash, make sure that the shutter speed matches the flash sync speed. For example, 200 or 250 are two common values for a camera’s flash sync speed.
- F5.6 and F8.0 are good general apertures to use when taking portraits. They give a sharp depth of field for the face plane.
- Low noise pictures are great when you need high-quality results for prints. One of the most common practices is to use a low ISO setting of 100 or even 50.
Flash Settings:
- Set the flash power correctly by testing it with your lightmeter to match the F-Number (F5.6, F8) you want to use.
- If you don’t have or don’t want to buy a flash meter, just take a test shot and adjust the flash power according to your desired result.
Once you have everything set up, try taking a photo and looking at it. Now let’s check the Split light pattern:
- Does the shadow cover half of your subject’s face?
- Is there any light on the cheek of the shadowed side of the face? (Light is too far forward creating Rembrandt Light.)
- The eye socket on the light side should not be in shadow? (Light is too far behind the subject).
- The best practice is to see a catchlight in at least one eye (If you don’t, try nudging the light source slightly more forwards.)

On your next attempt to take a picture, experiment a little bit with the rotation of your main light source around the subject.
Try different light positions to get the perfect Split between shadow and light.
We can photograph the model’s face and attain the perfect shadow and highlight Split even if their face is turned away from the camera. So that means it can be successfully applied to Short or Broad lighting.
All we need to do is ensure that the light source is rotated in the same direction as their face. This way it will create a central split-shadow effect even if they are not on axis with the camera.

Photo by Oscar J Harper
This is a great tip to make sure the split shadow stays on your subject’s face even when shooting from an angle.
How High Should The Split Light Be?
The ideal height for the Split light is probably the same height as the subject’s head. This will give a uniform shadow down the centre of the face and a straight vertical shadow on the neck. This height will also prevent any weird shadows from forming in the eye socket.
If you raise the Split Light above head height and then tilt it down to face the subject’s head you should still see a good half-split shadow down the centre of the face. The shadow created beneath the chin on the neck, however, will be sharply angled and this may unbalance the straight shadow down the centre of the face.
Now, if you lower the light source below the height of the subject’s head and tilt it up you should still see the half Split shadow as before. You may see some strange shadows around the eye though. There may be an odd shadow above the cheekbone that puts the eye into shadow. This style of lighting is usually reserved for lighting horror movies or Halloween photographs.

Photos by Oscar J Harper
So it seems that the best height for your Split light is roughly the same height as the head of the subject. This seems to give the most pleasing result and predictable shadows.
How to Get Catch Lights in One Eye with Split Lighting
It’s important to get a catchlight in at least one eye to give it some life, but you may not see catchlights in either eye. This may occur if the light source is very small or far away from the subject.
To ensure one catchlight in the eye nearest the light source make sure the source light or modifier is not too small. Try adding a larger modifier like a small softbox or a 40cm beauty dish. The extra width should just be enough for the shiny reflective liquid on the eyes surface to catch the highlight.

If it is a small light or modifier, pull it further away from the model and even nudge it forward a little if necessary to ensure a catch light in the nearest eye.
How to Get Catch Lights in Both Eyes with Split Lighting
To see catchlights in both eyes is a little more difficult and this is sometimes known as true split lighting. You could try adding a large modifier to the light such as a bigger softbox or umbrella. This will have the effect of pushing the light source a little forward of the face and allowing both eyes to catch the modifier as a sparkly reflection in the eye.
This wrap-around light has the possibility of dropping some light onto the cheek of the shadow side of the face, however. This could then be described as Rembrandt lighting which is not the perfect Split lighting that you were going for. Make sure the light is set horizontally and not elevated to help prevent this from happening.

Alternatively, you could revert back to the smaller light modifier but this time place a reflector or fill light on the opposite side so the eye in the shadow side can catch the reflection. Place this second light as close to the main light as possible because if it is too far on the opposite side, the divergent catchlights could make the subject look cross-eyed.
Conclusion – Summary of Split Lighting Setup
- The Split lighting pattern is a powerfully dramatic side light.
- It produces theatrically moody portraits that seem to suit male or elderly subjects.
- It’s not ideal for family portraits or corporate headshots.
- It is simple to set up requiring only one perpendicular side light source.
- The light position at the side of your model is fairly foolproof as you don’t have to be so precise as Rembrandt Lighting.
- It can be achieved with sunlight, window light, a continuous artificial light source or flash lights.
- It’s a great way to achieve low-key high-drama imagery.
- You can successfully add a second light to create some separation from the backdrop on the shadow side.
- It’s not too flattering as it can highlight skin blemishes but this can be diminished with a soft light modifier.
- It can easily be accommodated in both Short lighting and Broad lighting.
- The ideal height of the light appears to be level with the subject’s head.
- You can still see catchlights to give the eyes some life with a little wrangling.

Related Articles
Ultimate Guide To The Different Indoor Studio Lighting Setups!
Learn about all the different lighting patterns for portraits and see 18 basic lighting setups. Check out this helpful article here on our site.