How do we recreate amazing, beautiful portraits like those of the Hollywood movie stars of the ’30s, ’40s and ’50s? They look like expensive beauty shots that are difficult to produce, so how can we copy this portrait lighting style without large budgets and a huge, professionally equipped photographic studio?
From the images I’ve seen of the old Hollywood studios, the “Paramount” portraits are often characterised with quite hard light, strong contrast and dramatic shadows. This can be achieved by adopting a Paramount butterfly lighting setup to create our studio portraits.
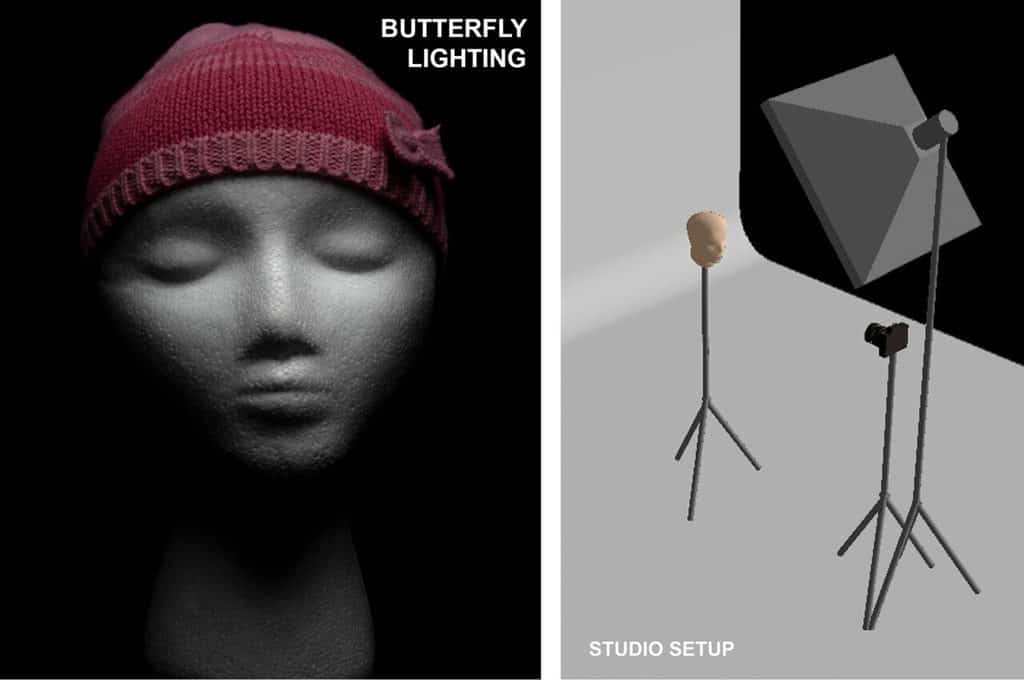
Paramount Lighting could be described as a type of Butterfly Lighting using hard light & high contrast to produce stunning Hollywood Studio advertising portraits of their top stars. It creates a symmetrical shadow beneath the nose and sculps out the cheekbones for a glamourous, flattering look.

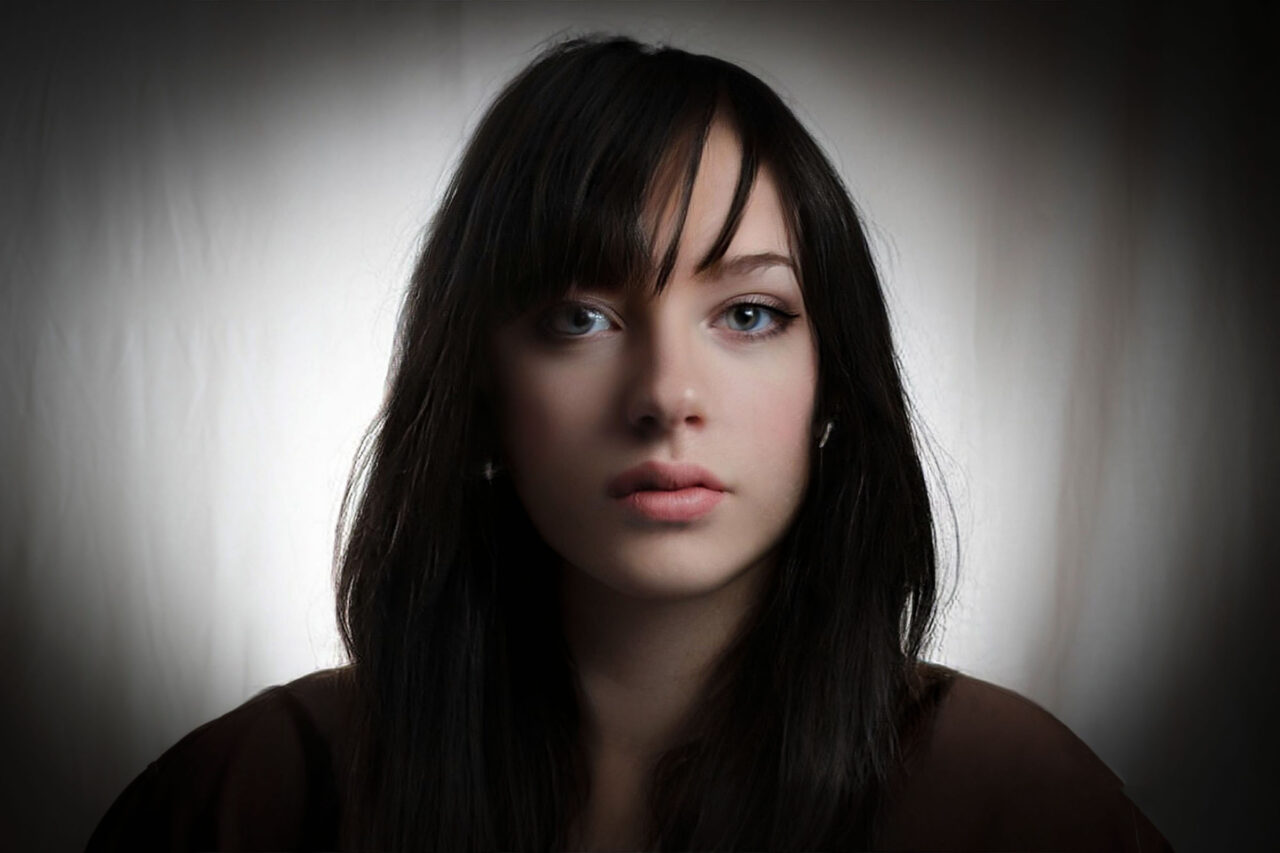
Photo by Oscar J Harper
The following article will explain how to recreate these timeless, moody portraits with a simple setup. It’s glamour lighting on a budget with minimal equipment using the classic technique of Paramount lighting that essentially produces a butterfly-like shadow beneath the nose.
Jump Ahead to Relevant Section
- What are the origins of Paramount lighting in studio portrait photography?
- What are the Advantages of Paramount Lighting in studio portrait photography?
- What Equipment do You Need to Create the Paramount Lighting effect?
- How to Achieve Paramount Lighting in Your Studio Photography?
- Conclusion
What are the origins of Paramount lighting in studio portrait photography?
The origins of Paramount lighting in studio portrait photography can be traced back to the 1930s. The movie director who gave Marlene Dietrich her signature look was Josef von Sternberg. He would light her in moody, shots illuminated by what became known as Paramount lighting which is basically a butterfly lighting effect with harder light.
One of the first portrait photographers to adopt this technique was George Hurrell. His work with Paramount lighting is considered by many, the best and most iconic in Hollywood history. He used it for his portraits of movie stars such as Marlene Dietrich, Clark Gable, and Greta Garbo.
It is believed that he helped to evolve the “Paramount” lighting technique whilst working as a portraitist for Paramount movie studios in Hollywood.
Although he could achieve the look with just one, main light, he often used several lights to achieve the overall Hollywood “Paramount” look. There would often be one or more backdrop lights, a hair light and possibly some kickers and fills.

What are the Advantages of Paramount Lighting in Studio Portrait Photography?
Paramount Lighting is a technique that is used in studio portrait photography where the shape of the nose shadow is a butterfly. It is a type of lighting that can be used to create a dramatic effect resulting in a glamorous and highly sculpted, flattering portrait.
It has been around for decades but it has recently become popular again with the rise of social media influencers who are looking for ways to make their photos look more dramatic and striking.
It is often distinguished by the presence of high contrast tones and deep shadows. This would be perfect for the drama that we associate with low-key photographs.

It can be used to add a touch of glamour to our photographs. We can inject a little of the magic of the heyday of Hollywood studio photography heritage into our compositions. We may have to consider the hair, makeup and props to help capture the true essence of Hollywood glamour.
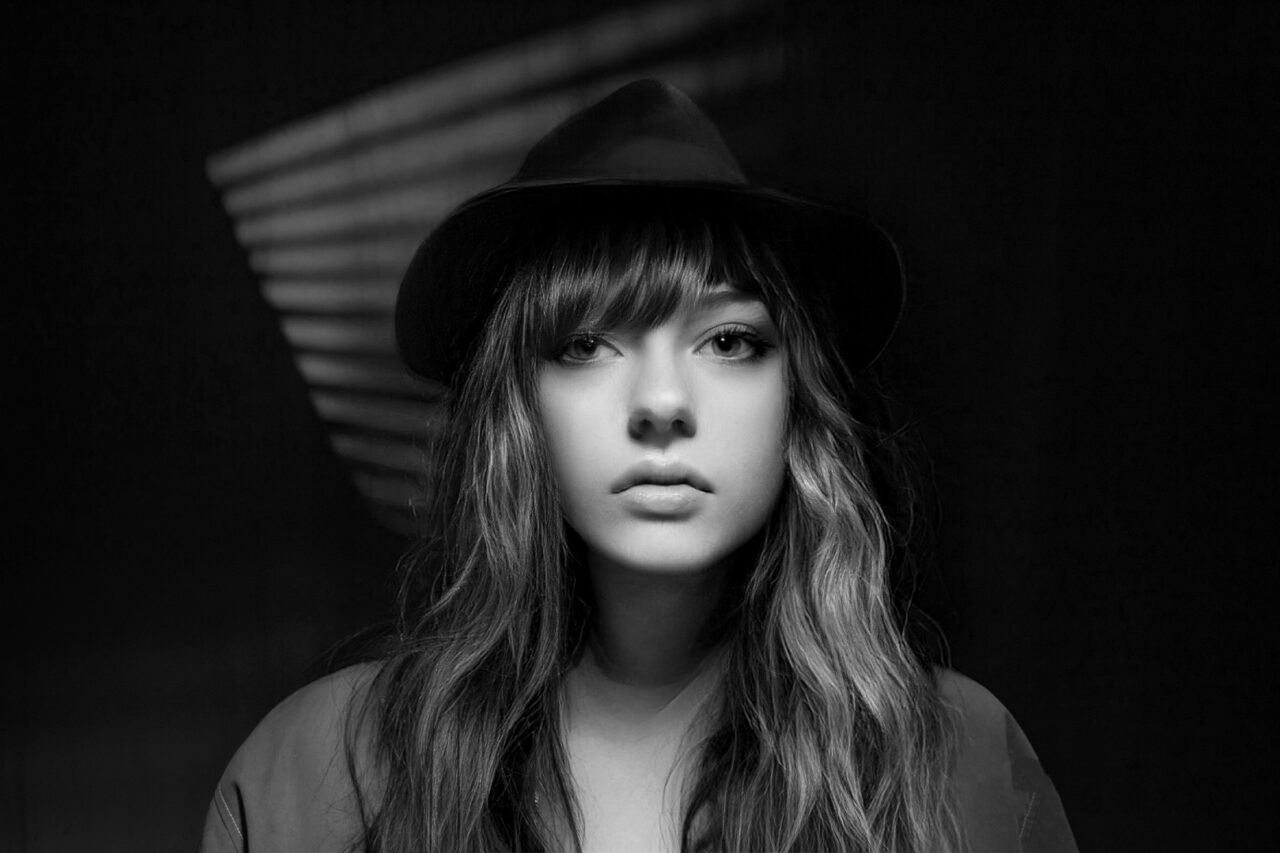
Use a bold, shiny hairstyle (add a hair light if necessary). Darker than usual makeup like lipstick could help to boost the facial contrast. Hats, feathers and jewellery can add to the chic style that was so often portrayed in the great Paramount portraits.
The high location and face-on position of the key light produce the distinctive butterfly-shaped shadow beneath the nose of the subject and fairly flat lighting to the front plane of the face. This adds a little 3-dimensional quality to the face and is easier to understand as the lighting is usually a little harder in Paramount Lighting.
The high angle of the light can also highlight the cheekbones by sculpting the hollows beneath with a shadow that has a slimming effect on the face. A deep shadow is naturally created beneath the chin which can hide a multitude of chins, particularly if minimal fill light is used.
What Equipment do You Need to Create the Paramount Lighting effect?

- Main Light – Set in front of the model Continuous light (Fresnel studio lights if you can get them), LED or Tungsten – Strobes or Speedlites for strong bursts of white light. The goal is hard-ish light.
- Radio Trigger – For the off-camera Strobes and Speedlites.
- Modifier – For a defined butterfly shadow choose a small, non-diffused modifier, 7-inch reflector, beauty dish or snoot.
- Light Stand – This will carry the light and the modifier above the subject, a boom arm will make this easier.
- Camera – Use whatever you have but a camera with manual control will give you greater creative control. DSLR or Mirrorless are good options.
- Lens – Choose an appropriate lens for portraits, usually between 50-100mm focal length.
- Tripod – This will aid in fixing the composition and framing of the photograph. If we are using flash at fast sync speeds of 200 – 250 we may be able to shoot handheld as there will be little chance of motion blur. It will also loosen up the composition by allowing you to move freely around the subject.
How to Achieve Paramount Lighting in Your Studio Photography?
When you are taking your first Paramount photo, the position of the light is very important. The best way is to put the main light source directly in front of the subject and make sure they are facing into the camera lens and it is directly in front of their face.
This is a good starting point. Use a suitable portrait lens, usually between 50mm and 100mm. Place the camera in front of your subject to frame the head and shoulders of the model.
Set up the single light source studio lighting by placing it in front of the subject and above, making sure that the stand is not going to obscure your subject (or use a light on a boom arm). Elevate it so that it has a downward angle, (approx. 45-degree angle to start with) pointing towards your subject but not too steeply down on them to achieve the perfect butterfly lighting pattern.

Image by Oscar J Harper
I believe that it was common practice to shoot Paramount photos with hard light so let’s consider how to modify the light if we want to see hard-lined shadows. We can leave the light unmodified, or clip on a 7-inch reflector to control the spread of light and prevent it from falling on the backdrop.
For more precise control of the spread of light, we can clip a honeycomb grid to the 7-inch reflector. These will typically reduce the beam of light to a tight cone of between 10 and 60 degrees.
For a slightly softer but still semi-hard lined shadow, attach a beauty dish that is light bounced off a parabolic dish and produces a slightly smoother appearance on the skin too.

Photo by Oscar J Harper
The use of the larger diffusing modifiers such as a softbox or umbrella may have the unfortunate result of killing the typical Paramount butterfly shadow beneath the nose. These larger modifiers tend to produce a much softer, wrap-around light, particularly if they are close to the subject.
This has the effect of flattening the overall light on the subject and eradicating any shadows that would give depth and form. They have their place in studio photography but probably not if we are trying to produce a dramatic Paramount shadow photograph.
To add to the story we may consider adding a Gobo to the background light. This is a go-between object (between the backdrop light and the backdrop) that creates a shadow and light pattern on the backdrop behind the subject. This can add interest in the form of texture or project an image to reinforce the idea of a scenario such as a window, tree shadow or a building in silhouette.

Camera settings:
- When setting your camera’s shutter speed, make sure it matches the sync speed of your flash. Common flash-sync shutter speeds are 60, 200 or 250.
- When shooting portraits, it’s appropriate to use an aperture between F5.6 and F8.0.
- To prevent noisy pictures, set the ISO to be as low as possible. 100 or 50 are your best settings.
Flash Settings:
- To check if your flash power is correct, use a flash meter. Set the power of your flash to achieve the correct F-Number exposure of F5.6 or F8.
- Otherwise, take a test shot and adjust the flash power up or down accordingly based on the desired results.
When all the elements are set up, shoot a test shot and review the result. Now, let us consider the Paramount butterfly shadow beneath the nose:
- Is it clearly visible just beneath the nose?
- Does it touch the top lip? (if it does we should decrease the angle of the light).
- Are the eye sockets in deep shadow? (if so, we should decrease the angle of the light).
- Is the nose shadow symmetrical? (if not, move the light on-axis with the nose).
- Can we see catchlights in the eyes (if we can’t, the light is apparently too steep)?

Photo by Oscar J Harper
Take this time to adjust the angle and height then shoot more test shots.
Experiment with different light setups until you find something that has a certain perfect symmetry to it that may begin to capture the spirit of famous Movie photographers such as Clarence Bull and George Hurrell.
We can photograph the model’s face and achieve a symmetrical Paramount butterfly shadow even if it is turned away from the camera. We just need to ensure that the subject’s nose remains on axis with the light source.

Photo by Oscar J Harper
With this manoeuvre, the butterfly shadow will remain symmetrical beneath the nose, even though we are shooting it obliquely with our camera.
Conclusion: The Power of Paramount Lighting and How the Study of Classic Photos Can Help You Achieve The Hollywood Style.
The conclusion of this article is that Paramount Lighting is a powerful tool for photographers to achieve Hollywood style photographs. It appears that a particular theme of many of the great photographers that adopted this style for advertising the movie stars, was the hard lighting and stark contrast, so that is worth keeping in mind.
It is possible to evoke the essence of these iconic and beautiful photographs with our modern strobes and Speedlites but we will probably never match them exactly due to them being produced with very special Fresnel lights, chemical film and special cinematic lenses that seemed to produce a certain, creamy smooth softness to the skin.
Not to mention the use of skilled makeup artists and that some of the photos were highly retouched by expert artists to create that almost unearthly quality to the portraits.
It is a goal that is worth pursuing though particularly if you are interested in studying and emulating the great Hollywood masters of portrait photography. In studying their photographs you may learn more about lighting setups, composition and posing.
Look for catchlights, areas of hard and soft contrast and how and where different lights were placed. Observe if hair lights, fill and kickers were used and their relative brightness. The pictures will reveal a lot of these details if we look closely.
Related Articles
Ultimate Guide To The Different Indoor Studio Lighting Setups!
For a comprehensive look at all the different types of principal lighting positions and 18 studio lighting setups, check out our illustrated guide right here in Photography Skool.