How do we introduce the beautiful yet dramatic lighting style of the great old master painters from history, into our own portrait photography? They look professional and difficult to produce, so how can we create this portrait lighting pattern without the expense of a dedicated studio and specialised lighting and equipment? One way is to introduce the Rembrandt Lighting technique:
Definition of Rembrandt Lighting
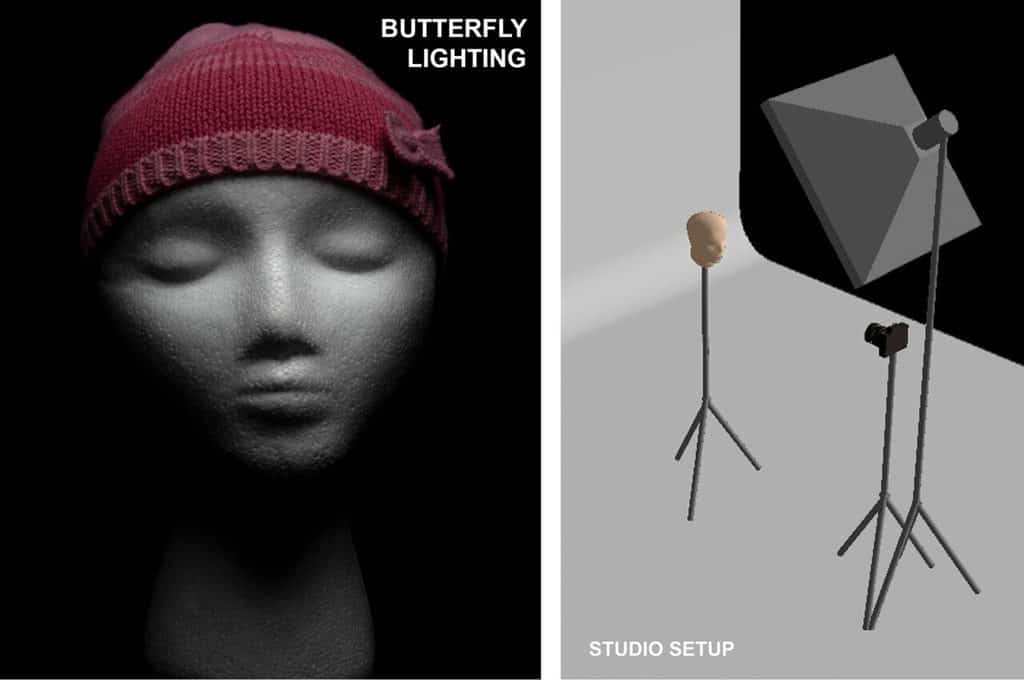
Rembrandt Lighting, named after the painter, produces a dramatic, moody portrait. The unique feature is the inverted triangular patch of light beneath the eye on the dark side of the face. It can be achieved with one light or softened with a fill light. It is effective in broad or short lighting.

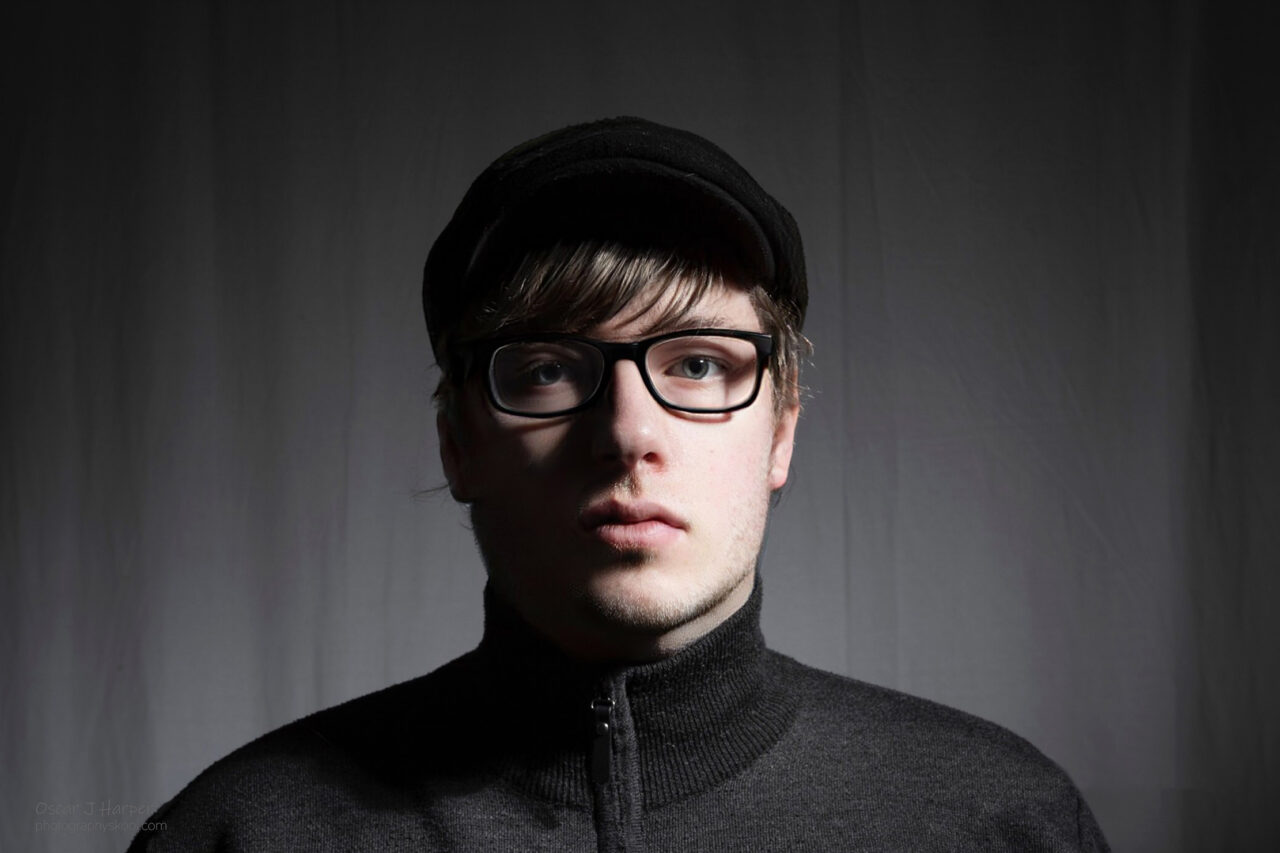
Photo by Oscar J Harper
From the portrait paintings I’ve seen by Rembrandt, they seemed to be captured with high-level sidelight, strong chiaroscuro effect and theatrical shadows. One way of achieving this is to use a Rembrandt lighting setup when photographing our studio portraits.
This article will discuss how to create these timeless, moody portraits with a simple setup for beginner photographers. It’s a classic lighting setup that is executed with limited equipment and can be achieved by using the technique of Rembrandt lighting that produces a triangle of light in the shadow side of the face just beneath the eye.
Table of Contents
- What are the Origins of Rembrandt Lighting in Studio Portrait photography?
- What are the Advantages of Rembrandt Lighting in Studio Portrait Photography?
- What Equipment do you Need to Create the Rembrandt Lighting Effect?
- How to Create Rembrandt Lighting in your Portrait Photography!
- Conclusion
What are the Origins of Rembrandt Lighting in Studio Portrait Photography?
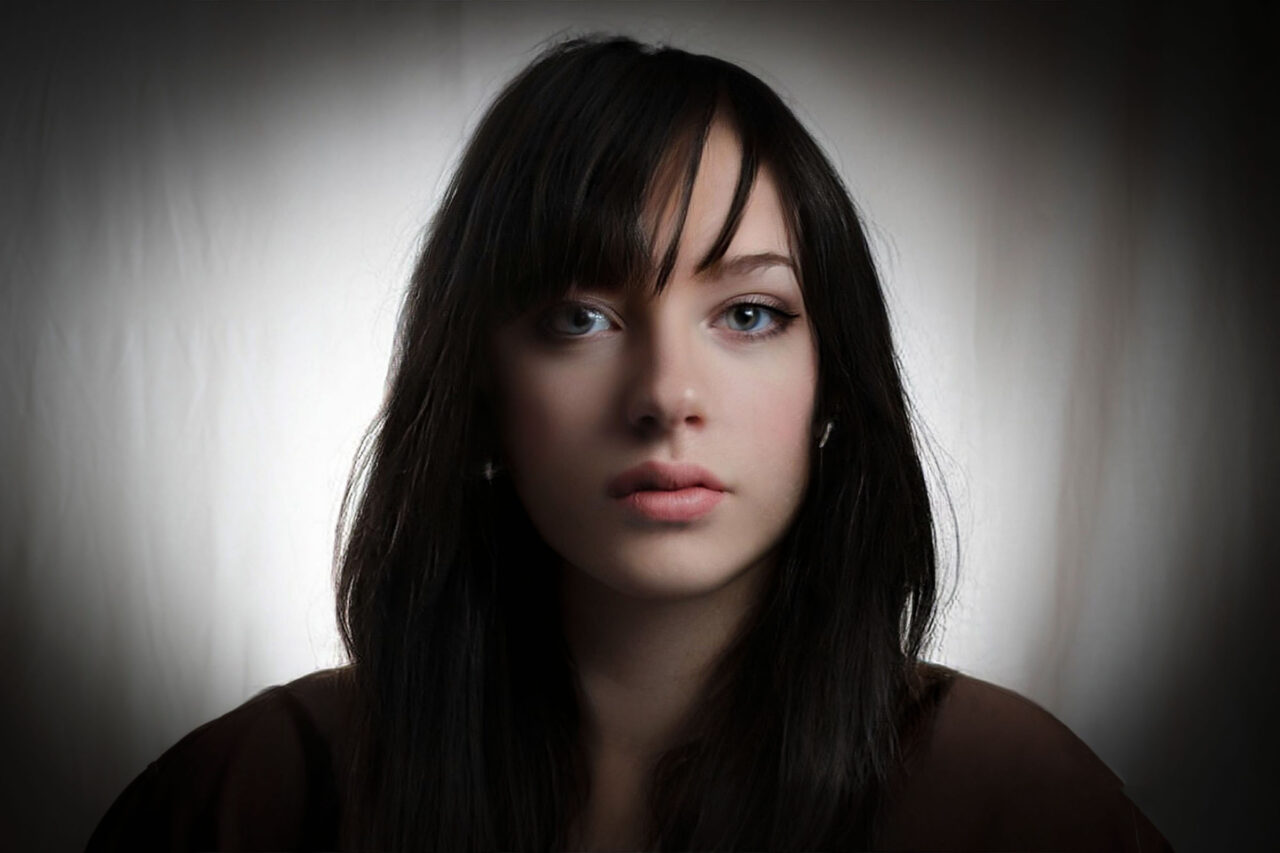
Rembrandt lighting is so named after the 17th century Dutch artist (Rembrandt Harmenszoon van Rijn 1606 – 1669) and it defines a particular effect that produces a triangular patch of light that appears just beneath the eye on the dark side of a face.
This occurs when the subject is lit from the opposite side from such an angle and elevation to cause the nose shadow to connect to the cheek shadow. This leaves the only visible patch of light in the form of an inverted triangle on the shadow side of the face.

Photo by Oscar J Harper
The style of lighting that produced this more realistic, 3D effect probably precedes the famous Dutch painter, Rembrandt and was developed by the early Renaissance artists of Italy that were trying to move away from the flat compositions of Gothic art.
It appears that the phrase was coined by a movie maker called Cecil B. De Mille while making the 1915 movie, The Warrens of Virginia. He decided to use spotlights on the actors to light them dramatically from the side.
When the producer gloomily surmised that the audience wouldn’t pay full price for half-lit actors, De Mille suggested calling it Rembrandt Lighting leading to the joke that the audience should pay double to see such a prestigious illumination technique.
Some of Rembrandt’s portraits may have been illuminated from a high window light in his studio which caused the distinctive half-shadowed face and an iconic patch of triangle light on the shadow side. This is probably why this particular setup, when recreated in photography, is known as Rembrandt Lighting.

Rembrandt sometimes illuminated his subjects with high, offset light which created the inverted, triangular patch of light beneath the eye on the opposite side.
What are the Advantages of Rembrandt Lighting in Studio Portrait Photography?
Rembrandt Lighting is a studio photography technique that can be used to create a very dramatic effect, or a moody and sophisticated look.
It’s perfect for portraiture as it creates a very striking image that can hold the viewer’s attention.
It’s been around for centuries in the field of fine art, but it is gaining traction again as it can produce classically moody photographs. Rembrandt was a master of the chiaroscuro technique. This is a Low-key technique that often captures scenes with high contrast and deep shadows.
It is perfect for the drama that we associate with this genre and is probably why many portrait photographers use Rembrandt lighting.
You can use it to add a touch of drama to your own photos! Lighting in the paintings of past masters can inspire you when it comes to composing your shots.
The high, off-axis position of the key light produces the distinctive Rembrandt triangle of light beneath the eye of the subject. This adds 3-dimensional volume to the face and a narrowing effect as half of the face is mostly in shadow.

The triangle patch of light is formed by the angled shadow of the nose on one side and the edge of the cheekbone where it drops away to the side of the face. This helps to highlight the eye on the dark side like a carpet of light leading to the eye.
A deep, angled shadow is naturally created beneath the chin and on the side of the face and neck, particularly if minimal fill light is used. This can help to slim the neck and face for a more flattering result.
What Equipment do You Need to Create the Rembrandt Lighting effect?

- Main Light – Place it above and to the side of the model – You can use continuous studio lights, Tungsten or LED lamps – Speedlites or Strobes for powerful outputs of white light.
- On-camera Radio Trigger – For off-camera flash heads or Speedlites.
- Modifier – For a sharper Rembrandt shadow select a small modifier without a diffuser or try a snoot, beauty dish or 7-inch reflector.
- Light Stand – A sturdy light support on three legs to carry the off-camera light fitting or flash-head.
- Camera – Using a camera with manual control will allow you to maximize your creative potential. DSLR or Mirrorless cameras are good options.
- Lens – Generally, a 50-100mm lens is used for portraits.
- Tripod – This will help you with the composition and framing of the photos. If we use the flash at high sync speeds of 200 – 250 and handhold our camera, there will be little chance for motion blur. It also loosens up the composition by allowing easy movement between different angles.
How to Create Rembrandt Lighting in Portrait Photography?
When establishing your first basic Rembrandt lighting setup, you should make sure the main light source is coming from above and to one side of the subject at roughly a 45-degree angle of rotation to start with. If you rotate the light too far it becomes Split lighting which we will discuss in the next article.

Photo by Oscar J Harper
There should be very little ambient light to maintain the low-key effect. Ensure that the model faces towards the camera, which should be positioned in front of their face at eye level.
The best way to achieve this is to use either a 50mm or 100mm portrait lens in order to frame your subject’s head and shoulders correctly while they are standing in front of you.
To light your subject up, place the main source of light on one side of them and above. You want it to be angled at about 45 degrees with the direction pointing towards the subject, but not too steeply so that it casts a shadow over the eye.
It’s possible to shoot with hard light, so let’s see how we can modify it if we want to see hard-lined shadows. As an example, we can set up the light and leave it unmodified or clip on a 7-inch reflector that will control the spread of light and prevent it from reaching the backdrop.

Photo by Oscar J Harper
You can create a tight, focussed beam of light by clipping honeycomb grids to the 7-inch reflector. This will allow you to create a precise 10 to 60 degree beam of light.
It can be hard to decide whether you want harsher or more natural lighting for your portraits. With its semi-hard lined shadows, you can use a beauty dish (light bounced off of a parabolic dish) for softer and smoother skin tones.
To change the quality of the light, we can attach a larger modifier to it. For example, a softbox will produce diffused and wrap-around coverage that appears softer if it’s closer to the subject. The shadows will be much softer and produce a more subtle transition between light and dark.

Photo by Oscar J Harper
To add interest to your backdrop, you may want to use a Gobo. This is a type of light filter (placed between the backdrop light and the backdrop) that can be used to create different shadow and light patterns on your background.
Adding a little bit of texture or reinforcing the idea of a scenario can help make your message stronger. This might be done with the gobo that can create elements like shadows, textures, or silhouettes.

Photo by Oscar J Harper
Camera Settings:
- When using your flash, make sure that the shutter speed actually matches the flash sync speed to avoid ambient light creeping in. For example, 200 or 250 are common for a camera flash sync.
- A lot of portraits are taken with an aperture between F5.6 and F8.0
- To take low noise pictures, as a rule of thumb – try to use ISO settings like 100 or even 50.
Flash Settings:
- Make sure your flash power is set correctly by using a flash meter. Check that the F-Number exposure you desired (F5.6 or F8) is achieved by your current power setting on your flash.
- Otherwise, take a test shot and adjust the flash power according to the desired results.
When all the elements are set up, take a test shot and review it. Let’s now check Rembrandt’s patch of light under the eye;
- Is a patch of light visible under the eye on the shadow side?
- Is it roughly the width of the eye and length of the nose? (if not, adjust the rotation and the angle of the light!)
- The eye sockets should not be in shadow? (Decrease the height of the light to fix this).
- If catchlights are not visible in the eyes, the light may be set too steeply!

Photo by Oscar J Harper
Try adjusting the angle and height for your next shot, then take more test photos.
Try various different light setup positions until you find something that has the perfect asymmetry that might capture the lighting artistry of famous painters like Rembrandt.
We can photograph the model’s face and achieve an asymmetrical Rembrandt shadow even if it is turned away from the camera. We just need to ensure that the light source is rotated in the same direction as the subject’s face. It works very well in broad lighting or short lighting setups.

Photo by Oscar J Harper
This is a great tip to make sure that the Rembrandt shadow stays in place on the subject’s face even when we are shooting from an angle.
Conclusion: Rembrandt Lighting and How Studying Classical Art Can Help You Achieve It!
There are a wide variety of lighting setups that photographers can use to create dramatic portraits, but it seems apparent that the Rembrandt lighting technique is very effective even with a single light source. This article went into detail about how this is sometimes seen in Rembrandt’s portraits and why it works so well.
It’s possible to recreate the stunning lighting of these iconic images with modern strobes or Speedlites, but we will never match them exactly since they were created with natural light from high windows or even candlelight.

Photo by Oscar J Harper
It is a good goal to pursue, but if that’s not your thing, just think of how you can use modern lights to achieve similar lighting techniques. A study of those painters of the past may reveal some important techniques you can use when it comes to setting up the lights and the compositions of your photographs.
Look for hard and soft contrasts as well as where different kinds of lights are placed. Try to see if there was evidence of the equivalent of Hair lights, Fill and Kickers that all affect the lighting composition in some way. Observing these details can help us to better understand the lighting used in the paintings.
Related Articles
Ultimate Guide To The Different Indoor Studio Lighting Setups!
An in-depth overview of all the primary positions for studio lights followed by an illustrated guide of 18 tried and tested portrait lighting studio setups. See this helpful article here in Photography Skool.