Mastering The Art of Rim Lighting!
Have you ever seen a portrait that simply takes your breath away? Chances are that the photographer used the magical effect of the rim lighting technique to create a striking and dramatic image. Rim lighting is a powerful technique that can transform an ordinary portrait into something more accomplished.
By highlighting the subject’s edges and shape with a light placed behind them, rim lighting produces a glowing rim effect that captures the viewer’s attention. If you’re looking to elevate your portrait photography to the next level, read on to discover the secrets of this enchanting technique.

(This post may contain affiliate links which means I may receive a commission (at no extra cost to you) for purchases made through links. Learn more on my Privacy Policy page.)
Rim Lighting Definition
Rim lighting: a powerful technique for dramatic studio portraits. 1 or 2 lights placed behind the subject create a glowing rim light effect. Careful attention to settings and placement creates stunning images with no lens flare. Capture your subject’s essence with this moody and dynamic style.
What You Will Find in This Guide
- What is Rim Lighting in Studio Portrait Photography?
- What are the Advantages of Rim Lighting in Studio Portrait photography?
- What Equipment do you Need to Create the Rim Lighting Effect?
- How to Create Rim Lighting with one light source in your Portrait Photography!
- How to Create Rim Lighting with two light sources in your Portrait Photography!
- Conclusion – Summary of Rim Lighting Setup
What is Rim Lighting in Studio Portrait Photography?
Rim light photography is an impressive technique used in studio portrait photography to create stunning and dramatic images. This technique involves the use of a type of separation light that works exceptionally well against a dark or a black background. By illuminating the edges of a subject, it creates a glowing halo effect that adds depth and dimension to the photograph. It’s a great way to add a touch of creativity and uniqueness to your portraits, and it’s especially effective when used as the main light source.
This technique leaves the subject’s face on the camera side in deep shadows, creating a dramatic low-key portrait and mysterious effect that draws the viewer’s attention. If you’re looking to elevate your studio portrait lighting setup, rim lighting is definitely a technique to consider. It’s a simple yet effective way to add a touch of drama and magic to your images, and it’s sure to leave a lasting impression on anyone who sees your work.
“As an Amazon Associate, I earn from qualifying purchases.”
Check out the latest Canon DSLR cameras on Amazon US here
Check out the latest Canon DSLR cameras on Amazon UK here.
What Are The Advantages of Rim Lighting in Studio Portrait Photography?
Rim lighting is a popular technique in studio portrait photography, and one of its main advantages is the glowing rim light effect it creates. This effect is particularly enhanced when there are fluffy edges in the shot, such as hair, textured clothing, or feathers. The result is a visually striking and captivating image that draws the viewer’s attention and creates a sense of depth and dimension.

Photo by Oscar J Harper
The glowing rim effect also creates an interesting minimal but easily understandable form, which can be a great way to create a powerful and memorable portrait. Additionally, rim lighting can be used to separate the subject from the background, making them stand out more and creating a sense of visual separation that can add to the impact of the image.
Overall, the advantages of rim lighting in studio portrait photography are numerous, and mastering this technique can help photographers take their portraits to the next level, creating images that are both visually striking and emotionally compelling.
What Equipment do You Need to Create The Rim Lighting Effect?
To create the rim lighting effect in studio portrait photography with a single light source, you will need the following equipment:
- A bare bulb or 7-inch reflector flash
- A radio flash trigger
- A stand to hold the light source in place
- A dark background or backdrop to help enhance the glowing rim effect
- A subject is to be positioned in front of the light source
- A camera with a lens suitable for portrait photography
- A tripod to fix the camera position in relation to the subject and flash

“As an Amazon Associate, I earn from qualifying purchases.”
Check out some 7 inch reflectors on Amazon US here.
Check out the 7 inch reflector kit I use on Amazon UK here.
While this setup is relatively simple, it’s important to note that the results may vary depending on the quality of the equipment used and the specific conditions of the shooting environment. Experimentation and practice may be necessary to achieve the desired results, but with some creativity and a willingness to learn, anyone can master this technique and create stunning rim-lit portraits.
How to Create Rim Lighting With One Light Source in Your Portrait Photography!

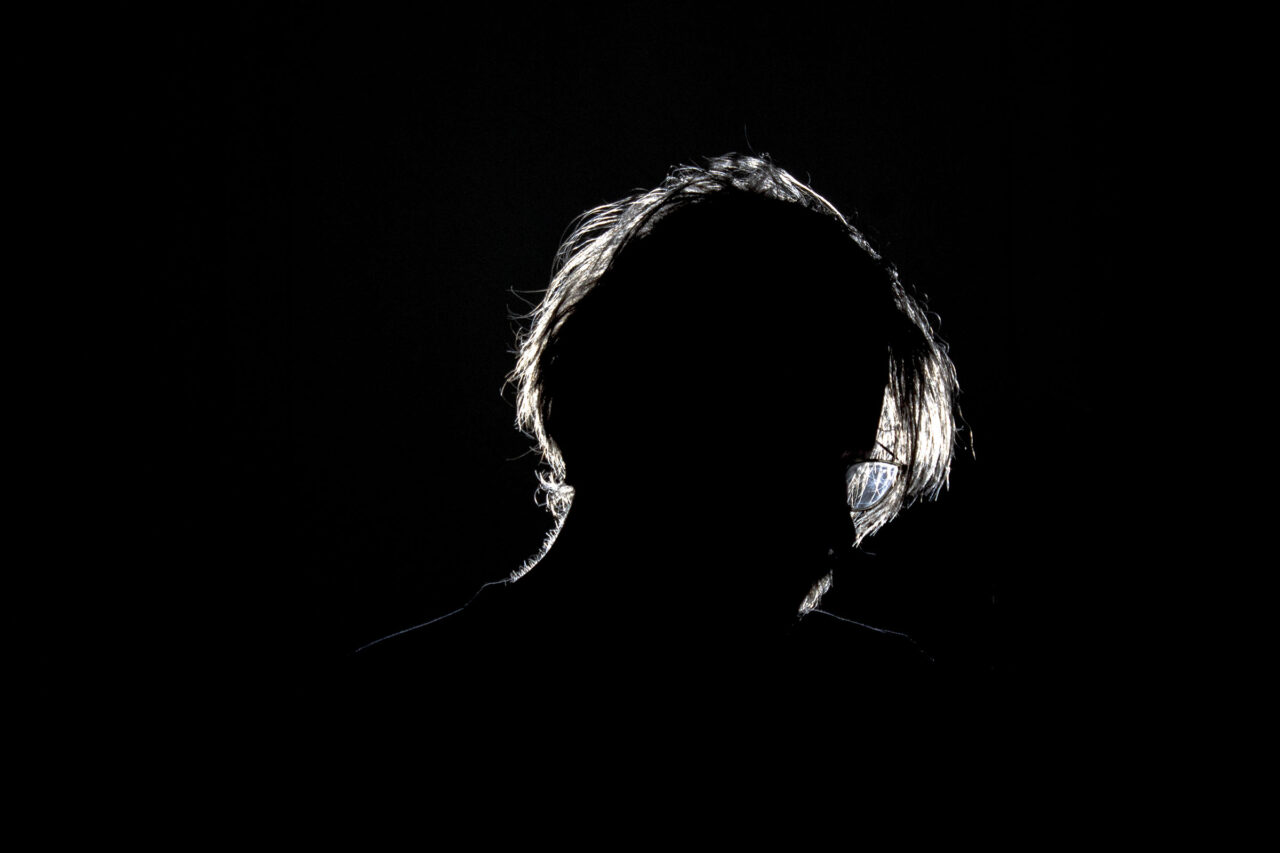
Creating a stunning rim lighting effect with a single light source can be a simple and effective technique for portrait photographers. Achieving this effect is simple; the first thing to do is just set up a bare bulb or 7-inch reflector flash right behind the subject’s head and shoulders and direct it towards the camera. This is often the only light that will be required. The subject will block the direct light from the camera preventing any chance of lens flare and creating a halo of light around their silhouette.
“As an Amazon Associate, I earn from qualifying purchases.”
Check out the affordable Yongnuo Flash products I use, on Amazon US here.
Check out the affordable Yongnuo Flash products I use, on Amazon UK here.
This technique is particularly effective on dark backgrounds or when used as the main light source to create a dramatic and moody portrait. To get the most out of this technique, it’s important to experiment with the placement and intensity of the light source, as well as the rotation and position of the subject. Place the camera on a tripod to guarantee the accuracy of the alignment of the subject and light source.

Photo by Oscar J Harper
With some practice and a willingness to experiment, you can create striking and memorable portraits with just a single light source and a little bit of creativity.
To get the best results when creating rim lighting with a single off camera flash, it’s important to pay attention to your camera settings, flash settings, and radio trigger settings. First, you’ll want to set your camera to manual mode, which gives you full control over the exposure settings. Then, adjust your aperture and shutter speed to achieve the desired depth of field and exposure.
The shutter speed should be set to your flash sync speed of 60, 200, or 250, or whatever your camera sync speed is. As the background will probably be black or out of focus you can probably set your aperture to produce a shallow depth of field that will still keep the main subject in focus. Choose a setting of F4 or F5.6 to start with.

Photo by Oscar J Harper
For flash settings, you should set your flash power to a high setting to maximize the halo effect. Remember that most of the light will be blocked by the subject which will prevent any danger of lens flare. Adjust the distance of the light source from the subject to fine-tune the rim effect.
Finally, you will need a radio trigger attached to the hotshoe of the camera. This will allow you to remotely control the flash without cables appearing in shot or interfering with the subject. Take your first image and review the results. Continue to take test shots then refine your camera and flash settings until they look perfect. With the right settings and equipment, you can create stunning rim-lit portraits that are sure to impress.
While rim lighting can be a striking technique on its own, it’s often used in combination with other lights to create a more dynamic and visually interesting portrait with three-dimensional effects. One popular three-point lighting setup involves combining the rim light with a key light and/or fill light. The rim light serves to define the edges and shape of the subject, while the second light, the key light provides overall illumination of the front of your subject and highlights the important features of the face or body.

The third light, the fill light is then used to soften the shadows and create a more balanced and flattering lighting setup. By using supplementary lights in conjunction with the rim light, photographers can create stunning and visually complex portraits that draw the viewer’s attention to the subject while still emphasizing the dramatic and moody effect of the rim lighting.
Take a test shot and review the result. If the Key and Fill are overwhelming the Rim light effect then reduce the power of the flash heads (The key light should be a stop or two higher than the Fill light). If the lights are still too powerful, adjust the aperture to a smaller opening (Larger F number).
If all this is not enough to achieve the perfect balance of the three lights, try moving the Key and Fill further away from the subject. With some practice and careful attention to the placement and intensity of the rim light, photographers can create truly breathtaking portraits that are sure to impress.
How to Create Rim Lighting With Two Light Sources in Your Portrait Photography!
Creating a rim light setup with two rear light sources can be a powerful technique for portrait photography that can create different looks, but it requires some careful consideration to avoid lens flare. To get started, position two light sources behind your subject angled towards the sides of their head or body. This will create two distinct rim lights that will highlight the edges of your subject’s form and sides of the face.
To avoid lens flare, you’ll want to position the lights so that they are not directly facing the camera. You could also elevate the lights and point them downwards to ensure that they remain out of the camera frame. You will probably want to use a light modifier like a 7-inch reflector or snoot on your flash heads or Speedlites to control and restrict the spread of light that strikes the side of the model.

One other trick is to use barn doors or flags to block the light from hitting the camera lens. Another option is to use a lens hood or tilt the camera down to minimize the risk of flare. It’s also important to adjust the power of each light to achieve the desired intensity and balance.
Use the same camera settings as in the single light example above. Take some test shots and review the outcome. Adjust the rotation of the lights if there is too much or too little rim being highlighted. Also, adjust the power and distance of the lights. Reduce the aperture opening if necessary to reduce the effect of overly powerful flash output.
With some experimentation and attention to detail, you can create striking rim-lit portraits that showcase your subject’s form and add a dramatic edge to your photography.

Photo by Oscar J Harper
With two rear rim lights, you will have the option to be creative with coloured gels on the light sources. You could, for example, use different complementary coloured gels on each of the lights for an interesting twist, such as: orange and blue or red and green.

Conclusion – Summary of Rim Lighting Setup.
In conclusion, rim lighting is a striking technique that can add a dark and moody effect to your studio portrait photography. By using a single light source or combining multiple lights, photographers can create stunning portraits that highlight the edges and shape of their subject while emphasizing their key features. Additionally, using supplementary lights in conjunction with the rim light can create more complex and visually dynamic portraits. However, it’s important to pay attention to camera settings, flash settings, and radio trigger settings to get the best results and to carefully consider the placement of your lights to avoid lens flare. With some experimentation and attention to detail, you can use rim lighting to create striking portraits that capture the essence and personality of your subject.
Here’s a short checklist to summarize the Rim Lighting technique and setup:
- Rim lighting is a powerful technique for creating dramatic and moody studio portraits.
- A single light source or two lights behind the subject can be used to achieve the rim lighting effect.
- Add a creative flare with the addition of coloured gels on the lights.
- Using supplementary lights such as key and fill, in conjunction with the rim light can create more visually dynamic portraits.
- Camera settings, flash settings, and radio trigger settings are important considerations when using rim lighting.
- Careful attention must be paid to the placement of lights to avoid lens flare.
- With experimentation and attention to detail, rim lighting can help you create striking portraits that capture the essence of your subject.
Related Articles
Ultimate Guide To The Different Indoor Studio Lighting Setups!
Learn about all the different lighting patterns for portraits and see 18 basic lighting setups. Check out this helpful article here on our site.