After the Key and Fill, the third light to consider using is the Kicker, sometimes known as a Separation Light. This would be the next light to introduce, should it be deemed necessary, to complete the classic three-light setup.
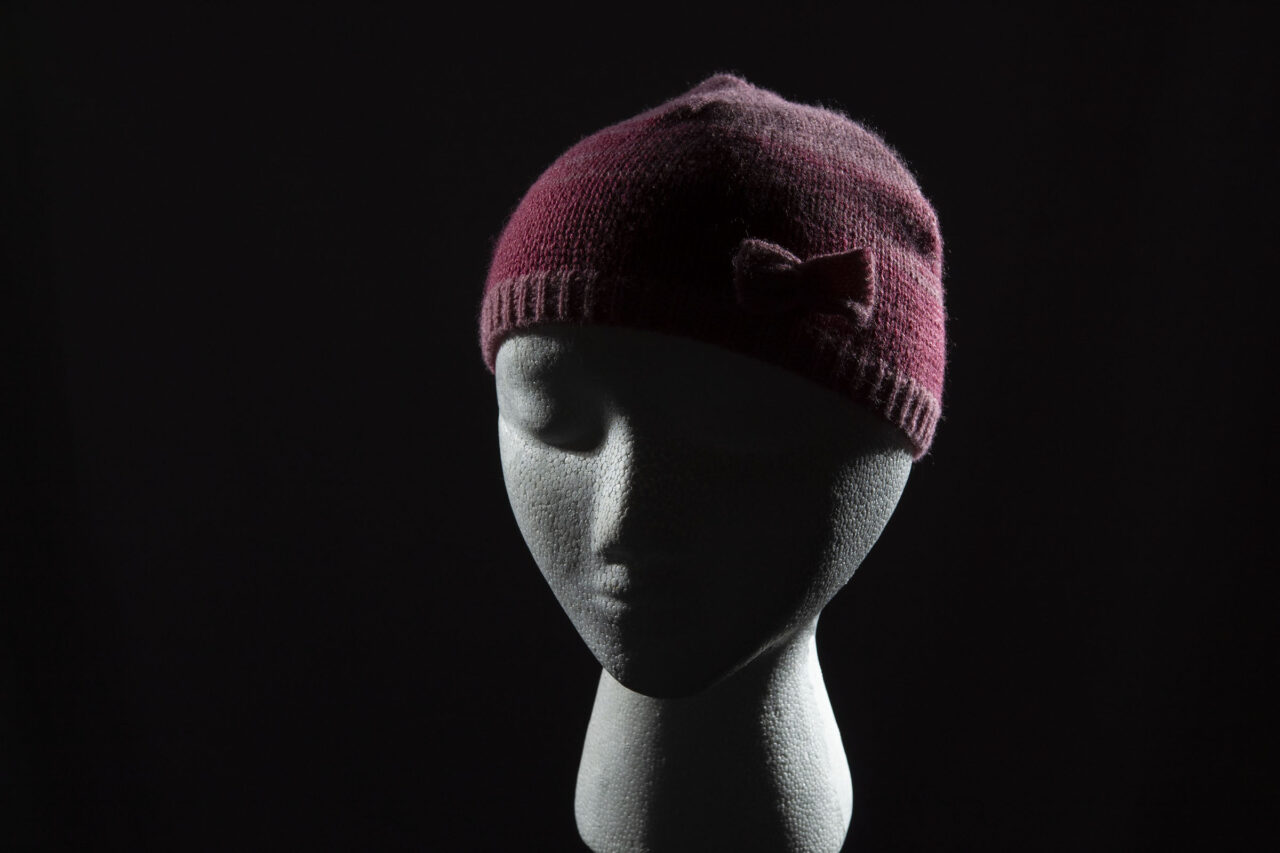
The Kicker Light is a separation light that defines edges by highlighting them against a backdrop. Usually placed behind and to one side, it illuminates the edge of the subject directly. A kick of light is boosted into the scene from outside the frame adding sparkle and definition to edges.

(This post may contain affiliate links which means I may receive a commission (at no extra cost to you) for purchases made through links. Learn more on my Privacy Policy page.)
It can be seen that the Kicker can provide a useful boost to the edges of a subject to prevent it from merging into the gloom of an unlit backdrop. The following article will explore the use of the Kicker Light in more detail and explain when to use it, the types, the positions and the relative brightness.
Do You Need a Kicker Light in Studio Photography?
It won’t always be necessary to introduce a Kicker into the mix of lights for a particular setup. If we want a dramatic, mysterious image with strong contrast and shadows we can omit the use of the kicker to highlight the edges. In this case, we may want the edges to remain undefined and blend into the dark shadows to add mystery and intrigue.
If we already have some other type of separation such as a backdrop light pointing backwards to illuminate the wall behind the subject, it may not be necessary to employ a Kicker. The Backdrop light will effectively allow the darker edges of the subject to be revealed as a silhouette against the brighter background.

Photo by Oscar J Harper
“As an Amazon Associate, I earn from qualifying purchases.”
Check out the latest Canon DSLR cameras on Amazon US here.
Check out the latest Canon DSLR cameras on Amazon UK here.
There may already be a good degree of contrast between the subject and the background such as white clothing against a black backdrop or dark coloured clothing against a light background. For head and shoulder shots, we may be photographing blond hair against a dark backdrop or dark hair on a white background. In that case, we may be able to forego using a Kicker unless we want to add interest with a sparkly edge or make the hair shine.

What is The Effect of a Kicker Light in Studio Photography?
The use of the Kicker can inject a boost of apparently stronger light to particular edges to add interest with a bright glimmer to the fringes of the composition. The fortunate side effect is that the rims of the subject also become visibly separated from the backdrop. This helps to create a sense of three-dimensional form and space between the subject and the background.
When used on the same side as a Key or Fill Light, the Kicker can add a brighter back edge to an already illuminated side of the face. It Kicks up the intensity of the light in a particular area. This sets up multiple layers of varying illumination to add interest and twinkle to the composition.

Photo by Oscar J Harper
Depending on the width of the Kicker edge light, it can begin to sculpt out and define the facial features such as the cheekbones and jawline.

This degree of complexity may not be necessary for all photographic setups but it’s a useful lighting tool to have knowledge of for future projects.
What Can I Use as a Kicker Light in Studio Photography?
“As an Amazon Associate, I earn from qualifying purchases.”
Check out the Godox products I use, on Amazon US here.
Check out the Godox products I use, on Amazon UK here.
We can use flash or constant lights for the Kicker provided the other lights in the setup are the same type. Mixing flash and constant lights could be problematic at flash sync shutter speed as the flash will tend to overwhelm the constant lights so they no longer make a contribution to the overall lighting scheme.
At the right angle, we could use the powerful light of the sun, pouring in through a studio window as a kicker. We could then use a flash as the Key Light on the dark side of the subject, opposite the Sun Light.

Photos by Oscar J Harper
It may be possible to use a reflector as the Kicker if the Key and or Fill lights are in a favourable position to bounce light off it and set up a bright kicker edge. As the Kicker is usually a punchy accent light, it may be useful to try using the silver or gold foil reflectors as they produce a slightly harsher reflected light that could deliver the boosted Kick of light required.

Photos by Oscar J Harper
Where do I Put my Kicker Light in Studio Photography?
Usually, the kicker Light is placed behind and to one side of the subject, pointing back towards the camera. Be careful that it is not in-frame or causing any lens flares. Use a deep lens hood if necessary or apply a modifier to the light source to minimise the flares.
The Kicker can be placed on the opposite side of the Key Light, the same side or even both sides depending on our overall goal for the image. It may be necessary to feather the Kicker to minimise the spread of light on the side of the subject and condense it down to an intense edge of light.

Photo by Oscar J Harper
Feathering is the rotating of a light source off-axis to the subject to control the spread of light and place the light precisely where it is needed. It makes the light source appear smaller to the subject which produces a slightly harder light which is ideal for a Kicker.
If the Kicker is placed on the same side as the Key Light, some say that this looks more natural but to perform the role of a Kicker it should appear to be more intense and concentrated than the broader wash of the Key Light.

If it is placed on the opposite side to the Key Light it will take on the role of an intense Separation Light that defines the edge of the subject in a narrow band of accent highlight against the backdrop. The width of the highlight band will depend on the degree of feathering. The more off-axis the feathering, the narrower the band of accent light for the Kicker.
Be careful as we feather the lights by turning them away from the subject that we don’t start to illuminate elements that we don’t want to, such as the background, floor or ceiling. This could have the effect of allowing light to bounce around off reflected surfaces and reduce our control over the exposure and composition.
How Bright Should The Kicker Light be?
The Kicker often appears brighter than the Key or Fill lights even if they are set to the same power. This may be because of the shallow angle of incidence/reflection as the light source bounces off the subject and is received more directly by the camera sensor.

It seems to be a popular option to make the Kicker appear as a brighter, more intense accent strip to the edges of the subject. This seems to add an interesting extra dimension contrasting with the mid-tones of the Key Light and the gloomy shadows where there is no light. It seems to lift the whole composition by adding sparkle.
A particularly interesting layering is when we have the Key and the Kicker behind the subject and the resulting illumination is separated by a central band of dark shadow. Effectively like using two Kickers. This time I made the Kicker on the right of the image 2 stops brighter than the Key on the left as it was feathered away from the subject.

A Hair Light could be said to be a Kicker for the top of the head. These often appear brighter than the other lights as there could be a myriad of specular highlights directly reflecting the light source into the camera from the shiny hair.

What Type of Modifiers Are Best For The Kicker Light in Studio Photography?
Because the Kicker Lights are usually pointing back towards the camera an unmodified Flash unit could potentially cause unwanted lens flare as it strikes the front lens element directly.

A large softbox could be used as long as it is feathered sufficiently not to overwhelm the side of the subject with wrap-around broad light with no strong accent. In that case, it could be thought of as Back Lighting. Turning a large softbox away from the subject may cause too much light to fall on the backdrop which may not be your desired lighting plan.
Adding a soft grid to our large softbox would give us more control over the spread of light but could still allow backdrop pollution if feathered too far around. We could switch to a tall, thin strip box with a grid to help avoid light falling on the background, give us more precise control of Kicker output and eliminate problems of lens flare.

For more precise placement of the Kicker Light output, we could switch to a standard 7-inch reflector which would contain the spread of light and give a pleasing hard light for crisp, bright highlights. To take this control to the next level we can introduce a tight grid to the reflector.
The grids are aluminium, honeycomb discs about 10mm thick that spring fit onto the wide-open end of a 7-inch reflector. They are painted matt black to minimise distracting reflections and usually come in various different output angles such as 10°, 20°, 30°, 40°,50° & 60°.

Photos by Oscar J Harper
From my own experiments, measuring angles and doing a little trigonometry, it appears that the “degree number” refers to the total spread of the light cone. It is a little innacurate but close enough for our purposes.
Here’s a useful table to define the spread of light for the usual set of reflector grids:
| Grid Type (in Degrees) | Cone of Light Spread (in Degrees) |
| 10° | 10° |
| 20° | 20° |
| 30° | 30° |
| 40° | 40° |
| 50° | 50° |
| 60° | 60° |
For a really tight beam of light, we could move to a Snoot. This is an aluminium tube, painted matt black that tapers down to a narrow opening from a wider end that accommodates the flash head. We can even add a grid to this for the ultimate control over the light beam. These are great for picking out a very specific element to be highlighted.

Related Articles
Ultimate Guide To The Different Indoor Studio Lighting Setups!
For a comprehensive look at all the different types of principal lighting positions and 18 studio lighting setups, check out our illustrated guide right here in Photography Skool.