There can be many lights used in a studio lighting scenario to create the perfect image. Each has its own particular function and they can vary in power, position and colour. One light is crucially important, however; It is the light source that defines the basic form, shadow and composition of the subject. It’s the foundation upon which the other supporting lights are built. This is the brightest of a set of studio lights and is known as the Key Light.
The key light in photography is the principal light source that defines the overall lighting, form and mood of the composition. It is often supported by additional lights of lesser power or in strategic positions to improve the balance of contrast, shadow detail and separation from the background.

Being the Key light implies it is the most important light amongst a group of lights working together, therefore we will assume that a Key Light is never the only light in a studio setup. Let’s take a more detailed look at the role of the Key Light, the types, brightness, positions, set-up and supporting lights.
What Can I Use as a Key Light?
In the carefully controlled environment of a studio, it should be possible to use almost anything as the Key Light. From a constant light source to a strobe flash head or Speedlite. It has to be the dominant light source that does most of the work of setting the scene and defining the photographic outcome.
A constant light source could be an LED light, tungsten light or a fluorescent lamp. The great advantage of these is that we can see the effect and outcome immediately without taking a photo and it is easier to arrange the composition. The other advantage is that we can use the cameras built-in light meter in real-time to accurately set the exposure based upon your creative choices of Aperture and Shutter Speed.

One disadvantage, if we are shooting in colour, might be that there could be a colour cast on our photos if we forget to set the White Balance to the correct colour temperature or light source in camera. The White Balance can be corrected in post-processing but becomes more difficult if you are using several different types of light sources with different colour temperatures.
A flash burst can be provided by a studio strobe or an off-camera Speedlite flash-gun. These lights can be triggered by radio signals from a transmitter fixed to the hotshoe of the camera. Unless we have studio strobes with a modelling light we won’t be able to see the effect of the light until we take a photo and review it. This means that there will be a little trial and error until we perfect the setup.

The advantage of using flash lights is that they are generally more powerful than constant lights which means we have the option of using smaller apertures to improve the depth of field. We will also be able to use lower ISO settings such as the base ISO of our camera which could be as low as 100 or 50. This will ensure high-quality results with very little noise.
Professional studio strobe lights are more powerful than Speedlites and so probably offer the greatest flexibility as our Key Light and secondary lights.
How Do We Set up For a Key Light Photo?

This is where we decide the overall mood and composition of our photograph. The Key Light will do the lions share of defining the main shadows and highlights so it’s important to get it right. There are a few things to consider when setting up for a Key Light Flash Photograph:
- What position should the Key Light be in?
- How bright should the key light be?
- What are the supporting lights to the Key Light?
- What are the camera settings for a Key Light photo?
- What are the flash settings for a Key Light Photo?
What Position Should The Key Light be in?
This is a subjective concern and depends upon the overall nature of the desired images. The Key Light is usually placed in front of the subject at some angle around it or perpendicular to it. The height is variable from almost overhead down to ground level. The rotational position combined with the height produces an almost unlimited variation of possible shadow compositions and light modelling details.
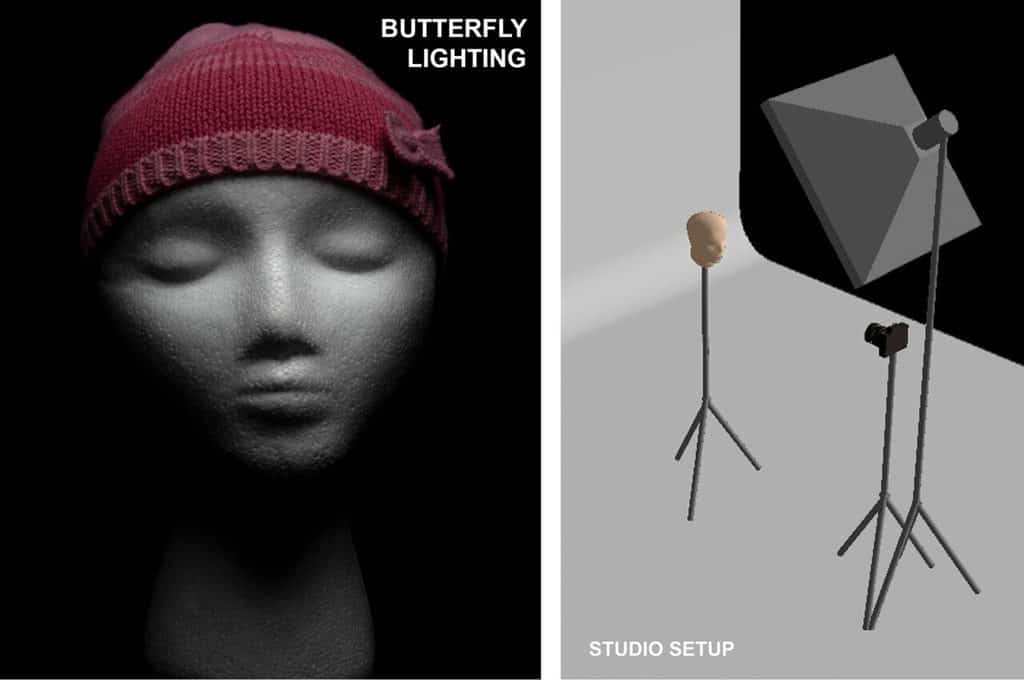
For the most flattering, softest lighting the Key Light should be placed directly in front of the subject. This will produce a fairly flat and shadowless result that softens skin texture. From this frontal position, as we raise the light up and tilt down to the subject we start to see a symmetrical shadow developing beneath the nose and this is known as Butterfly lighting due to the shape of the shadow. This is a classic setup used to photograph Hollywood stars in the early 20th century and often used hard lights and became known as Paramount Lighting after the Studio.

If we drop the light down low and tilt up towards the model we see an unflattering shadow pattern with darkness above the nose and in the eye sockets. This looks unnatural and would be best applied to horror or Halloween projects.
From here, if we raise the light back up to about 30 degrees above the subject and start to rotate it around to the left or right, like on a clock face, we will start to see a shadow developing on the side of the nose. The first established shadow pattern that we see is known as Loop Lighting and occurs at approximately 30 degrees (but could vary) from the frontal position. This is where the nose has a shallow shadow on one side that loops around the bottom of it but doesn’t reach the top lip. This is still very flattering but begins to add some drama and depth to the subject.

Rotating further around in the same direction to approximately an angle of 45 degrees we arrive at the next established lighting setup and this is called Rembrandt Lighting. This has a distinctive dramatic shadow pattern. The nose shadow joins with the cheek shadow and leaves a triangle of light beneath the eye on the dark side of the face.

For very dramatic shadows we continue rotating the light around the subject to 90 degrees ie perpendicular to the head and body and we see what is known as Split Lighting. Half the face is lit and the other is in deep shadow. This is extremely dramatic but can result in unflattering texture as the light source is parallel to the front face plane.

If we continue to rotate the Key Light around the subject it will now be behind it and may take on the role of a Separation Light, Back Light or a Rim Light. If the light is still the most powerful and dominant source and defines the intended outcome of the image, it may still be considered as the Key Light. The supporting lights should of course be less powerful and have less impact on the concept than the defining key light.
How Bright Should The Key Light be?
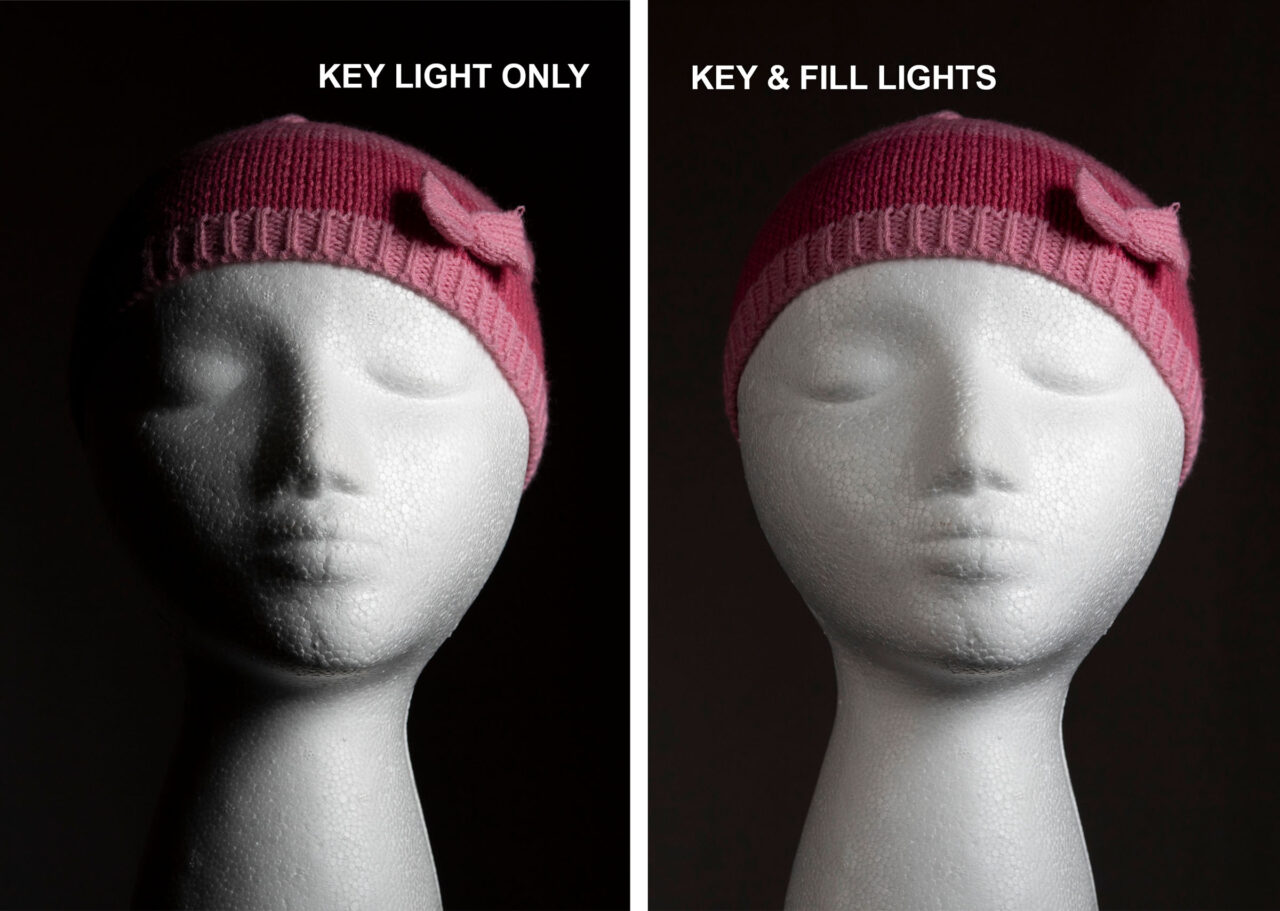
Again, this is a subjective consideration and is also dependent upon the mood of the photograph we want to produce. In order to fulfil the role of a Key Light, it should be the brightest, most prominent light in the group. It should be the light that does the most work in defining the main highlights and shadows on the subject. We know it should be brighter than the supporting lights so a good rule of thumb for a well-balanced, fairly low contrast composition in a portrait would be to have a ratio of 2:1 brightness for Key to Fill light.

This ratio would provide a pleasing balance of contrast between the bright and dark sides of the subject and some depth, 3-dimensional modelling to prevent the composition from looking too flat. This is quite a subtle contrast but to make the transition even softer you could decrease the ratio closer to 1:1, at which point you have a very flat, shadowless lighting setup. This would be appropriate in High-Key photographs.

If we go the other way and increase the ratio between Key and Fill lights, you begin to introduce some drama, contrast and shadows. This would be very appropriate as the basis for Low-Key photographs. If we push the ratio into the high contrast side while still maintaining some degree of Key and Fill lighting most Speedlites and Strobes would be able to achieve high ratios of over 32:1, 64:1 or higher. This would give a very dramatic, moody result if that was the desired outcome.

What Are The Supporting Lights to The Key Light?
There are several supplementary lights that support the output of the main Key Light and indeed, allow it to become the Key Light in a group:
Fill Light – This is often placed on the opposite side to illuminate the deepest shadows that were created by the key Light. It will have less power than the Key or be placed further away from the subject. This helps to lift some detail out of the dark shadows while retaining some 3-dimensional depth to the form.
Separation Light – Sometimes called the Kicker Light as it kicks in light from behind and to the side to help define the boundaries of the subject particularly when the subject is a similar tone to the backdrop. This ensures that the main subject is separated from merging into the backdrop with well-defined, crisp edges.

Hair Light – This is a specialized type of separation light that is placed above and behind the subjects head. It lifts the hair from the backdrop and adds shine and detail to the edge of the head. We can pick out a particular area of the hair with a Snoot or highlight the whole top of the head and shoulders with a wider softbox or umbrella.

Backdrop Light – Sometimes called a Spray Light or Halo Light, this is another type of separation light but points away from the subject and illuminates the backdrop instead. It is particularly useful if the subject’s Key Light creates deep shadows on one side as it places a pool of light on the backdrop that allows the silhouette to be revealed.
What Are The Camera Settings For a Key Light Photo?
In the studio, we would preferably use Strobes or off-camera Speedlites for maximum power and versatility. Therefore:
- Set the Shutter Speed to the flash-sync speed of 1/200th or 1/250th.
- Set the ISO to 100 for high quality, noise-free images.
- Set the Aperture to achieve the depth-of-field desired:
- (F1.8 for razor thin depth-of-field and F8 for everthing on your subject in focus).
We can hand-hold the camera as the shutter speed is quite fast or use a tripod if you prefer.

What Are The Flash Settings For a Key Light Photo?
We will most likely be using two or more off-camera flashes so we will require a radio trigger mounted on the hotshoe of the camera. Take a test shot with the Key Light only first, to establish the correct exposure with your camera settings. If the exposure is too dark or too bright, adjust the power of the Key Light flash accordingly.

Now, introduce your first supporting light ie Fill or Kicker. Set the power of this below the power of the Key Light, and take a test shot with both flashes firing and review the result. Is the Fill light producing the desired detail and contrast on the shadow side? If not, adjust the power of the Fill Flash and try again?
Continue this process with the third and possibly fourth supporting lights until the overall desired lighting setup is achieved.

Related Articles
Ultimate Guide To The Different Indoor Studio Lighting Setups!
For a comprehensive look at all the different types of principal lighting positions and 18 studio lighting setups, check out our illustrated guide right here in Photography Skool.