This is the complete guide to the use and connection of the Yongnuo YN660 flash to the Yongnuo YN560-TXii remote radio trigger flash controller. They are perfectly compatible and can help you create more dramatic lighting scenarios using multiple flash units with different settings all controlled remotely and wirelessly.

Yongnuo YN660 Speedlite Flash Description And Specifications
The Yongnuo YN660 Speedlite, Manual flash is a very capable and affordable flash for photography. It can be used directly attached to the hot-shoe of a camera or used remotely off-camera for more creative lighting set-ups. It can be triggered by the hot-shoe itself, or as a flash slave triggered by other flashes or it can be fully controlled remotely by a radio trigger attached to the cameras hot-shoe.

It has a guide number of 66 (GN66) which means it will produce a good exposure at a distance of 66 metres with the following settings:
- ISO 100 (on camera)
- Aperture F/1 (on camera)
- Flash Zoom 199mm (on flash)
- Flash Power 1/1 (Full Power on flash)
Note: Guide Number: GN = F number x Distance
This is a marked improvement in power over its predecessor YN560-IV which had a guide number of GN56.
The Other Important Specifications YN660 Speedlite
- 2.4 GHz Wireless Radio System (100m range without obstructions)
- Acts as Master to YN660 & YN560 flash units and RF603 receiver systems
- Can control up to 6 groups of the above-mentioned flash units
- 16 radio channels to choose from
- Acts as a Slave to YN560-TX, YN560-TXii, RF603, and RF602 systems
- Flash power control from 1/1 to 1/128 in 1/3 EV steps
- Instant sync and skip-preflash optical slave modes
- Zoom Range: 20-199mm (14mm with Diffuser Panel)
- Tilting Head from -7 to 90°
- Rotating Head 360° (180° in either direction)
- Locking clamp hotshoe foot
YN660 Speedlite Control Buttons And Rear Panel Explained

- (A) Flash Head –
- The flash head can tilt from +90 degrees to -7 degrees.
- It can also rotate 360 degrees, 180 degrees in either direction.
- (B) Group Identification Label –
- This is something that I attached to each Speedlite to help me identify, from a distance, which Group each flash is in.
- Useful if you have multiple Groups.
- (C) Wireless Link Indicator Light –
- Blue indicates that the flash unit is communicating with the radio controller or another flash unit.
- Red means, when in TX (transmitter) mode it is transmitting a trigger signal to another flash that is in RX (Receiver) mode.
- Purple means it is receiving a trigger signal from a radio controller or another flash that is in TX (transmitter) mode.
- (D) LCD Screen – This is where you can view all the relevant flash control information:
- Flash Mode.
- (M) – Manual – Single flash mode.
- (Multi) – Strobe – Multiple rapid flashes.
- (- -) – Off – Set flash Not to fire.
- Trigger Mode.
- (TX) – Sets the flash as a master transmitter controller for other flashes (YN560iii, YN560iv, YN660) or other wireless triggers (RF602, RF603ii, RF605).
- (RX) – Sets the flash to Receiver mode (Radio Slave). It can now be controlled by another:
- YN660 flash that is set to TX trigger mode.
- YN560iv flash, set to TX trigger mode.
- YN560-TX wireless radio trigger.
- YN560-TXii wireless radio trigger.
- RF602, RF603(ii) & RF605 triggers.
- (S1) – Instant sync Optical Slave mode.
- Triggered by a master flash on-camera.
- Rotate the body of the remote flash to face the sensors towards the master flash.
- Multi strobe flash cannot be used in this mode.
- (S2) – Pre-flash cancel, Optical Slave mode.
- Like the S1 mode but it can ignore the pre-flash that occurs for focussing, TTL or anti-redeye before being triggered by the main on-camera flash.
- Beep sound indicator.
- This can be turned on or off.
- Flash Power.
- From full power (1/1) to (1/128th) power.
- Number of flashes per burst. (in Multi (Strobe) Mode))
- Strobe flash frequency (Hz – Cycles per second)(in Multi (Strobe) Mode)).
- Channel and Group Numbers.
- Choose a channel from 1 to 16.
- Select a group from A to F (there can be multiple flash units in each group).
- Flash zoom settings.From 20mm to 199mm.
- Note: When controlling the flash with the YN560-TXii, zoom control is limited to 24mm to 105mm.
- Flash Mode.
- (E) – Trigger mode button –
- TX (Radio Transmit).
- RX (Radio Receive).
- S1 (Optical Slave).
- S2 (Optical Slave – ignore pre-flash).
- (F) – Backlight/ Beep button –
- Press once to backlight the scene for a short period in low light.
- Press and hold to enable/ disable the beep sounds.
- (G) – Flash Mode button –
- (M) – Manual – Single flash mode.
- (Multi) – Strobe – Multiple rapid flashes.
- (- -) – Off – Set flash Not to fire.
- (H) – Charging Light/ Test Button.
- Red Light – Flash head is fully charged and ready to shoot.
- Blue Light – Flash head is recharging, wait for a red light.
- Test Button – When it is red, press to make a test flash.
- (I) – Foot Locking Lever –
- Securely clamps and locks the flash unit onto a camera hotshoe or light stand with a hotshoe fitting.
- (J) – Group/ Channel Button –
- Press once to access the Group settings. (Rotate the selection dial to change the Group from A to F).
- Press and hold to access the Channel settings. (Rotate the selection dial to change the Channel from 1 to 16).
- Press the “Set” button to confirm the choice.
- (K) – Zoom/ Function Button –
- Press once to access the flash zoom settings. (Zoom number starts to flash, rotate the selection wheel to change the zoom from 20mm to 199mm).
- Press the” Set” button to confirm the choice.
- Press and hold to get into the advanced function settings.
- Once in, rotate the selection wheel to cycle through the advanced settings.
- Press the central “Set” button to select a function to change.
- The function starts to flash.
- Rotate the selection wheel to alter the setting.
- Press the central “Set” button to confirm the change.
- SL – Sleep power saving mode – on or off.
- SE – Stand-by then Shut-down – choose different timings.
- 3 & 30 minutes
- 15 & 60 minutes
- 60 & 120 minutes
- 00 & 120 minutes
- Sd – In S1/S2 trigger mode, Shut-down.
- 30/60/120 minutes.
- Sd – In RX trigger mode, Stand-by then Shut-down.
- 5 & 30 minutes.
- 15 & 60 minutes.
- 30 & 120 minutes.
- 00 & 120 minutes.
- lcd – LCD backlight display duration.
- 7, 15 or 30 seconds.
- So – Sounds, on or off.
- Inc – Increments of flash power control.
- 0.3 increments
- 0.5 increments
- 0.3, 0.5, 0.7 increments.
- rF – Choose communication mode.
- RF 603
- RF 602
- Gr – In TX trigger mode, Choose how many Groups to make available.
- A LL (All groups available for control)
- A (Group A only available)
- Ab (Groups A & B only available)
- Ab c (Groups A,B & C only available)
- Cl – Clear all settings back to factory settings.
- U – Version of installed software.
- (L) – On-Off switch or Lock to disable the keys whilst leaving the unit switched on.
- (M) – Spinning selection wheel –
- Used for choosing various settings and functions.
- (N) – Set/ OK button –
- Used to confirm various actions and decisions.
- When in Multi mode:
- Press once to access the Number of strobe flashes per burst.
- Press again to access the Strobe Frequency panel (Hz).
- Press once more to confirm selections.
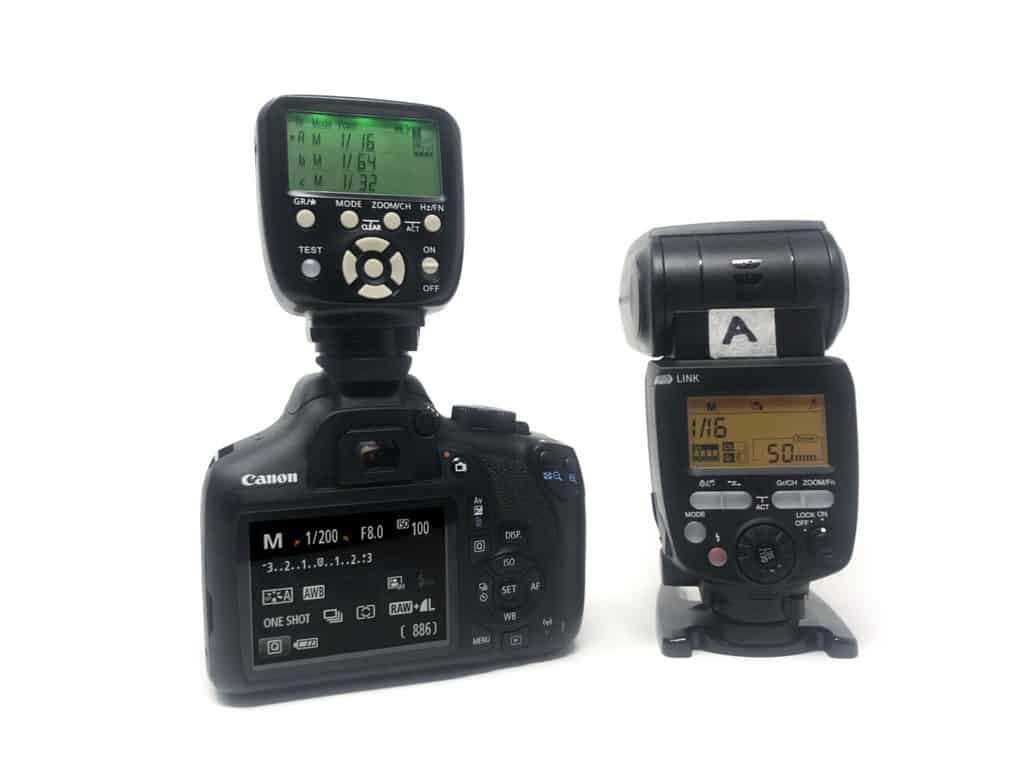
Yongnuo YN560-TXii Radio Flash Controller Description And Specifications
The YN560-Txii flash trigger is a radio transmitter that can control up to six different groups of Speedlite flashes with different settings. It is totally compatible with the YN660 flash and can remotely control the flash power, flash zoom and whether to produce single or strobe bursts. It also has 16 radio channels to help avoid interference from any nearby radio transceiver equipment.

- 2.4 GHz Wireless Radio System (100m range without obstructions)
- Acts as Master Controller to YN660 & YN560 flash units and RF602, RF603, RF603ii receiver systems
- Can control up to 6 groups of the above-mentioned flash units
- 16 radio channels to choose from
- Flash power control from 1/1 to 1/128 in 1/3 EV steps
- Zoom Range control: 24-105mm
- Max range: approximately 100m
- Locking clamp hotshoe foot
- Remote 2.5mm shutter release port
- Battery: 2 x AA batteries (alkaline or rechargeable Ni-MH)
- Standby time 120 hrs
- Size: 65.5 x 89 x 42mm
- Weight: 80g (excluding batteries) 125g (with batteries)
YN560-TXii Controller Buttons And Rear Panel Explained

- (1) LCD Screen – This is where you can view all the relevant flash control information:
- (Gr) – Groups
- Groups A, B & C visible on screen or
- Groups D, E & F visible on screen
- (Mode) – The form of flash control for each different group
- M, Multi or (–)
- (Power) – Flash power for each different group
- 1/1 (Full Power) to 1/128th
- Battery charge indicator
- (Ch) – Channel indicator
- 1 to 16 channels
- (Zoom) – Flash zoom indicator for each different group visible after pressing the ZOOM/CH button
- 24mm to 105mm
- (Multi) – (Only visible in Multi-Mode for any particular group)
- Number of flashes per burst.
- Strobe flash frequency (Hz – Cycles per second)
- (Gr) – Groups
- (2) MODE Button – The form of flash control for each different group
- (M) – Manual – Single flash mode.
- (Multi) – Strobe – Multiple rapid flashes.
- (- -) – Off – Remotely set flash Not to fire.
- (3) Group Selection Button – (GR/*)
- Press once to change Group
- Press and hold the (GR/*) to access groups D, E, F.
- Press and hold again to go back to groups A, B, C.
- (4) TEST Flash Button –
- Press to wake the flash units
- Press to test flash all the active flash units
- (5) Up/Down Left/Right Control Buttons –
- Used for changing various settings and functions.
- (6) Zoom/ Channel Button – (ZOOM/CH)
- Press once to flip between Zoom and Power selections
- Press and hold to enter the Channel selection panel
- (7) Frequency/ Function Button – (Hz/FN)
- (In Multi Mode) Press once to enter the Flash Strobe Frequency (Hz) panel
- Use the direction keys to change the frequency (Hz)
- Press once more to enter the Number of flashes per burst
- Use the direction keys to change the Number of flashes
- Press the Set/OK button to confirm your selections
- Press and Hold to enter the advanced function menus
- Press the Up & Down keys to cycle through the functions
- (01 60 3) – Communiation Mode
- Press Left & Right to change the number (3 or 2)
- (02 PA 9E) – Group Page Option
- Press Left & Right to switch On & Off
- (03 9P) – Number of active groups
- Press the Left & Right Keys to change the number of active groups
- (c) – Groups A,B & C
- (cd) – Groups A,B,C & D
- (cde) – Groups A,D,C,D & E
- (cdef) – Groups A,B,C,D,E & F
- Press the Left & Right Keys to change the number of active groups
- (01 60 3) – Communiation Mode
- Press the Up & Down keys to cycle through the functions
- (In Multi Mode) Press once to enter the Flash Strobe Frequency (Hz) panel
- (8) On/ Off Switch –
- (9) Set/ OK button –
- Used to confirm various actions and decisions
- (10) Foot Locking Lever –
- Securely clamps and locks the controller onto a camera hotshoe.
How Do You Connect YN660 Flash to YN560-TXii Radio Trigger?
This is the method to set set up remote shooting of the YN660 Speedlite wirelessly for more creative lighting. Place the flash, on a stand or clamp, in the desired location and switch on. Place the YN560-TXii directly into the hot-shoe of the camera, switch on the camera then switch on the TXii trigger. See below for the connection procedure:
To connect YN660 to YN560-TXii set both to the same communication mode (RF602 or (RF603 the default)). On the Flash, set Trigger Mode to RX (Receiver) and set the Group (A-F). Set both to the same channel (1-16). On the YN560-TXii, set the Group to match the Flash then adjust Flash Power and Zoom.
Let’s break this down into detailed illustrated steps to help get you started on connecting the flash unit to the radio trigger:
- Select the Communication Mode: On the back of the flash unit, hold down the ZOOM/Fn button. This takes you into the Function menus.
- Rotate the wheel until you see (rF 60 3)
- Press the Set button and the last number will start to flash
- Rotate the wheel to switch between 2 and 3 (3 is the default for RF 603)
- Press the Set button to confirm

- Select the Trigger Mode: On the back of the Flash unit, press the Trigger Mode button (it looks like a lightning bolt), until it cycles through to RX (Reciever mode).

- Select the Group: On the Flash control panel press the Gr/CH button once, the Gr panel will start flashing.
- Rotate the selection wheel until the desired Group is showing (A-F)
- Choose “A” if you only have one flash unit to connect
- Press the Set button to confirm

- Select the Channel: On the back of the Flash unit, press and hold down the Gr/CH button, the Ch panel will start flashing.
- Rotate the wheel until the desired Channel is showing (1-16)
- Choose “1” to start with
- Press the Set button to confirm

- Select the Channel: On the back or the YN560-TXii trigger, press and hold down the ZOOM/CH button, the Ch panel will start flashing.
- Press Up & Down keys until the desired Channel is showing (1-16)
- Choose “1” to start with
- Press the Set button to confirm

- Select the Group: On the back of the TXii trigger, press the GR/* button and it will cycle through the Groups.
- Stop when it lands on the same Group as the Flash Group setting.
- To view Groups D,E,F, press and hold the GR/* button.
- Press and hold GR/* button to return to Groups A,B,C.

- Select the Flash Power: With the relevant Group selected, on the back of the TXii trigger,
- Press the Left & Right buttons to cycle through the Flash Power settings by 1 full Stop.
- Press the Up & Down buttons to cycle through the Flash Power settings by 1/3rd Stop.
- Stop when you have selected the desired Flash Power (1/1 – 1/128th)
- Choose a mid-range power to start with – 1/16th. (Using the flash at full power for long periods will cause longer recycle times and can overheat the flash head)

- Select the Flash Zoom: On the back of the trigger, press the ZOOM/CH button once.
- Press the Up & Down keys to cycle through the zoom options. (Choose a mid-range to start with – 50mm)
- Press the ZOOM/CH button once more to return to Flash Power options.

How Do You Take A Flash Photo With The YN660 Speedlite Connected To YN560-TXii Radio Trigger?
Now you are ready to take a remote, wirelessly controlled flash photograph. Place your subject or model in position and set your flash up on a stand or clamp in a position to provide flattering light; usually in front of, slightly above and to one side of the subject.
To take a photo with YN660 connected to YN560-TXii set both to RF603, Group A and Channel 1. On the Flash, set Trigger Mode to RX. On the trigger set the power to 1/16th, set the zoom to 50mm. Set the camera to Sync shutter speed, F8 & ISO 100. Shoot and review. Adjust the power or zoom as required.

Let’s look at this process in a little more detail:
Connect the Flash and the Trigger as detailed in the “How do you Connect” chapter above.
Set your exposure in the camera; remember that the YN660 Flash is a manual unit and there is no ETTL function so there will be a little trial and error to find the perfect settings.
- Start with a mid-range aperture (F8 – F11) to achieve a good depth of field on the subject.
- Select your camera’s flash sync speed (1/60, 1/200 or 1/250)
- Choose a low ISO (100) to keep noise to a minimum.

With your camera hand-held or on a tripod, focus the subject and go ahead and take the first picture. The flash should fire remotely as it is triggered by the YN560-TXii controller at the desired flash power and zoom.
Take a look at the results and decide if there is any need for adjustment of the settings:
If the image is too dark, using the YN560-TXii controller, increase the power by 1 Stop to 1/8th power, then try again. If it looks overexposed, do the opposite.
Note: You can fine-tune the flash power by 1/3rd increments by pressing the Up or Down buttons instead of the Left & Right Buttons

The other aspect to check is the light fallout:
If there is too much light striking the back drop you could consider narrowing the beam of light from the flash head by adjusting the zoom to a longer focal length.
Note: You may need to adjust the flash power if you change the zoom range as more light will be focussed into a narrower beam.
Alternatively, try repositioning or rotating the flash unit so that it strikes the subject more from the side and misses the backdrop.

How Do You Take A Flash Photo With Multiple YN660 Speedlites Connected To YN560-TXii Radio Trigger?
This is a great feature of the YN560-TXii; the ability to connect and control many multiples of flash units wirelessly and have them all sync at the exact time of shutter release. It can add a very professional, studio look to your photographs.
To take a photo with Multiple YN660s and YN560-TXii set all to RF603 & Channel 1. Set each flash to a different group. Set all flashes to Trigger Mode RX. On the trigger set the power & zoom of each flash. Set the camera to Sync shutter speed, F8 & ISO 100. Shoot and review. Adjust as required.
Now, let’s break this down into detailed illustrated steps to help get you started on connecting multiple YN660 flash units to the YN560-TXii radio trigger.
Let’s assume you have Three YN660 Speedlite Flash Units. It would be useful to mark them up with individual stickers A, B & C.

- Flash Unit Settings (YN660’s)
- Using the methods explained above in the “How do you Connect” chapter, set each flash unit to the same Communication mode: RF 603, this also matches the Flash Trigger setting.
- Now, set all three Flash Units to the Trigger Mode of RX (Radio receiver mode).
- For maximum flexibility of control, it is best to put each Flash Unit into a different group. Set each Flash Unit to the Group that matches the sticker you applied earlier, A, B or C.
- Set each Flash Unit to the same Channel, Choose Channel 1 to start with.
- Radio Trigger Settings (YN560-TXii)
- Make sure the Communication Mode on the YN560-TXii trigger is also set to match the Flash Units, RF 603.
- Also make sure the Channel is the same as all the other Flash Units, Channel 1.
- Now you have to decide the role of each Flash Unit. The following assignments have a logical flow:
- Group A Flash – Key light (main illumination Flash Unit placed in front of and to one side of the subject).
- Group B Flash – Hair light or Rim light (placed behind and on the opposite side to the Key light).
- Use a snoot if you have one to control the spread of light.
- Group C Flash – Backdrop light (placed facing the background, behind the subject)

- On the YN560-TXii trigger, select the Flash Power and Flash Zoom for each Flash Group:
- Press the GR/* button until you land on Group A (Key Light)
- Press the MODE button until you land on M (Manual)
- Press the Left & Right buttons until you reach the desired Flash Power
- Choose 1/16th to start with.
- Press the ZOOM/CH button
- Press the Up & Down keys to select the flash zoom
- Choose 50mm to start with
- Press the ZOOM/CH button once more to return to Flash Power Panel
- Press the GR/* button once more until you land on Group B (Hair Light)
- Press the MODE button until you land on M (Manual)
- Press the Left & Right buttons until you reach the desired Flash Power
- Choose 1/64th to start with
- Press the ZOOM/CH button
- Press the Up & Down keys to select the flash zoom
- Choose 80mm to start with
- Press the ZOOM/CH button once more to return to Flash Power Panel
- Press the GR/* button once more until you land on Group C (Backdrop Light)
- Press the MODE button until you land on M (Manual)
- Press the Left & Right buttons until you reach the desired Flash Power
- Choose 1/32nd to start with
- Press the ZOOM/CH button
- Press the Up & Down keys to select the flash zoom
- Choose 24mm to start with
- Press the ZOOM/CH button once more to return to Flash Power Panel
- Camera Settings: Set your exposure in the camera; remember that the YN660 Flash is a manual unit and there is no ETTL function so there will be a little trial and error to find the perfect settings.
- Start with a mid-range aperture (F8 – F11) to achieve a good depth of field on the subject.
- Select your camera’s flash sync speed (1/60, 1/200 or 1/250)
- Choose a low ISO (100) to keep noise to a minimum.

You can now go ahead and take your first photo with three wirelessly controlled Flash Units. As the shutter speed is quite fast you can hand-hold the camera or use a tripod. Focus on the subject and then take the first photo. All three Flash Units should fire remotely at the various flash power and zooms.
The chances that everything will be perfect on the first attempt in unlikely….. possible but unlikely.

Key Light – 1/16th Power
Hair Light – 1/64th Power
Backdrop Light – 1/32nd Power
Review the result and make small changes before trying again. If the depth-of-field looks fine then leave the Aperture setting. The YN560-TXii Trigger gives you full control over all three Flash Units without having to step away from the camera. Use it to tweak the Flash Power and Zoom of the Three Flashes.

Key Light – 1/32nd Power
Hair Light – 1/128th Power
Backdrop Light – 1/128th Power
Note: Don’t forget, you can fine-tune the flash power by 1/3rd increments by pressing the Up or Down buttons instead of the Left & Right Buttons
With a little trial and error, tweaking the Flash Units with the remote control on the trigger unit you should start to produce some very compelling, professional looking photographs like those of George Hurrell (1904-1992), Clarence Sinclair Bull (1896-1979) or Studio Harcourt (Paris 1934 – The Present)
Related Questions
What is a Snoot in Photography And How to Use it?
This is a light modifier that can be used with constant or flash lights in the studio. It has the capability of minimising the uncontrolled spread of light whilst focussing the light into a tight, controlled beam. There are some limitations though which you can read about in our illustrated case-study right here on Photography Skool.
How Do You Freeze Action in Photography, With or Without Flash?
It is possible to freeze action with a fast shutter speed or with a burst of flash. It is interesting to note that using a lower power of flash output results in an insanely fast flash duration; up to 1/20,000th of a second or faster. This is perfect for freezing the fastest of action events, provided the flash isn’t overpowered by the ambient light. You can read more about this fascinating type of photography right here on the Photography Skool website.
Ice Cube Splash Photography, How do You Achieve Pro Results on a Budget?
A very popular action-freezing technique to try and capture in photography but how do you achieve those very professional-looking results? I used the Speedlite and trigger discussed in the article above. Find out all the tricks and tips to successfully use the flash and trigger in our illustrated guide and video right here in Photography Skool.
How Do You Make Water Drop Photos With Pro Results on a Budget?
Using the flash and trigger described above, you can achieve some remarkably professional-looking Water-Drop photography on an affordable budget. To find out more about this captivating subject check out our fully illustrated article right here on this website.
What Are The Different Indoor Studio Lighting Setups? Ultimate Guide!
I used the Speedlites and trigger described in the above-written article to produce a multitude of different studio lighting setups as explained in this ultimate guide. You can use this guide to help you practice the 18 studio lighting setups based upon the 5 basic light positions and it’s all available right here on Photography Skool.