We’ve all seen those amazing drinks photographs with the splashes created by dropping ice cubes into a beverage. The splashes are perfectly frozen in time like polished liquid metal. How is that degree of sharpness achieved with such a fast-moving subject?
The secret is flash duration time not the shutter speed of the camera. The good news is that these amazing results can be achieved with a low budget set-up: entry-level DSLR, affordable Speedlite and radio trigger plus a simple kit lens.

What do You Need to Create a Professional Looking Ice Cube Splash Photograph on a Budget?
- A budget DSLR (entry level, like a Canon Rebel T6/1300D/X80) (or similar)
- A standard kit lens, like a Canon 18-55mm F3.5-5.6 (that probably came with your camera)
- A budget Speedlite, like a Yongnuo YN660 (or similar)
- An inexpensive radio trigger for the flash, like a Yongnuo YN560-TXii (or similar)
- An A3 sheet of gloss white plexiglass.
- Some acrylic ice cubes (they are perfectly clear and don’t melt away)
- A glass of water.

How do You Create a Professional Looking Ice Cube Splash Photograph on a Budget?
- Place a glass of water on the plexiglas.
- Place the speedlite lower than the plexiglas and poining away towards the back wall.
- Set the flash power to 1/32nd, initially.
- Set the camera on a tripod, focus on the front edge of the glass then switch to manual focus and reframe.
- Set the aperture to F8, shutter speed to 1/200th, ISO 100.
- Drop an ice cube into the glass of water and try and hit the shutter button just before it hits the water.
- If you have a remote shutter release, it would make things easier.
- Review the results and adjust the flash power to suit.
- Remember, the lower the flash power, the shorter the flash duration, the sharper the image.

Let’s take a more detailed look at the stages for setting up a pro-looking ice cube splash photograph:
The Budget Equipment
Camera
You could use almost any DSLR or Mirrorless camera but for the purposes of achieving an affordable set up I used a good, all-round entry-level DSLR, the Canon Rebel T6 (EOS 1300D in the UK, Kiss X80 in Japan).
You can pick these up for around $250 second-hand or new for around $500 with a kit lens (or something similar). The Rebel T6 has only an 18 megapixel, cropped sensor but as you will see it did a great job of capturing a sharp image.
Kit Lens
These are lenses that often come provided with the camera so you can start taking photos straight out of the box. They are not the highest quality glassware but they can produce great results on our budget setup.
I used the 18-55mm Canon kit lens F3.5-5.6. On a cropped sensor camera, applying the 1.6 crop factor, it effectively becomes a 28-88mm lens; still a good range for our splash photography.
Speedlite Flash
It would be advantageous to use an off-camera radio-triggered Speedlite flash for this type of splash photography. These can be very expensive if you choose those made by the usual camera manufacturers, often 3 to 5 times more costly than the budget options.
For this shoot I used the Yongnuo YN660 radio-controlled Speedlite which can be purchased for under $100. It can be triggered remotely via a radio signal trigger or as an optical slave to another flash. It has a full range of flash powers from full power to 1/128th and is therefore very controllable.
The lower flash powers produce a much shorter overall flash duration and therefore more ability to freeze the action and prevent any blurring during the splash photograph. So, think about the overall exposure settings to achieve a low-power flash shoot.
Flash Radio Trigger
You need a way to trigger the Speedlite flash remotely and I achieved this with a compatible trigger for the Yongnuo YN660 flash unit. I used the Yongnuo YN560-TXii radio trigger that can control up to six groups of flashes, each group with independent settings for flash power and flash zoom. It is a fairly inexpensive piece of kit, usually available for under $50.

To sync the flash trigger I set them both to Channel 1, you can choose from 1 to 16 channels (this ensures that you can choose a radio channel that is free from interference from any other local devices that may be using the same or adjacent radio channels).
Set the flash Speedlite to RX mode so that it operates as a receiver to be triggered by the radio trigger that operates as a transmitter.
After setting the Speedlite to Group A, you can then control all the settings in Group A by selecting that on the radio trigger. I selected the flash power of 1/32nd and the flash zoom of 24mm (wide angle) as the initial flash settings.
Props Required For The Shoot
The physical props required for the shoot are minimal and very inexpensive.
- Gloss White A3 Plexiglas sheet. ($10-$15)
- This should be glossy to produce a perfect mirror-like reflection of the glass (which adds a touch of sophistication to the finished image).
- Acrylic Ice Cubes. ($10-$15)
- These are perfectly clear plastic ice cubes with slightly irregular, rectangular shapes.
- They don’t melt or break or change size and they refract and transmit light better than real cubes.
- You can drop them over and over again during the shoot without detriment (all day if necessary).
- A Glass of Water. (No cost)
- This is the main subject of the photograph and you will probably have one in your cupboard.
- An interesting shaped glass will provide added interest to the photograph.
- A glass with an elegant stem always looks great in the reflection of the Plexiglas.

The Process
Setting Up The Scene

You will need to set up the Plexiglas sheet on a horizontal surface (small table or box) at a comfortable height, fairly close to a white wall or white sheet. Place the Plexiglas at the far edge of the stand so that the table is not visible through the viewfinder of the camera.
Place the glass in the centre of the Plexiglas sheet. (It is worth taking a little time to clean the glass to remove dust and fingerprints as this will minimise the post-process cleaning of the image).
Place a few ice cubes in the glass and fill it with water from a pre-filled jug (you’ll need to keep topping up the glass as you drop the cubes and splash the water out).

Setting Up The Speedlite Flash
You need to place the flash head on a stand, at a level below the level of the Plexiglas and facing towards the wall, pointing upwards a little and facing away from the camera.
It is good practice to cover the body of the flash unit in plastic to prevent the worst of the inevitable splashes of water. Leave the face of the flash head uncovered though (it will be pointing away from the splash zone so should remain unaffected).

The idea is to bounce light off the wall so it reflects back and backlights the glass of water and the splashes. This also minimises the problem of specular highlights or hotspots on the subject.
Switch on the flash and set it to Group A and channel 1. Place the radio trigger in the hotshoe of the camera, switch on the camera then switch on the flash trigger.
Make sure the trigger is set to edit Group A and is set to the same channel as the flash, ie channel 1. Initially, set the flash power to 1/32nd (this will give a flash duration of approx. 1/9000th of a second). Set the flash zoom to the widest (24mm).

Setting Up The Camera
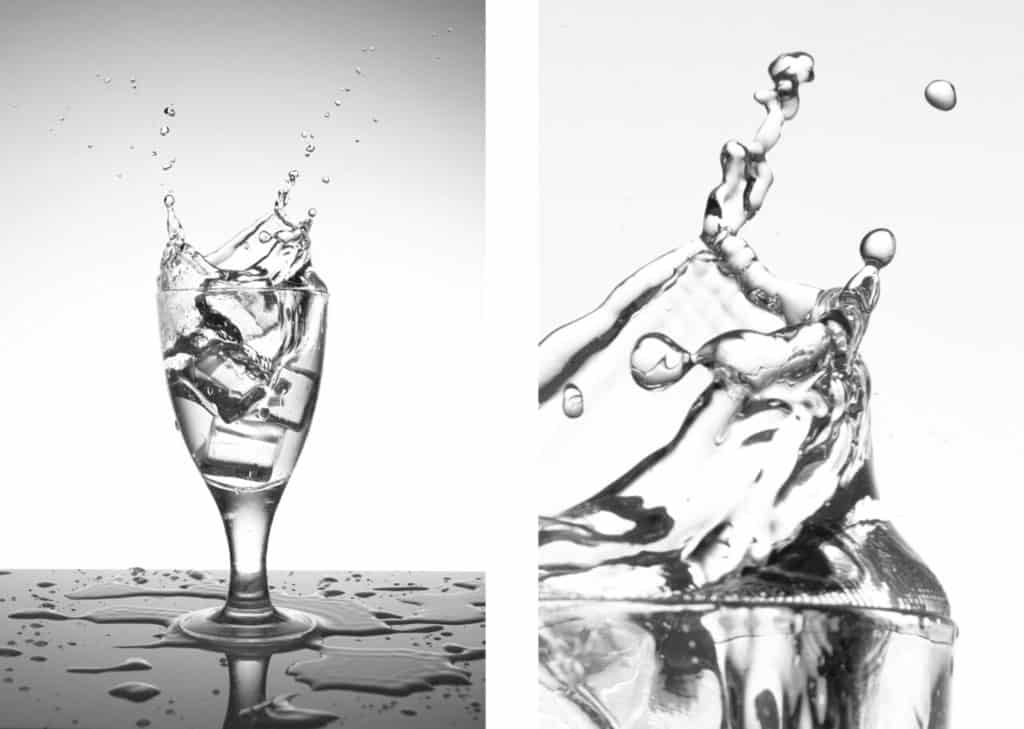
Set the camera on a tripod at roughly the same height as the centre of the glass. Zoom in the lens as necessary to eliminate the front edge of the Plexiglas. Frame the scene to include the whole glass, leaving some space above the glass for the splashes to occupy.

The composition on the left is badly framed as you can see the box that the Plexiglas is sitting on and the glass is too high in the frame, leaving no room above it to accommodate the potential vertical splashes.
On the right is a much more pleasing composition with the glass lower in the frame, eliminating the supporting box and leaving room above the glass for the splash arc. The horizon line has also been corrected by carefully tilting the camera on the tripod.
Focus the camera on the front edge of the glass then switch to manual focus to lock it (you don’t want the camera to attempt to refocus once we start splashing). Reframe the scene as above.
- Set the aperture to F8 which should give a good depth of field.
- Set the shutter speed to your flash sync speed (usually 1/60, 1/200 or 1/250).
- Set the ISO to 100 to minimise the grainy noise.

Taking The First Splash Photo
You should now be set up to take your first flash photo. Line up your cubes in a convenient place. If you have a remote control shutter release it will make the next part easier but it’s not essential. If you can lock your mirror up at this stage, it will make the shutter response time a little faster.
Take a photograph of the glass filled with water and ice cubes, before you start the splashing process. This will allow you to check the exposure and it will give you a clean/dry image that you can use later in post-processing to remove the inevitable puddles of water on the Plexiglas.

Take an ice cube and hold it directly above the glass of water, about 10 inches above. Half press the shutter then drop the ice cube into the water. Just before it hits the water press the shutter button all the way.
The camera will shoot and the flash should burst into life. The chances are that you missed the splash on the first shot.
Try a few more times, adjusting your shutter timing until you hit it the splash perfectly.
Review Your Results
Have a look at your results, there’s a good chance that a few of them captured the splash right at the most dynamic moment. If the images look too dark or too bright, adjust the flash power accordingly. Try to stay below 1/8th power to keep the flash duration speed to a minimum for super sharp splash beads.
If you find that the flash is still too dark, increase the ISO to 200 or 400 rather than open up the aperture and risk losing depth of field.

Improving The Edges of The Splash Trails
To make the edges of the splash beads look more defined, make sure the rest of the room is in darkness so that the curved edges of the water splash pick up and reflect the blackness of the room on either side of the central flash.
You could even place some black flags (black boards or black paper) on either side of the scene, just outside of the viewfinder that will be reflected in the edges of the water droplets and ice cubes.

Related Topics
How To Use Yongnuo YN660 Flash And YN560-TXii Trigger, Helpful Illustrated Guide!
These are the budget flash and trigger that I used in this shoot. If you would like to read an in-depth description of the functions, how to connect them and how to use them in photography, click here to read our helpful illustrated guide right here on Photography Skool.
How to Successfully Freeze Action in Photography, With or Without Flash!
The photos in the above article were all taken with the help of a Speedlite flash. It is also possible to freeze action without flash using available ambient light. It requires some different solutions and it is all explained in our illustrated guide that you can find here on Photography Skool website.
How to Capture Motion Blur in Photography!
This is the opposite but interesting technique to water splash photography. Rather than trying to freeze the action solid, we actively try to encourage the moving subject to record as a blur. This can have very unexpected but stunning, almost impressionistic, abstract results. If it’s a technique you would like to know more about, check out our full-colour guide here on Photography Skool.
Freeze Moving Objects While Blurring The Background!
This is a hybrid of freezing and blurring the subjects within the frame. It is a little tricky to master but with a little practice, you should achieve some stunning results. To see our step-by-step guide to the mastery of this very creative technique click here to see the article on Photography Skool website.
Amazing Splash Photography Without Flash, Using One Simple Hack!
At the opposite end of the technical lighting scale, you can achieve very convincing water splash photographs without the need for large flashguns or studio strobe lights! The powerful, constant light source that is used is freely available to everyone although its appearance can be somewhat elusive in certain parts of the World. You can discover the simple lighting hack and read our comprehensive shutter speed case study right here on Photography Skool.
How Do You Make Water Drop Photos? Pro Results on a Budget!
For a less violent water splash photograph, you could try this technique using one Speedlite bouncing light off a wall. The results are remarkable and can be achieved on a surprisingly cheap budget. To read our fully illustrated guide click here to view it on this website.