Motion blur is unfocussed movement captured in a photograph. It has many forms and there are many techniques to achieving it. It can transform a dull, static image into something much more exciting and dynamic. It can, very successfully, convey a sense of movement, action or drama that makes it more attention-grabbing. The following guide will explain all the steps and techniques to unlock the visual potential of movement in photography.
To capture great motion blur photos, use a moving subject. Use a slow shutter speed and Manual mode. To assist slowing the shutter use:
- Small aperture
- Low ISO setting.
- Tripod
- ND filters to darken the image.
Try using rear curtain flash sync to achieve motion trails ending in a sharp image.
There are a number of ways of achieving motion blur in photography. They are not difficult once you have the knowledge, some basic equipment and a little practice. The following article will set out the simple steps to assist you in producing great motion blur photographs that will enhance your burgeoning portfolio.

The Steps to Achieving Great Motion Blur in Photography
Choose a Suitable Subject
What would make a great subject to produce an interesting motion blurred photograph? Certainly something or someone that is moving either quickly or slowly and gracefully. It could be an object or a person that is standing still but moving some element attached to it or them like a helicopter with its spinning rotors or a croupier dealing cards. The idea is not to snap the action and freeze the scene cold. It is to allow the blurred, fuzzy trails of movement and colour to reveal the story and drama of a dynamic scene. This can all be achieved in a single, still photo, which is amazing.
You can capture the unrelenting energy and movement of a city or the tranquillity of a gently babbling brook, the imperceptible movement of gently drifting clouds could be recorded as a tangible trail of time passing.

There is really no end to the possible subjects for a motion blur photograph. Subjects in motion all have their own speeds and degrees of movement and it’s down to the photographer to attempt to capture that movement as a blur, a smudge of time to convey the story behind the action.
Choose a Suitable Shutter Speed
The shutter speed is the most important setting to consider when attempting to record motion blur. This is provided by the shutter curtains that can open and close to allow a quantity of light into the camera and onto the sensor. This can happen incredibly fast or extremely slowly. To capture the motion blur on a sensor, the moving subject has to have time to record some movement between the opening of the front shutter curtain and the closing of the rear shutter curtain. This can’t happen at very fast shutter speeds; to capture motion, there just wouldn’t be any time to register the movement.
So this has to happen relatively slowly. How slowly, depends on the subject and the speed of motion. It also depends on the type of blur you need to see to convey the right message. Do you want to see a short smudge or an endless trail? To slightly blur people walking along a street or jogging you could try a shutter speed of 1/30th of a second. For a longer blur streak, you could try 1/15th of a second. It gets more difficult to handhold the camera at these lower speeds though. For a cruising car on the street, you could increase the shutter speed to 1/60th of a second to capture a dramatic blur.
A speeding racing car might work with a shutter speed of 1/125th to 1/250th and still produce the desired motion blur. These slightly higher speeds will mean that you could comfortably handhold the camera and still maintain a sharp background. It’s all about experimentation at this point. Try different shutter speeds, try different lenses until you see the best result for the subject and the story. Fortunately, digital cameras have abundant memory on their cards so shoot away and try different things out.

Choose a Small Aperture
The aperture is the adjustable opening in your lens and it is one of the settings that control the amount of light entering the camera. As the shutter speeds get slower to help you achieve motion blur there could be a danger of overexposing the photograph if you’re not in an automatic mode. This is where your influence over the aperture helps you take control of the exposure. You can close down the aperture to decrease the amount of light as the shutter speeds get slower as large aperture openings let in more light. Good exposure is always a balancing act between shutter speed and aperture size. The great side effect of having a smaller aperture-opening is that more of the scene will be in focus as the depth-of-field is increased.

Use Manual Mode
This is probably the best shooting mode to use as you will have full control over Shutter Speed, Aperture size and ISO. You can use this mode with the confidence that the camera won’t try to sabotage your carefully constructed exposure to create the perfect motion-blurred image. This is also the only shooting mode in which you can employ the “Bulb” mode in shutter speed. This allows you, with the aid of a remote shutter release, to open up the shutter for those really long exposures of more than 30 seconds. To avoid overexposure you will only be able to adopt the use of the “Bulb” mode in low-light or if you force the scene to appear darker by applying ND (Neutral Density) filters to the cameras lens.
Depending on the ambient light of the scene and your goal for the final image, Manual mode makes it easy to under or overexpose the scene by manipulating the aperture opening size and the ISO setting. This leaves you free to set the shutter speed to achieve the degree of motion blur that you desire.
Choose a Low ISO Setting
The ISO setting can change the amplification of the available light. This is generally useful in low light conditions as a higher ISO will boost the brightness of the low light levels and require you to maintain a faster shutter speed. This could damage our pursuit of motion blur though as the faster shutter speeds assisted by a higher ISO setting could minimise or eliminate the blur.
So, you need to take control of the ISO setting. This can be done in Shutter Priority Mode or in Manual mode. If you are not used to working in Manual mode, which can be a little daunting, then use Shutter Priority Mode which does most of the heavy lifting for you. You still have full control over the shutter speed but you can also override the Auto ISO setting. To assist you to achieve a slower shutter speed choose a lower ISO setting; ISO 100 during a sunlit day or a little higher as the light retreats.
Use a Sturdy Tripod
As you get more comfortable with this technique you may wish to achieve longer and more dramatic motion blur trails. This will mean that your shutter speeds will get slower and it will become impossible to handhold the camera without some camera shake which could add some unwanted blur to the background. This is where we can introduce a tripod into the mix. A good sturdy tripod will keep everything in focus that is supposed to be sharp while allowing the motion blur to unfold and stream onto the sensor and be recorded as a continuous band.
The tripod could be a full-size, full-height accessory that is difficult to carry around or a convenient pocket-sized gizmo that would be perfect for capturing those unexpected candid shots. If you don’t have a tripod with you, improvise by using a convenient wall, table or chair. You may need to use a remote shutter release or the self-timer to avoid further possible camera shake.

Use Very Slow Shutter Speeds For Remarkable Results
Some of the most extraordinary and beautiful motion blur trails occur when using extremely slow shutter speeds. We are no longer dealing with fractions of a second but several seconds, tens of seconds, even minutes. It can’t really be described as a shutter speed as it becomes a length of time. We’re effectively just opening the barn-door to see what strolls across the light sensor and leaves its telltale stain. There are several very cool techniques that employ the super-slow barn-door photography.
- Light Painting
- Cloud Trails
- Hazy Water
- Star Trails
- Light Trails
How to Achieve The Different Types of Motion Blur in Photography!
How to do Light Painting

Photo by Oscar J Harper
This technique is as it sounds; it’s painting with light. For this method to work you need to be in a relatively dark place and open the shutter for quite a long time. A handheld light source is used to literally paint in the air a shape, pattern, character or words while the shutter is open and it can record all of the motion trails as continuous drawn lines. The process is to set up your camera so that you can achieve at least a 30 second exposure.
This may mean selecting a small aperture and a low ISO number. You could even use the “Bulb” setting in Manual mode. This allows you to keep the shutter curtain open as long as you want while the shutter button is depressed. It would be best to use a remote shutter release to eliminate camera shake. Things that you could use to paint with light include:
- A torch (battery-powered or flaming)
- Candles
- Laser pointers
- Fireworks (observed not handheld)
- Sparklers
- Lights tied to strings (spin and twirl them around)
- Glow sticks
- Phone torch
- Christmas tree lights
- LED strings

Photo by Oscar J Harper
Experiment with different timings and check the overall scene is not too under or overexposed. This may require a little trial and error but persevere as the results are well worth it.
How to Capture Cloud Trails

Clouds can be very dramatic, moody and complex creating a highly textured and interesting background in the upper part of the scene. In that instance you might want to capture them as they are with a faster shutter speed. If however, they are not so interesting you could add a little more drama into the sky by using a slow shutter speed and recording them as a smeared passage of time. Set the camera up to record a shutter speed of several seconds.
The timing depends on the speed of the cloud movement in the sky. If they are ripping along at a pace you may only need a 1/15th or 1/5th of a second but if they are barely moving at all you may need tens of seconds or a minute. The result should be a smeared sky with streaking lines visible in the direction of the movement of the sky. It can really lift a static scene and add dynamism and interest to a mediocre image.
How to Achieve Hazy Water

Moving water always look interesting whether you photograph it to freeze the action or to blur it. There are degrees of blur when you capture water in motion. Some slow shutter speeds will render the water merely indistinct and blurred but if you slow the shutter down to several seconds you can achieve a very surreal haziness. Depending on the available light you will need several seconds and possibly up to tens of seconds or a minute. You will definitely require a tripod to keep the rest of the scene in sharp focus. You will probably have to employ the other tools of extreme motion blur; a small aperture-opening and a low ISO number.
This technique is perfect for shooting waterfalls and fountains where the tumbling cascades of water will be transformed into a soft, hazy mist. Any collection pools will be rendered smooth and flat as the myriad splashes and ripples are erased and equalled out to an average horizontal plane. With this method, gently chopping oceans, seas, rivers and lakes can appear to be millpond still. So, rather than capturing the urgent sense of movement as with some of the other techniques, the motion blur of gently moving waters is conveying the idea of peace and tranquility.
How to Create Star Trails

It is possible to create some motion blur trails at a cosmic level. This can happen when we photograph a clear night sky when there are many stars visible. You may have to get out of town as the light pollution from cities can make the stars almost invisible to the naked eye. Once you have found a secluded spot where many stars are visible you can set up your camera on a good and steady tripod. If your tripod is not the sturdiest, try lowering it by collapsing the legs to the lowest position, this should make it much more stable and free from wobbling.
Use a wide-angle lens to capture a large part of the sky and you will also need a large aperture to help you capture the faint starlight. Set it to its widest angle of view and its maximum aperture. Set the ISO at 400 or 800. This seems to be contrary to all the previous advice where the smallest aperture and lowest ISO number were suggested. This is because the amount of light we are gathering from the distant stars is so meagre that we have to give the camera a little boost to help it to capture the light trails.
Let’s frame the image with a lot of sky but don’t forget to include a little of the ground with trees or building to provide scale and context. Now we focus on the starry sky, then turn the autofocus off to stop the lens hunting for a focus point. In Manual mode, we can set the shutter speed for 30 seconds. With a remote shutter release, we can take the first thirty second exposure. On its own, this would just look like a still picture of the night sky with slightly oval-shaped stars.
You have to exercise some patience for this type of photography. We need to take a further 20-100 shots from exactly the same position with the same settings and without moving the camera at all. The best way to do this automatically is to get a remote shutter release with a continuous shooting facility sometimes called an intervalometer. This will save you from standing around for hours and pressing the shutter release every 30 seconds.
You can set the intervalometer to take 50 photographs each of which will be 30 seconds with very little lag between shots. Individually, these 50 pictures won’t be very impressive. You will need to composite them together in software such as photoshop or Starstax. This will stack all the images together and reveal the amazing star trails created by the earth spinning around its axis. They will look like curved lines of light cutting through the dark night sky.

An impressive way to get the star trails to form concentric circles in the sky is to point your camera at Polaris, the North Star. This star lines up with the Earth’s Axis so it appears to remain stationary as all the other stars appear to rotate around it, creating circular light trails if you use the method outlined above. This technique can produce spectacular motion blur that marks the passing of time with these cosmic light trails.
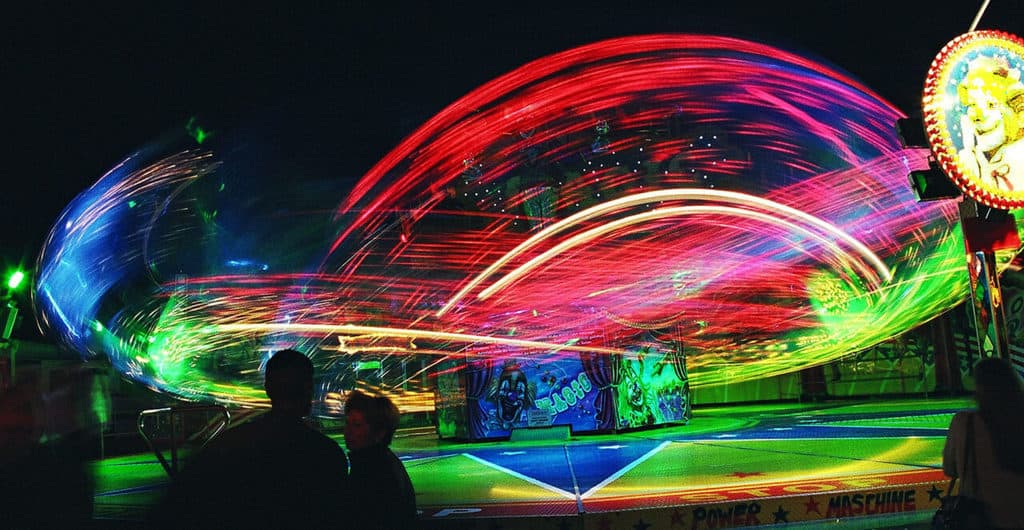
How to Produce Light Trails

This technique can create photos that look spectacular. It can produce streaking, bright laser beams or snaking light trails across the whole frame of the photograph. They are usually created by multiple vehicles at night moving through the scene with their lights on. The light source could be anything that is moving with lights attached. Very slow shutter speeds are required for this 30 to 60 seconds or more. A tripod will definitely be required. They are usually carried out at night, during the dark part of the “Blue Hour” (the hour before sunrise or after sunset) or indoors in the dark.
Find a location with many vehicles or other moving light sources. An interesting backdrop will also help the overall composition. You need to set your camera up on a tripod and frame up the scene. Focus on the backdrop as the foreground will be your blurred light streaks. You’ll probably need a small aperture which will keep everything in focus anyway. Start by choosing the lowest ISO setting to help extend the duration of the open shutter. Wait for the traffic to get moving at a reasonable speed. You should probably be between traffic lights/stop signs so the vehicle movement is continuous and unbroken.
Set the shutter speed to 30 seconds and connect a remote shutter release on a cable or wi-fi. Once everything is moving nicely hit the shutter button remotely and wait patiently without touching the tripod. Ideally, you want the light streaks to appear across the whole frame. After the shutter closes again review the results. You may be astounded or disappointed. If it didn’t quite work out, adjust the timing of the shutter and try again. It’s a little hit and miss at first. You may find that it is impossible to get a long enough exposure to achieve the long, snaking light trails that you imagined. In this case, it may be time to introduce some ND filters (Neutral density).
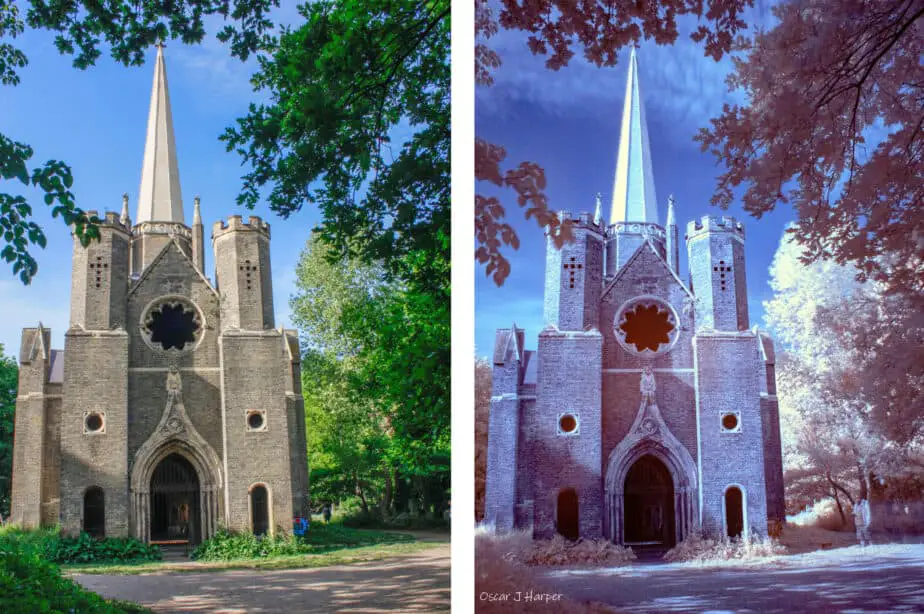
How to Use ND (Neutral Density) Filters For Very Slow Shutter Speeds in Bright Light

So, what do Neutral density filters actually do for photographers? In photography, a neutral density filter or ND filter reduces the amount of light entering the lens. This allows slower shutter speeds or bigger apertures to be used in brighter conditions without overexposing the images. So this is a very useful technique to give more control in a wider range of lighting conditions for special effects like blurred backgrounds and motion blur such as moving water or vehicle light trails etc. Most importantly, these filters reduce or modify the intensity of all wavelengths or colours of light equally, giving no change in hue or colour rendition.
In the following photos, you can see that as we change the filters and start to stack them up the moving water gets more blurred as the shutter speed gets slower, without affecting the overall exposure of the images. As we stack the four filters together we get the maximum effect of 10 stops and the water is noticeably blurred.

4 Stacked Filters Slows The Shutter Speed And Smooths The Water (Right Image)
Photos by Oscar J Harper
There is a problem with stacking filters on wide-angle lenses though. When you screw additional filters on to the end of your lens you are effectively adding a long tube to the lens and this will cause unfortunate vignetting especially on very wide-angle lenses. This can be eliminated by zooming in a little to crop out the vignette.

Photo by Oscar J Harper
Another problem is that when you attach a very dark filter like a 10 stop filter you can’t really see anything through the viewfinder. This can be resolved on a digital camera by switching to screen view (live view) and the digital sensor adjusts the scene so the image can be seen with the filters in place. These types of photos show some of the effects you can achieve although you will probably need a darker filter than a 10 stop or you will need to work in a lower light situation to achieve the very long exposures of 20 or 30 seconds.
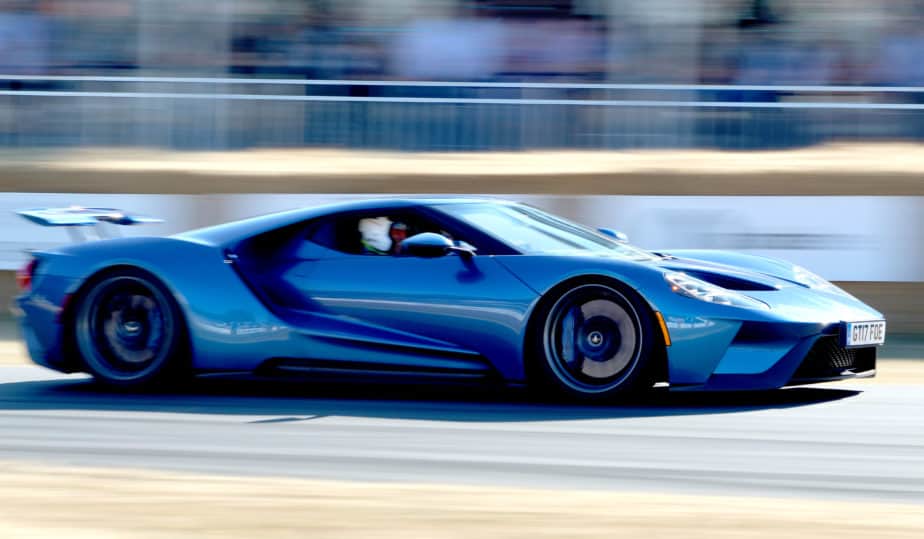
How to Blur the Background – Panning

This technique is the opposite of the motion blur that we have discussed above. This time we are going to attempt to blur the background while keeping the main subject in focus. This is done by following a moving subject, by swinging your camera at exactly the same speed and in the same direction. You have to match the speed precisely and you should swing the camera in a smooth horizontal direction without deviating up and down. You should set your camera to continuous autofocus and continuous shooting. Also, choose the Shutter Priority mode so you can take control of the shutter speed. Select a suitable shutter speed to match the speed of the subject, the following are just starting points, you can adjust them as you experiment:
- Walking person 1/20th of a second
- Moving vehicle 1/60th of a second
- Speeding race car 1/125th of a second
Stand with your legs shoulder-width apart and facing the location where you want to capture the subject. Now, holding your camera up to your eye, rotate your shoulders in the direction where the subject will enter the scene. Once the subject arrives, start panning and follow it with your camera. Try to match the speed and keep your movement smooth and horizontal. Try to aim at the same point on the moving target.
Half-press down your shutter button to start the continuous autofocus. Keep tracking, the camera lens motor will be grinding away as it refocuses. Just before the subject is perpendicular to your squared-up shoulders, press the shutter fully down. This will start the continuous shooting. Don’t stop panning, keep the movement going. After the camera has rattled off several shots, you can release the shutter button and stop the panning. Now review the results. If you are lucky and the autofocus and continuous shooting have worked you may have one or two perfect photos with a sharp subject and a nicely blurred background.
If not, don’t worry, simply adjust the shutter speed and try again. It takes a little practice to pan and follow a moving subject but eventually, you will achieve it and the results are well worth the effort. These types of photos add a great sense of urgency and speed to your pictures and are often much more interesting than a static shot of the same scene.
How to Set Up Rear Curtain Flash Sync

Photo by Oscar J Harper
This is a cool technique where the moving subject can have a blurred motion trail and a sharp image at the end of the trail. You will need a camera that has the option to choose when the built-in flash will fire and a sturdy tripod.
In automatic mode, it will not work. The camera will pop the flash up and fire it off straight away if the scene is too dark to capture a decent exposure. It will also select the shutter speed to work with the flash speed. The result is a well-exposed picture with no motion blur trails. This is not what we want.
With some modern DSLRs, you can use the flash with a slow shutter speed. You can choose if the flash fires when the first curtain opens (front curtain flash sync) or just before the second curtain closes (rear curtain flash sync). If you choose the Front Curtain Flash with a slow shutter speed, the flash will fire at the beginning of the exposure, capturing a sharp image of the subject. The rest of the exposure time will record a blurred motion trail of the movement of the subject. This will look strange in the final image as the sharp subject will appear at the start of the motion trail.
You need to go into the settings of the camera and change the flash sync to “Rear Curtain” or it might be called “2nd Curtain”. This will now force the flash to fire just before the 2nd curtain closes at the end of a long, slow shutter speed. Now, when you review your photograph you should see a nicely blurred motion trail ending in a sharp, flash-lit image of the subject at the end of the motion trail. You need the right lighting conditions to achieve this technique correctly.
The available ambient light should be sufficient to light the subject and record the motion blur before the flash fires. If it is too dark the movement won’t be picked up by the sensor and you will only see the static still of the flash-lit subject at the end of the exposure. Choose Shutter Priority Mode or Manual Mode and play around with the settings to find the right shutter speed and aperture to achieve the right length of motion trail.
You may have to light the moving subject with a torch or a spotlight to assist with the recording of the motion trail before the flash fires. A distant background or a remote flash would ensure that the backdrop is not illuminated by the flash and washes out the effect of the ghostly light trails.
How to Achieve Ghosting
This slow shutter technique can produce interesting results with mysterious ghostly figures drifting around the scene. You will need a tripod as the shutter speeds used will be several seconds. Set the camera to Manual Mode or Shutter Priority mode (Tv on a Canon). You will probably need to start with a fairly low-light scene so you can achieve a long exposure and so that it does not overexpose the overall image. Find some willing models and explain that when you press the shutter button they should begin to slowly move around within the frame. Ask them to freeze very briefly then carry on slowly moving several times within the exposure time, that will be several seconds.
This should produce a surreal looking series of smokey trails punctuated with slightly translucent sharper figures that appear in several places. Experiment with different shutter speeds. If the scene is too bright for a long enough exposure try dropping the ISO setting. You can also try underexposing the scene by using a smaller aperture. It is a creative technique and can produce some unexpected results. Have fun with different models and vary the type of movement, clothing, speed of movement and the time they pause.

Another great way to capture ghosting is to take yourself off to a busy public place like a city square or a hectic street crossing. Set up your camera on a tripod at street level or get above the scene on an upper level. There will be many people there milling around. Some will be moving through the scene with the goal of getting somewhere. Others may have paused to observe the restless spectacle. Frame a scene that has a pleasing composition with plenty of people and possibly a piece of the background to provide context. If the ambient light permits, choose the Shutter priority mode and select a slow shutter speed like 1/15th of a second to start with.
The aperture will be set by the camera. With a remote shutter button attached to stop camera shake, take a shot and review the results. This shutter speed probably won’t yield very much motion blur but it could be interesting. Try another shot with a shutter speed of 1/8th or 1/5th of a second. This should produce more interesting and longer motion blurs. Take the shutter speed as slow as you can get within the metering limits of the camera’s exposure in Shutter Priority mode.
The overall scene should have a combination of ghostly trails weaving through the crowds and some partial and fully sharp characters all mixed together in an interesting, thronging scene. If you are finding it difficult to get a long enough exposure due to the abundance of ambient light, it may be the right time to add some ND (Neutral Density) filters to your lens to darken the overall image. (See the description of ND filters earlier in this article or get more detail by clicking on the guide below.)
Related Questions
What Are ND Filters in Photography?
These filters can darken the scene and allow for much slower shutter speeds to help capture motion blur of all kinds. For a more detailed description of this very useful piece of kit, read our illustrated guide here!
Other Photographic Techniques
How Do You Freeze Moving Objects While Blurring The Background?
This is a very interesting aspect of capturing motion blur in digital photography. We’ve written a full guide on how to do it correctly in this blog and you can read about it in detail by clicking here!
How Do You Get Lens Flare in Photography?
This is a technique that can add an other-worldly, dream-like element to your photographs. To find out more about this cinematic technique, check out our illustrated guide, here!
How do You Paint With Light in Photography?
You can use motion blur to paint with light but there are many other ways to achieve it. For more information, you can read our comprehensive guide here in Photography Skool.
Ice Cube Splash Photography, Pro Results on a Budget!
An opposite but interesting technique to capturing motion-blur; this time you want to freeze the action. But how do you achieve those very professional-looking results? I used a budget camera, Speedlite and trigger. Find out all the tricks and tips to successfully use the flash and trigger to freeze action in our illustrated guide and video right here in Photography Skool.