Flat lighting in studio portrait photography is a widespread technique many portrait photographers use to achieve a soft, flattering look for their subjects. Flat lighting creates a two-dimensional image effect that can smooth out blemishes and imperfections on the subject’s face by minimising shadows and reducing the contrast between highlights and shadows.
But what exactly is flat lighting, and how can you achieve it in your photography? This article will explore the advantages of flat lighting, the equipment you need to create this effect, and step-by-step instructions on achieving it. It can often be accomplished with only one main light.

Whether you’re a beginner or a little more advanced, flat lighting is a technique worth adding to your skill set to produce stunning, professional-looking portraits.
Definition of Flat Lighting
Flat lighting in studio portrait photography produces even lighting by minimising shadows, reducing the contrast between highlights and shadows for a 2D look. It can create flattering portraits that minimise blemishes, but sometimes at the expense of a little dullness with certain subjects.
What You Will Find in This Guide (Click to Jump Ahead)
- What is Flat Lighting in Studio Portrait Photography?
- What are the Advantages of Flat Lighting in Studio Portrait Photography?
- What are the Disadvantages of Flat Lighting in Studio Portrait Photography?
- What equipment do you Need to Create the Flat Lighting Effect?
- How to Create Flat Lighting in Your Portrait Photography!
- Tips for Achieving Flat Lighting
- Conclusion – Summary of Flat Lighting Setup
What is Flat Lighting in Studio Portrait Photography?
Flat lighting is a popular studio lighting technique used by photographers in portrait photography. As a general rule, this technique is characterised by the absence of shadows on the subject’s face, creating a two-dimensional flat image.
Flat lighting minimises the contrast between highlights and shadows by eliminating the shadows typically cast from facial features. This process helps to produce a soft and flattering image that can reduce the harshness and smooth out blemishes and imperfections in the skin.
Flat lighting is best achieved by placing the Key Light, a large light source, directly in front of your subject. This can be accomplished in the studio with artificial lighting. This can be a softbox with multiple diffusing layers and without a grid. The size of the softbox is crucial as it needs to be large enough to allow the photographer or camera to stand in front of it while still allowing plenty of light to wrap around the subject.

This large light source will wrap light around the whole model, under the chin and nose, eliminating the shadows. The photographer or camera in front of the softbox becomes an interesting dark spot in the catchlight in the subject’s eyes. This silhouette creates a beautiful, soft image that is perfect for portraits.
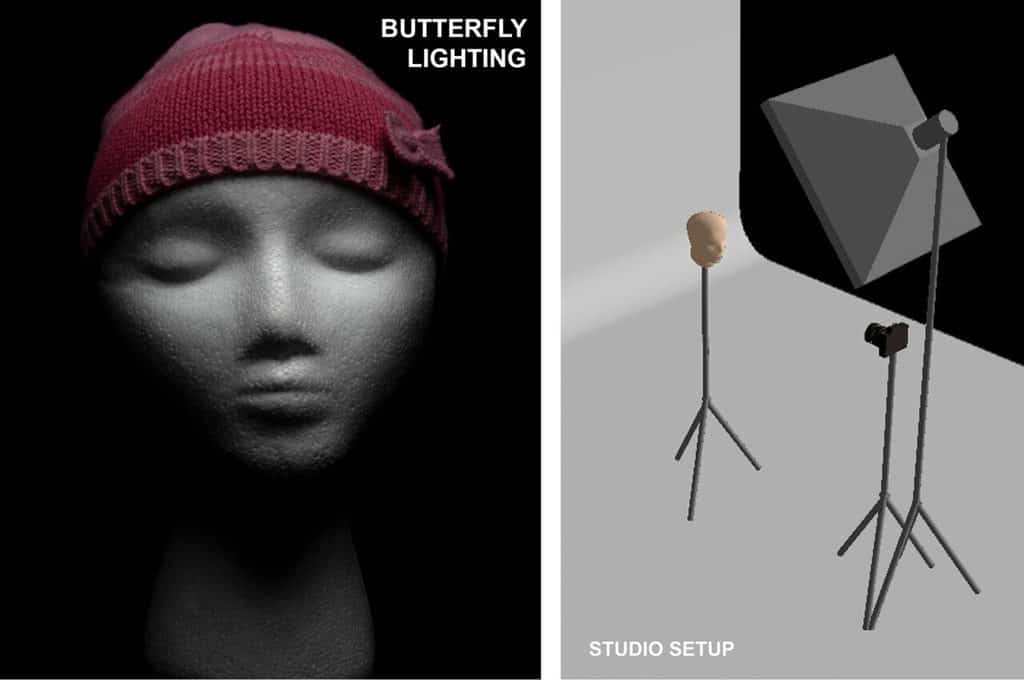
Flat lighting goes even further to soften the facial features than Butterfly lighting or Loop lighting by eliminating the small shadows beneath and to the side of the nose.
What are the Advantages of Flat Lighting in Studio Portrait Photography?
In the studio, it is possible to have complete control over the lighting of a subject. There are numerous advantages to using flat lighting in studio portrait photography. First and foremost, a good reason is that flat lighting helps to reduce the appearance of imperfections in the skin, resulting in a more flattering image.
Flat lighting can create a soft and even complexion by minimising the contrast between highlights and shadows, smoothing out blemishes and reducing the appearance of wrinkles and fine lines. This is particularly useful for portrait photography, where the goal of professional photographers is often to create a beautiful and timeless image of the subject.
Another advantage of flat portrait lighting is its simplicity. With a large light source placed directly in front of the subject at eye level, flat lighting is a relatively easy technique to master, making it accessible to photographers of all levels.

This simplicity also allows for more creativity in the studio. By removing shadows from the subject’s face, photographers can focus on other aspects of the portrait, such as composition, framing, and posing.
This can lead to more dynamic and exciting images that uniquely capture the subject’s personality and character. Overall, the advantages of flat lighting make it a popular and effective technique in studio portrait photography.
Flat lighting can be beneficial in certain circumstances by eliminating harsh light. For example, it can be helpful when the focus of the image is on the subject’s face or when the photographer wants to highlight the subject’s features rather than the lighting itself. It can also be useful when shooting subjects wearing highly reflective surfaces such as metal or glass jewellery, as the large softbox helps to reduce the appearance of glare and reflections.
Flat lighting can also be used in artistic or creative portrait photography to create a particular mood or atmosphere rather than a technically perfect image. Flat lighting can make a high-key, dreamy, ethereal image with little contrast or emphasise the subject’s mystery in these cases.
What are the Disadvantages of Flat Lighting in Studio Portrait Photography?
While flat lighting in studio portrait photography can produce soft, flattering images, it has some potential disadvantages. One of the main drawbacks of flat lighting is that it can create a lack of depth and dimensionality in the final image. By eliminating virtually all the shadows, the resulting portrait can look flat and two-dimensional, lacking the visual interest and contrast to make an image pop.

Flat lighting can also make an image look dull, mainly if it is overused or poorly executed. Without the interplay of light and shadow, a portrait may lack the dynamic quality that draws the viewer’s eye and keeps them engaged. Understanding the potential drawbacks of flat lighting before using it extensively in your portrait photography work is essential, as there may be better choices for some situations or subjects.
What Equipment do you Need to Create the Flat Lighting Effect?
You will need a few pieces of equipment to create this type of lighting effect in studio portrait photography. First and foremost, you will need a large light source that can be placed directly in front of the subject. This can be achieved using a single light source softbox, a light modifier designed to create soft, diffused light.
Softbox light modifiers come in various sizes and shapes, but you will want to use a large softbox that can wrap light around the entire subject for flat lighting. Look for a softbox with multiple diffusing layers and without a grid, as this will help to create an even and consistent light across the subject’s face.
In addition to the softbox, you will need a light source to power it. This can be achieved using a studio strobe, a flash designed for studio use. Look for a powerful strobe to fill the softbox with light and adjustable power settings to fine-tune the exposure.
A cheaper option would be a Speedlite flash that can operate off-camera remotely. Although not as powerful as strobes, satisfactory results can still be achieved with Speedlites through proper setup and camera settings.

You’ll need a light stand to hold the strobe or Speedlite and softbox in place and a trigger system to fire the flash when photographing. With these pieces of equipment, you will be well on your way to creating beautiful and flattering portraits using the flat lighting technique.
You could use the on camera flash, but the light will be flat and quite harsh. Any shadows cast on the wall behind the subject would be hard light with high contrast, which may not be your goal.
Here’s a Helpful List of the Equipment Required to get Started with Flat Lighting:
- Softbox: A softbox is a large, rectangular, octagonal or circular light modifier that attaches to a studio strobe or Speedlite. It can have one or multiple layers of diffusing material to minimise hot spots on the outer surface of the modifier. These layers, in turn, help to produce the soft light that assists the effect. The softbox helps to diffuse the light and create a smooth, even spread of light across your subject.
- Studio strobe: A studio strobe is a powerful light source to illuminate your subject. It connects into your softbox and can be adjusted to provide varying brightness levels.
- Speedlite flash: A portable, battery-powered flash can be mounted directly on your camera or off-camera with a remote trigger. It provides a burst of light that can help to fill in shadows and create a more even lighting effect. While a studio strobe is typically preferred for producing the flat lighting effect, a Speedlite flash can be a more affordable and portable alternative for photographers on the go.
- Light stand: A light stand is a tripod with an extended central pole that holds your studio strobe and softbox in place. It should be sturdy and adjustable, allowing you to position the light source at the desired height and angle.
- Remote trigger: A remote trigger sends a radio signal on the release of the camera shutter that allows you to fire your studio flash from a distance, allowing you to place the light anywhere without a cable connection back to the camera.
- Light meter: (Optional) A light meter is a device that measures the intensity of light in a particular scene. It can help you adjust your camera settings and achieve the desired exposure.
- Camera: You’ll need a camera to capture the images. Any camera with manual settings will work, although a DSLR or mirrorless camera is typically preferred for portrait photography.
- Lens: A lens is part of the camera that focuses light onto the sensor to create the image. For portrait photography, a lens with a focal length between 50-85mm is typically preferred, as it allows you to create a natural-looking perspective and flattering depth of field.
- Reflector: A reflector is a flat, reflective surface that bounces light back onto your subject, helping to fill in any shadows and create a more even lighting effect. It can be beneficial when you need to add a touch of brightness to your subject’s face.
- Remote shutter release: This is useful so the softbox can be placed directly behind the camera allowing the light source to be closer to the subject.
How to Create Flat Lighting in Your Portrait Photography!
There are several techniques that photographers can use to achieve flat lighting in their studio portrait work. One of the most common techniques is to use front lighting with softboxes to create even, diffuse light.

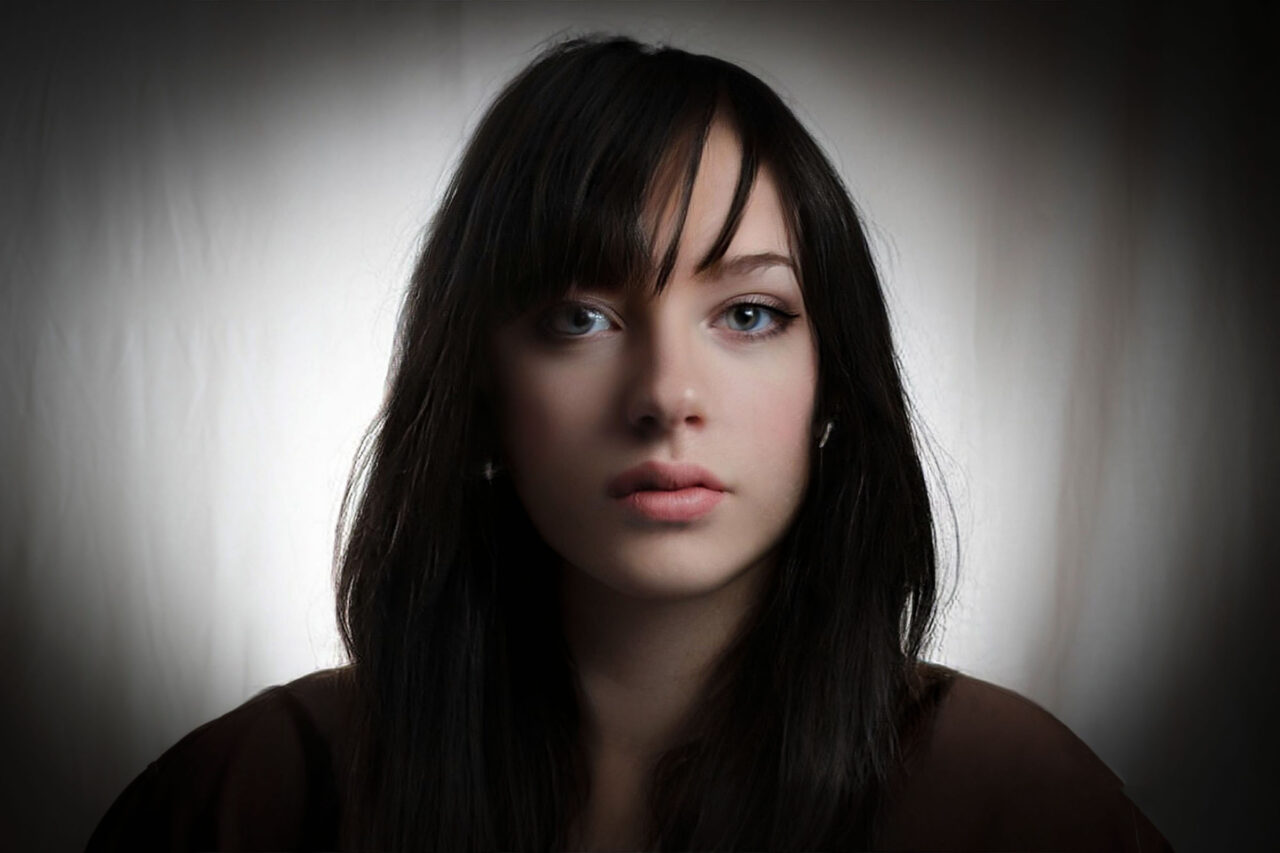
Photo by Oscar J Harper
Softboxes are typically square or rectangular boxes lined with reflective material and fitted with a diffuser panel that softens the light. Diffusers, conversely, are usually made of translucent fabric or plastic and placed over the light source to create a softer, more diffused light.
Creating flat lighting in your portrait photography is a relatively simple process. Firstly set up your equipment, including your softbox, studio strobe or Speedlite, and light stand. Place the softbox directly in front of the subject, ensuring it is large enough to wrap light around the entire face.
Adjust the height and angle of the softbox as needed to achieve the desired effect. Then, position the flash inside the softbox and adjust the power settings to gain the desired exposure. Use a trigger system to fire the strobe when taking a photograph.
006 Photo – Examples and 3D studio setup (done, photos in folder)

Once your equipment is set up, it’s time to work with your subject to create the perfect shot. Ask your subject to position themselves in front of the softbox and make necessary adjustments to achieve the desired composition, whether sitting or standing. Then, focus on their facial expression, posing, and any other creative elements you want to include in the shot.
By keeping the lighting flat and even, you can focus on these different elements of the photograph without worrying about harsh shadows or uneven lighting. With some practice and experimentation, you can master the flat lighting technique and create stunning portraits that are both flattering and timeless.
Here is a Helpful Bullet-Pointed List of Instructions on how to Create Flat Lighting in Your Portrait Photography:
- Direct your subject to stand or sit in front of the camera and adjust their position to achieve the desired composition.
- Set up your camera on the tripod to line up with the subject’s face.
- Place the trigger in the hotshoe and set the power to the middle range to start with.
- Use the flash sync speed of your camera: 60, 200, or 250.
- Set the Aperture to achieve good sharpness on the face: F5.6 – F8.
- Set the ISO to the lowest setting to minimise grain on your photos.
- Place the softbox directly behind the camera and facing the subject, ensuring it is large enough to wrap light around the entire face and body.
- Ensure the flash head is synced correctly to the radio trigger.
- Using the self-timer or a cable-attached remote shutter release, take the first test shot and review the result.
- If the light is too bright or dim, adjust the power of the flash accordingly, then shoot again. If it’s still too bright on the lowest power setting, try moving the softbox further away from the subject.
- Practice and experiment with the flat lighting technique to create stunning portraits that are both flattering and timeless.
Another technique for achieving flat lighting is carefully positioning two light sources directly above and below, with the camera aiming at the subject between the two softboxes, also known as Clamshell lighting.
The light sources should be positioned at equal distances from the subject to achieve even lighting. They should be angled so the light falls directly onto the subject’s face; this will help to minimise shadows and create a more even illumination.

A Reflector can also replace the lower softbox to produce flat lighting by bouncing light back onto the subject. White reflectors are commonly used to achieve this effect, as they reflect light evenly and create a soft, even illumination.
You can also achieve flat lighting by using a lightbox on either side of the camera, angled back towards the subject. This technique is sometimes called “Cats Eye” lighting as it creates a vertical dark line in the catchlights of the subject’s eyes. You can create a flat lighting effect by standing the lightboxes vertically and positioning the camera between them.

Tips for Achieving Flat Lighting
While it may seem simple in theory, creating a flawless, even lighting setup takes practice and attention to detail. With patience and experimentation, however, you can achieve stunning results that will make your portraits stand out. Consider the following tips to keep in mind. When working to attain flat lighting in your portrait photography:
- Practice and experimentation are essential. Take the time to experiment with different lighting setups, camera settings, and reflectors to find the combination that works best for your subject and style.
- Understand your subject and the intended message of the photograph. Flat lighting may not be the best choice for every subject or idea, so consider the overall tone and style of the image before committing to a lighting setup.
- Use multiple light sources for variation. While flat lighting is characterised by even, diffuse light, adding additional light sources can help to create variation and interest in the image and the catchlights in the eyes.
Conclusion – Summary of Flat Lighting Setup
In summary, flat lighting in portrait photography is a technique used to create a soft, even light on the subject’s face, minimising harsh shadows and reducing the appearance of blemishes and imperfections. This lighting setup is achieved by placing a large, diffused light source directly in front of the subject, such as a softbox without a grid. Two lights of equal power can also create the clamshell or cat’s eye lighting effect.
To create flat lighting in your portrait photography, you will need some essential equipment, including a softbox, a studio strobe or Spedlite and a light stand. However, this equipment is relatively affordable and can be purchased second-hand or rented from a photography equipment rental company.
While it can be a valuable tool in certain circumstances, there may be better choices for some types of photography. By understanding the characteristics, benefits, drawbacks, and techniques of flat lighting, photographers can make informed decisions about when and how to use this technique effectively.
With practice and experimentation, you can master the flat lighting technique and create stunning, flattering portraits that stand the test of time. Flat lighting is valuable in your repertoire if you’re new to studio techniques.

Here’s a Helpful Summary List of the Flat Lighting Technique and Setup:
- Flat lighting is a technique used in portrait photography to create soft, even lighting on the subject’s face.
- This lighting setup involves placing a large, diffused light source directly in front of the subject, such as a softbox without a grid or two lights of equal power in a clamshell or cat’s eye configuration.
- The advantages of flat lighting include minimising harsh shadows, reducing the appearance of blemishes and imperfections, and creating a flattering, 2-dimensional effect.
- To create flat lighting, you will need some essential equipment, including a softbox, a studio flash, and a light stand. This equipment is relatively affordable and can be purchased second-hand or rented from a photography equipment rental company.
- Flat lighting involves setting up your equipment, directing your subject, and adjusting your camera settings to achieve the desired exposure.
- With practice and experimentation, you can master the flat lighting technique and create stunning, timeless portraits that stand out from the crowd.
- For advanced or beginner photographers, flat lighting is a valuable technique to have in your repertoire. It can help you create beautiful, flattering images of your subjects.
Related Articles
Ultimate Guide To The Different Indoor Studio Lighting Setups!
Learn about all the different lighting patterns for portraits and see 18 basic lighting setups. Check out this helpful article here on our site.