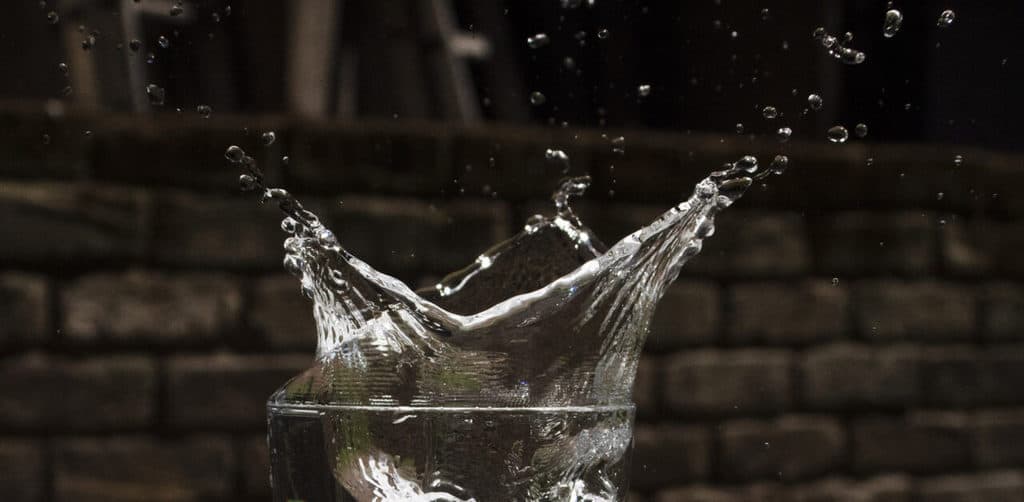
Although it is possible to capture awesome frozen, splash photographs with the aid of a flash it is also possible to get very respectable water splash photographs without the use of a flashgun or studio strobe, using an entry-level DSLR.
It’s not as easy as using a flash that has an insanely fast flash duration (ie very very brief) but it is possible if you have a very powerful, constant light source that allows you to use a very fast shutter speed. This is where the one simple hack comes into play:
To take amazing splash photographs without a flash use direct, overhead sunlight as the light source. Choose a fast shutter speed 1/1000th to 1/4000th. Increase the ISO up to 400 or 800 if you need a smaller aperture opening to increase the depth-of-field, whilst maintaining a fast shutter speed.

Let’s take a more in-depth look at the process of creating a water splash photograph using the power of our own star that is 93 million miles away.
We will examine the effects of different shutter speeds, apertures and ISO settings to determine the best combination in achieving the perfect splash photo without using flash.
At the end of the article, you will find a useful, condensed table of useable settings for your convenience.
Water Splash Photography Without Flash – Case Study
Setting Up The Scene

You need a very sunny, cloudless day for this to work as anticipated. So check out the weather reports and plan your shoot ahead of time (the sunny, clear days in the UK can be quite scarce). It’s best to choose a time during the middle hours of the day so the light is stronger, shadows are shorter, and the sun is a little closer to your location.
The Only Other Items You Will Need to Stage The Scene are:
- Some water (in a jug for topping up)
- A glass
- A plexiglass sheet
- Plastic Ice Cubes (for dropping)
Equipment Set-Up
- Set up the plexiglas sheet on a stand or small table
- Clean the glass (this saves on post process cleaning)
- Place the glass on the plexiglas
- Pour some water into the glass
- Place a few ice cubes in the glass
Initial Camera Set-Up
Even though we are out in the noon-day sun, it would be best to have a dark shadowy backdrop so that the water splashes stand out against it. I chose to point my camera in the direction of a wall that was in deep shadow ie in the direction of the sun. This would naturally look even darker when we expose for the bright glass and splashes.
- Fix your camera to the head of a tripod and set it to the height of the glass
- Attach a cable remote control shutter release to the camera if you have one
- Rotate your camera to the portrait orientation
- This would better suit the composition of a tall stemmed glass and space for water splashes above it
- Focus on the ice cubes in the centre of the glass then switch to Manual focus
Shutter Speed 1/640th
- Initial camera settings in Manual Mode:
- Set the ISO to 100 (to minimise the noise)
- Set the aperture to a fairly wide open setting (F6.3 to start with)
- Now adjust the shutter speed to slightly underexpose the bright scene and darken the backdrop (1/640th)
Take a photo without attempting a drop-splash to check the exposure and so that you have a clean, dry image that you can use to edit composites with, later in post-processing if you wish to.

Hold a plastic ice cube about 18 inches above the glass of water. Drop it and hit the remote shutter just before it hits the water. Try this a few times until you get the timing just right.
You can already see that the shutter speed of 1/640th of a second is not fast enough to freeze the falling ice cube no matter how bright the sunlight is.

After a successful ice cube drop, you can see some definite motion blur in the splash trails even though they are out of focus due to the large aperture opening of F6.3. It is clear that a shutter speed of 1/640th of a second simply is not fast enough to freeze the action even in the presence of a powerful light source.
Shutter Speed 1/1000th
Let’s increase the shutter speed to 1/1000th and see how this performs. This would normally be fast enough to stop the action of most everyday situations.

Even at this very fast shutter speed, you can see clear evidence that there is motion blur in the splash trails. I had to increase the aperture opening (F5.6) to compensate for the faster shutter speed and this has also made it harder to keep all of the splash depth in focus.

Let’s try massively decreasing the aperture opening to F10 to increase the depth of field while keeping the shutter speed at 1/1000th. I also increased the ISO up to 400 to compensate for the decreased amount of light entering the smaller aperture.
You can see that while the overall focus sharpness has improved there is still visible movement blurring in some of the smaller droplets of water.
Shutter Speed 1/1250th
I now chose to move the shutter speed up to 1/1250th of a second but keep the aperture at F10 and the ISO at 400.

The image got a little darker overall due to the increased shutter speed and no other compensation in the exposure. The freezing effect is improving but there can still be seen some indication of motion blur particularly in some of the smaller droplets at the end of the splash trails.

It is quite obvious when we look at the close-up of the falling ice cube that the shutter speed of 1/1250th of a second is still not capable of completely freezing the movement.
The velocity of the ice cube, dropped from 18 inches above the glass is approx. 3 metres per second. Let’s move on to an even faster shutter speed.
Shutter Speed 1/1600th
Moving up to 1/1600th of second shutter speed. The aperture remains at F10 and the ISO at 400.

Even at 1/1600th, we still haven’t achieved the perfect freezing-action shutter speed as the falling cube displays some traces of motion blurring. The amount of blur is decreasing but it’s still there.

From a distance, the splash trails look fairly sharp but in the spirit of perfectionism let’s zoom in to the splashes and see what’s actually happening. Although the fast-moving, tiny particles of water are out of the sharp depth-of-field there can still be seen, some elongation of the droplets due to movement within the shutter speed time frame.
This may be due to the smaller droplets at the end of the splash trails accelerating the fastest as they break free of larger droplets.
Shutter Speed 1/2000th
Let’s keep going with the experiment and push the shutter speed to an even faster speed of 1/2000th of a second. We increased the aperture to F11 and this made the image a little darker again as the opening got smaller and we maintained the ISO of 400.

The falling ice cube still isn’t frozen to perfection as we can see in the above image; everything else is pin sharp. The small aperture opening of F11 is keeping the glass rim in focus from front to rear.

In the close-up on the right, the larger blobs of moving splash droplets are fairly well frozen but there are still some smaller, rapidly moving drops that exhibit the effects of motion blur.
Maybe we’re being too picky? How fast do you have to go to achieve the perfect frozen splash?
Shutter Speed 1/3200th
Let’s take a bigger jump right up to 1/3200th of a second. I had to increase the aperture opening (to F5) to compensate for the faster shutter speed and therefore the resulting loss of light. This has brightened up the image and it has decreased the depth-of-field but the rim of the glass appears to be in focus from front to rear.

It seems implausible but the falling ice cube still appears to still be slightly blurred as it hits the max velocity of 3m per second at the end of the drop, just before it strikes the water.
You can’t really see any discernible movement trails but it is not pin-sharp. I also switched out the white Plexiglas base for a black one to see if this made any difference; it didn’t seem to.

Looking at the image as a whole, it looks like a very successful water splash photo and in most cases, this would be acceptable. As we’re treating this series of progressive shutter speed photos as an experiment we need to zoom in closer and look at the splash trails in detail.
When we close in on the smaller droplet trails there is still evidence of some slight motion blur, particularly on the very tiny particles of water.
Shutter Speed 1/4000th
Let’s bump up the shutter speed to the fastest possible speed on this entry-level Canon DSLR. This is as far as we can go with this particular camera. Let’s see what results we can achieve at the limit of shutter speed.
We still have some scope of adjustment with the Aperture and the ISO settings. This is the result using 1/4000th of a second and the same settings as the previous attempt at 1/3200th, ie F5 and ISO 400.

As you can see it is a very plausible water splash freeze. The shallow depth-of-field as determined by the Aperture of F5 is possibly causing the overall image to look a little blurred though.

Let’s also push the Aperture number up to F8 from F5 which shrinks the opening in the lens and will increase the depth-of-field to maximise our chance of capturing a near-perfect water splash.
Finally, it looks like I have managed to freeze the falling ice cube in mid-air at its terminal velocity of 3m/second (11kmph). This is the first shutter speed to achieve this to an acceptable degree.

Let’s push the ISO up to 800 in preparation for increasing the number up to F11. ISO 800 increases the amount of visible grain and you, therefore, have to make a judgement call as to whether this is acceptable in your image or not.
Pushing the ISO does give you more scope in the choices of shutter speed and Aperture settings available to you though.

After increasing the F-Number to 11, along with the ISO of 800 and a shutter speed of 1/4000th of a second, we have a very acceptable frozen water splash photograph using the power of natural sunlight.
Zooming into the detail we can see that the splash trails are perfectly frozen and appear to be like polished liquid metal. This was all achieved without the use of a flash unit or studio strobe light.
Conclusion
Even using the powerful, constant light source of our nearest star, (approx. 100,000 Lux), it is surprising how fast the shutter speed needs to be to properly freeze the action of moving splashes from an ice cube drop into a glass of liquid water. Here is a brief summary of the results of the different shutter speeds:
- 1/640th of a second – Not even close.
- 1/1000th, 1/1250th or 1/1600th – Didn’t cut it either.
- 1/2000th or 1/3200th – Getting very close but not quite perfection.
- 1/4000th of a second – This is when we begin to see consistantly good results.
Let’s not forget the importance of Aperture in the overall construction of a water splash photograph. The splashes can spread out quite far from the ice cube drop zone and this happens very rapidly after the initial splash. In order to capture as much of them in focus as possible, it was shown to be necessary to decrease the Aperture opening by increasing the F-Number and thus increase the depth of field. F11 was found to be a good number to settle on.
As we discovered though, if you increase the shutter speed and decrease the size of the Aperture opening, we may have to increase the ISO to allow those settings to happen whilst maintaining a decent exposure. You then have to decide if the visible grain or noise is acceptable for that particular image. In modern DSLR cameras, the grain from ISO 400 or 800 is relatively negligible and so is usually not a big problem. It may even add some extra grittiness to the photograph that may be desirable or advantageous.
As a Useful Summary of Useable Settings Combinations For Water Splash Photography Without Flash, we Have Compiled a Table Below:
| SHUTTER SPEED | MOTION BLUR | APERTURE | DEPTH OF FIELD | ISO | GRAIN (Noise) | SHARP NESS | USEABLE SETTINGS |
| 1/640th | Extremely Unacceptable | F6.3 | Shallow (Mostly Blurred) | 100 | Indiscernible | Very Poor | NO |
| 1/1000th | Very Unacceptable | F5.6 | Very Shallow (Very Blurred) | 100 | Indiscernible | Poor | NO |
| 1/1000th | Unacceptable | F10 | Deep (Sharp) | 400 | Barely Noticeable | Poor | NO |
| 1/1250th | Barely Acceptable | F10 | Deep (Sharp) | 400 | Barely Noticeable | Not Great | NO |
| 1/1600th | Barely Acceptable | F10 | Deep (Sharp) | 400 | Barely Noticeable | Not Great | NO |
| 1/2000th | Acceptable | F11 | Very Deep (Very Sharp) | 400 | Barely Noticeable | Good | NO |
| 1/3200th | Very Acceptable | F5 | Very Shallow (Very Blurred) | 400 | Barely Noticeable | Very Good | YES |
| 1/4000th | Extremely Acceptable | F5 | Very Shallow (Very Blurred) | 400 | Barely Noticeable | Excellent | YES |
| 1/4000th | Extremely Acceptable | F8 | Fairly Deep (Fairly Sharp) | 400 | Barely Noticeable | Excellent | YES |
| 1/4000th | Extremely Acceptable | F8 | Fairly Deep (Fairly Sharp) | 800 | Slightly Noticeable | Excellent | YES |
| 1/4000th | Extremely Acceptable | F11 | Very Deep (Very Sharp) | 800 | Slightly Noticeable | Excellent | YES |
Related Questions
How do You Take Ice Cube Splash Photographs With Flash, Pro Results on a Budget?
The other and arguably, easier way to perfectly freeze water splash photographs is with the use of a flashgun or studio strobe light. With these light units the duration of the light burst is incredibly brief; as fast as 1/20,000th of a second in some cases.
This can produce incredibly professional-looking frozen splash photos. You can read our fully illustrated article and see our video right here on Photography Skool.
How do You Successfully Freeze Action in Photography, With or Without Flash?
For a complete illustrated guide on freezing action with or without flash, click here for our comprehensive instructions on achieving this goal in photography.
How Do You Make Water Drop Photos? Pro Results on a Budget!
This is another great technique using flash to produce very professional-looking, perfectly frozen, glassy water drop photographs. In our illustrated guide you will discover that it is possible to achieve these amazing results on a relatively cheap budget. You can read all about this fascinating subject right here on the Photography Skool website.