Ever wondered how photographers produce those glassy, sharp, water drop pictures that look so professional and expensive looking? The secret is the incredible speed of the flash duration and the good news is that you can achieve it with only one, relatively inexpensive Speedlite flash and a trigger.
We’ll also show you one in-camera hack that will make your photographs look amazing and save you almost all of the post-production editing.
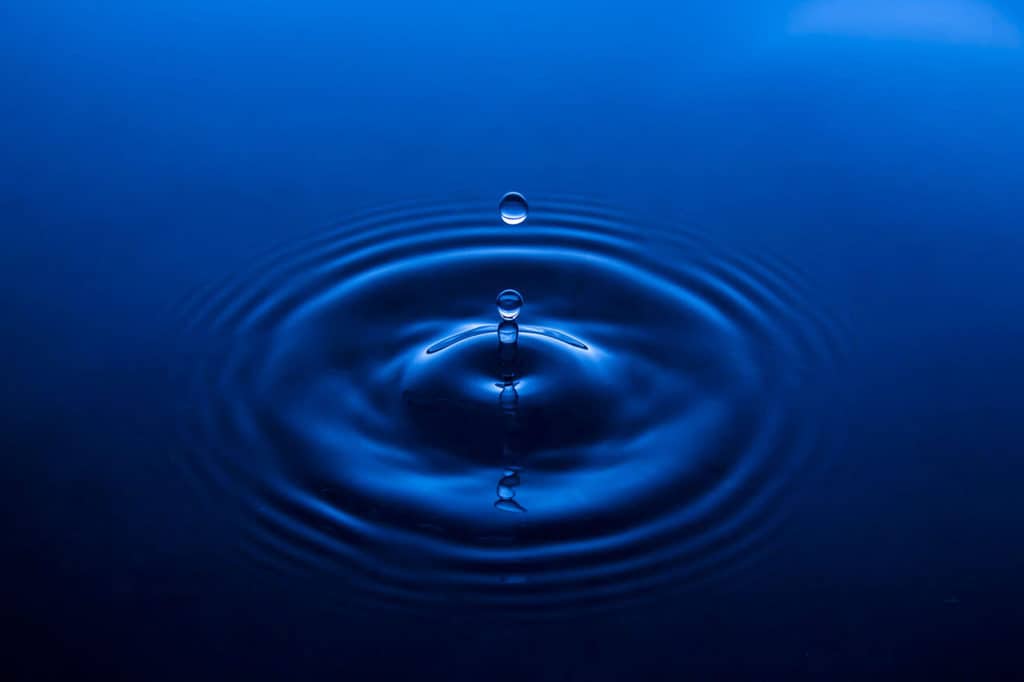
To make a water drop photo, drip water into a water-filled tray from a plastic bottle with a pinhole and a lid. Use a kit lens at 55mm. Set flash power to low, shutter speed to flash sync (1:200), ISO 100 and Aperture F8. Bounce the Speedlite off the rear wall, focus on the splash area and shoot.
It is fairly straightforward and inexpensive to produce these professional-looking photographs and you don’t need expensive equipment such as a laser trigger or an electronic drip timed drip release kit. In the following article, we’ll show you how to produce very accomplished looking water drip photographs that would look great, framed and hanging on a wall.
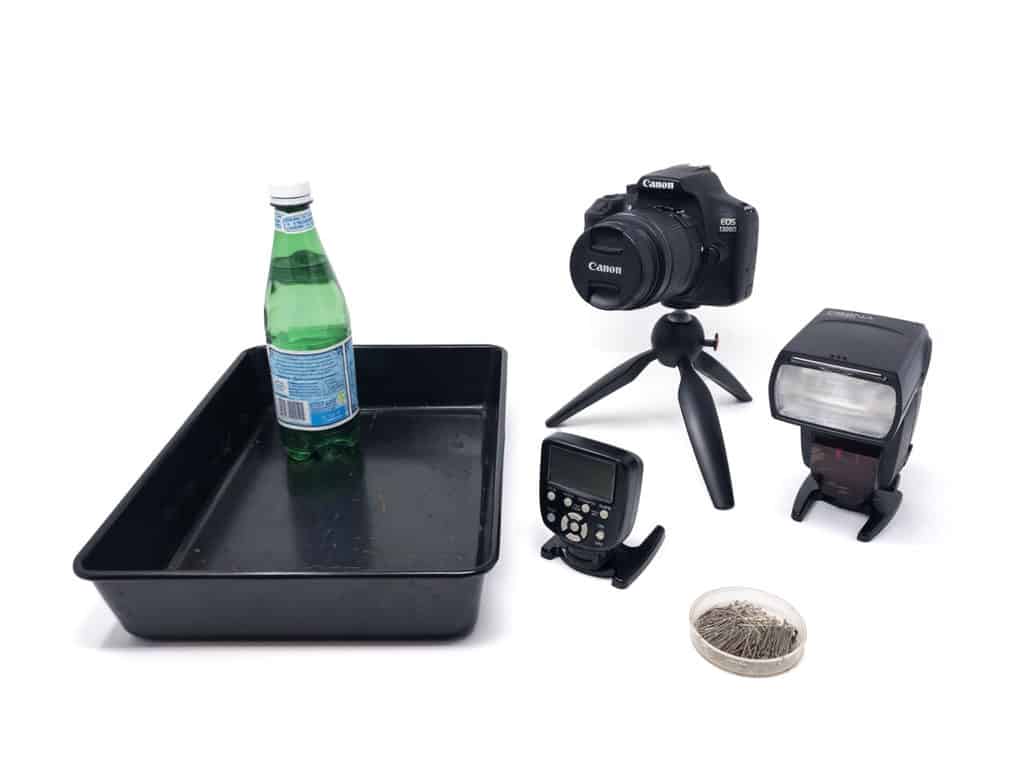
What do You Need to Produce a Professional Looking Water-Drop Photograph on a Tight Budget?
- A budget DSLR (entry level, such as a Canon Rebel T6/1300D/X80) (or similar)
- A standard kit lens, such as a Canon 18-55mm F3.5-5.6 (that may have come with your camera)
- A budget Speedlite, like a Yongnuo YN660 (or similar)
- An inexpensive radio trigger for the flash, like a Yongnuo YN560-TXii (or similar)
- A plastic water bottle with a lid (held on a bracket with a clamp)
- A dressmakers pin
- A tray of water
How do You Consistantly Produce a Professional Looking Water Drop Photograph on a Budget?
- Place a dark tray of water on a table or stand near to a white wall. (A two inch deep baking tray is perfect)
- Place the Speedlite beneath the level of the table, pointing away from it, towards the white wall.
- Using the pin, pierce the bottom of a 500ml plastic bottle with one pinhole.
- Attach the bottle to a clamp on a bracket about 12-18 inches above the water tray.
- Half fill the bottle with water then screw the lid back on.
- Set the camera on a tripod and attach the radio trigger to the hotshoe.
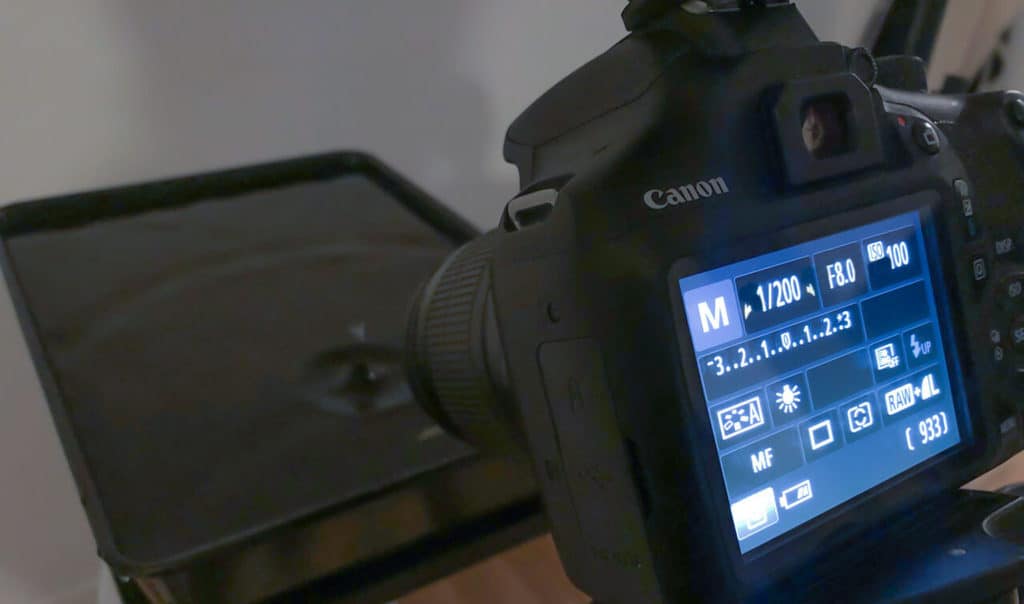
- Switch on the camera and set it to:
- Manual mode (M)
- Flash sync shutter speed (Usually 1:200)
- Aperture F8
- ISO 100
- Switch on the Speedlite, set it to:
- Group A and Channel 01
- RX mode (Reciever mode)
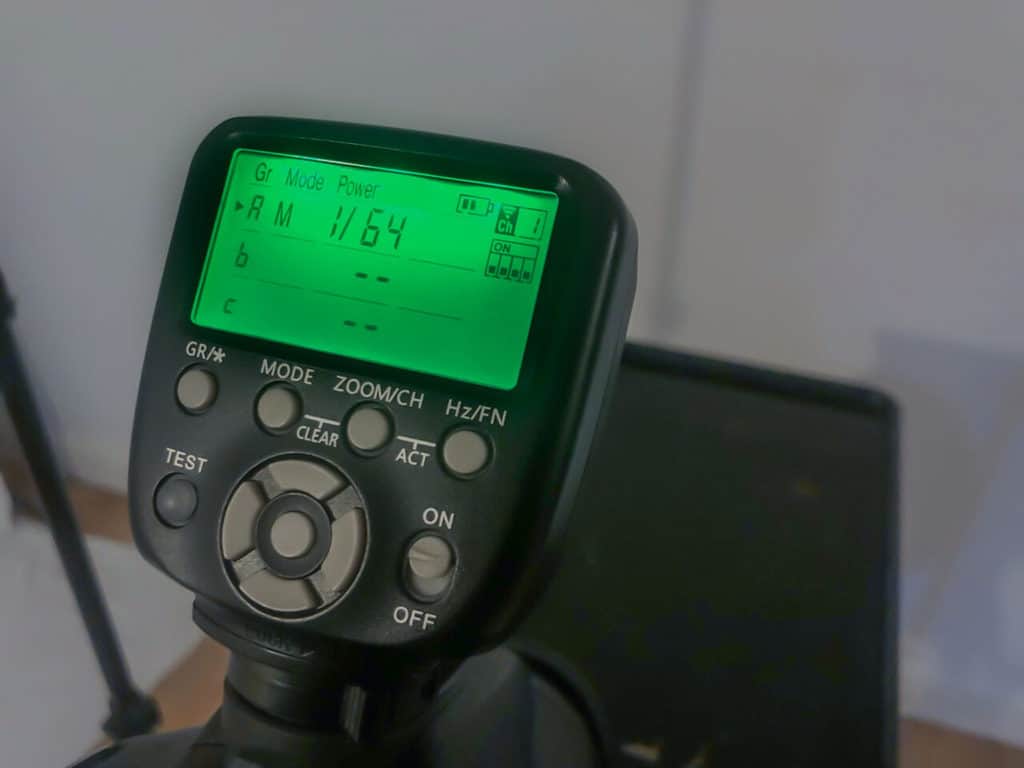
- Switch on the radio trigger and set it to:
- Group A and Channel 1 (to sync up with the speedlite)
- Set the Mode of Group A to M (Manual single flash)
- Set the power of Group A to 1/64th (Initially)
- Set the flash zoom of Group A to wide (24mm)
- Open the lid of the plastic water bottle a crack and it will start to slowly drip into the water tray.
- Place the camera quite close and slightly above at an angle to the splash zone.
- Zoom in the lens to 55mm.
- Place an object in the water where the splashes are occuring.
- Autofocus on the object then switch to manual focus.
- Remove the object and prepare to start shooting.
- If you own a cable shutter release, now is the time to dig it out.
- Observe the rhythm of the water drops and time the shutter release to just before the drop hits the water.
- Take a few shots then review the photos.
- Adjust the flash power if they’re too dark or too light.
- Remember, the lower the flash power, the shorter the flash duration and the sharper the image.
In-Depth Explanation of Professional-Looking Water Drop Photography
Let’s dive into a detailed look at the equipment and stages of setting up a pro-looking water drop image:
The Budget Equipment
The Camera
Any DSLR or Mirrorless camera would do but for the purposes of producing an affordable set-up, I used a Canon, all-round entry-level DSLR, the Canon Rebel T6 (EOS 1300D in the UK, Kiss X80 in Japan).
You can easily buy one for $250 second-hand or new at about $500 with a kit lens included (or something very similar). Although the Rebel T6 has only a cropped sensor with 18 megapixels, it still did a great job of producing a good, sharp image.
Kit Lens
These lenses often come with the camera body to allow you to start taking photographs straight away. They are usually quite inexpensive but can produce very acceptable results even though the optics are not particularly high quality.
I made use of the standard 18-55mm Canon kit lens which has apertures from F3.5 to F5.6. Using a cropped sensor camera and applying the 1.6 crop factor, it is converted to a slightly longer lens at 28-88mm lens; this still works well for our water drop photographs.
Speedlite Flash
In this case, I used one, off-camera radio-triggered Speedlite flash to backlight the water drops by bouncing off the rear wall. These can be up 5 times more expensive from the main camera manufacturers compared to budget options that are now available.
I used the Yongnuo YN660 radio-controlled Speedlite which can be purchased for around $100. You could also use the Yongnuo YN560-IV flash, available for under $100. They use the same radio trigger to set them off remotely via a radio signal or as an optical slave to another flash. They have a zoomable head from 24mm to 105mm and a full range of flash powers from full power to 1/128th. This makes them very controllable.
Consider the overall exposure settings to achieve a low-power flash shoot as the lower flash powers create a much faster flash burst. This allows the camera to have a greater chance of freezing the water drop and splash.
Flash Trigger
You need a compatible trigger for the Yongnuo YN660 flash unit in order to trigger the Speedlite flash remotely. The Yongnuo YN560-TXii radio trigger is perfectly compatible. It’s able to control up to six groups of flashes. Independent settings can be chosen for flash power and zoom in each group. It’s possible to pick one up for under $50 keeping it in the budget range.
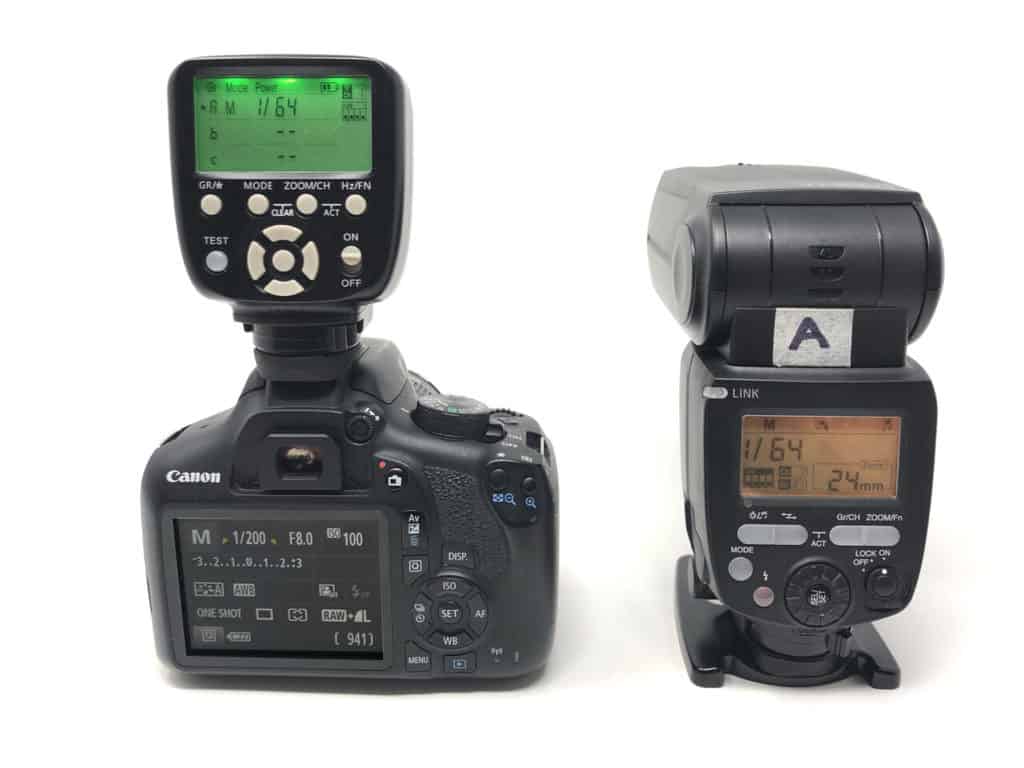
To sync the flash trigger and the Speedlite, I set them both to Channel 1, there are 16 channels (this ensures that you can choose a radio channel that is free from interference from any other local devices that may be using the same or adjacent radio channels).
Put the Speedlite in RX mode so that it operates as a receiver to be triggered by the radio trigger that operates as a transmitter.
Set the Speedlite to Group A, you then have full control of all the settings in Group A on the Speedlite by selecting that on the trigger. I initially chose the flash power of 1/64th and the flash zoom of 24mm (wide angle) as the flash settings.
Props Needed For The Shoot
The props needed are cheap and you will find some of them in your house.
- A simple tray like a baking tray (No cost if you have one in the kitchen)
- A dark or black tray helps to minimise stray flash reflections and gives the water an appearance of depth.
- A 500ml plastic water bottle with a screw-on lid (No cost if you find one in your recycling)
- A dressmakers pin (to pierce the bottom of the bottle)
- A light stand or bracket (to clamp the bottle above the water)
The Process
Setting Up The Scene
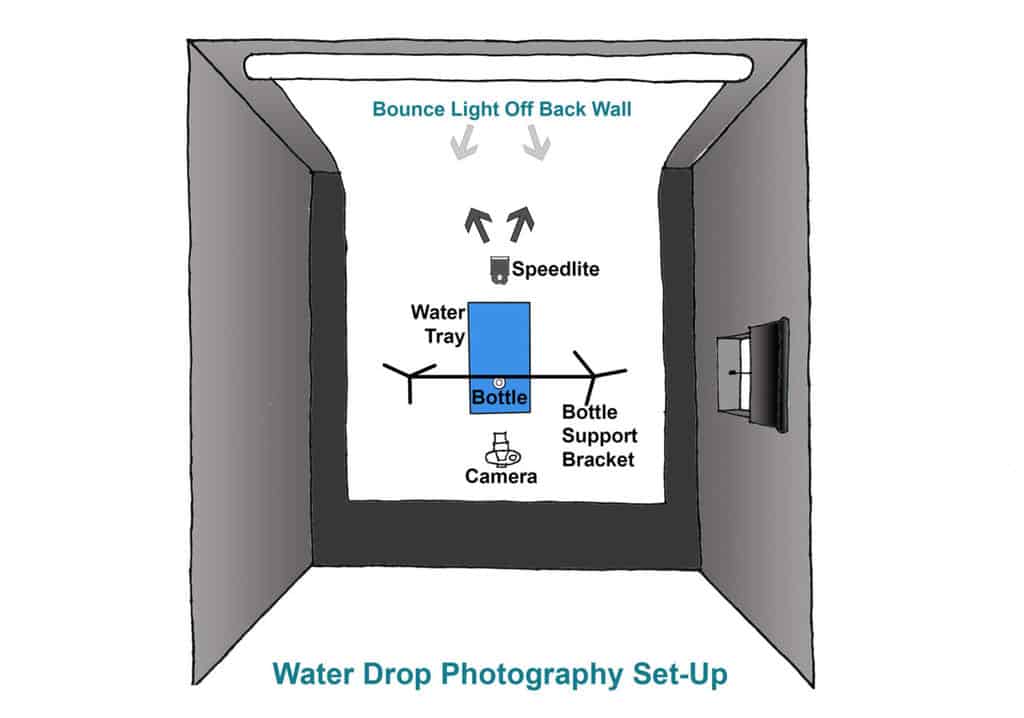
We need to place our dark tray on a stand or table close to a white wall, hanging sheet or white board to reflect the light back from our Speedlite. It should be about a metre high and quite stable. Almost fill the tray with water from a jug (this is easier than carrying a full tray of water from the sink to the table stand).
Now, set up a bracket with some light stands and a horizontal tube or bar above the tray of water. Clamp or tape the plastic bottle to the bracket so that it hangs vertically with the lid at the top. Remove the lid and half fill the bottle with water. Screw the lid back on and you will see that the water dripping will stop from the pinhole in the bottom of the bottle. Set the height of the bottom of the bottle to be about 12 inches above the water in the tray.
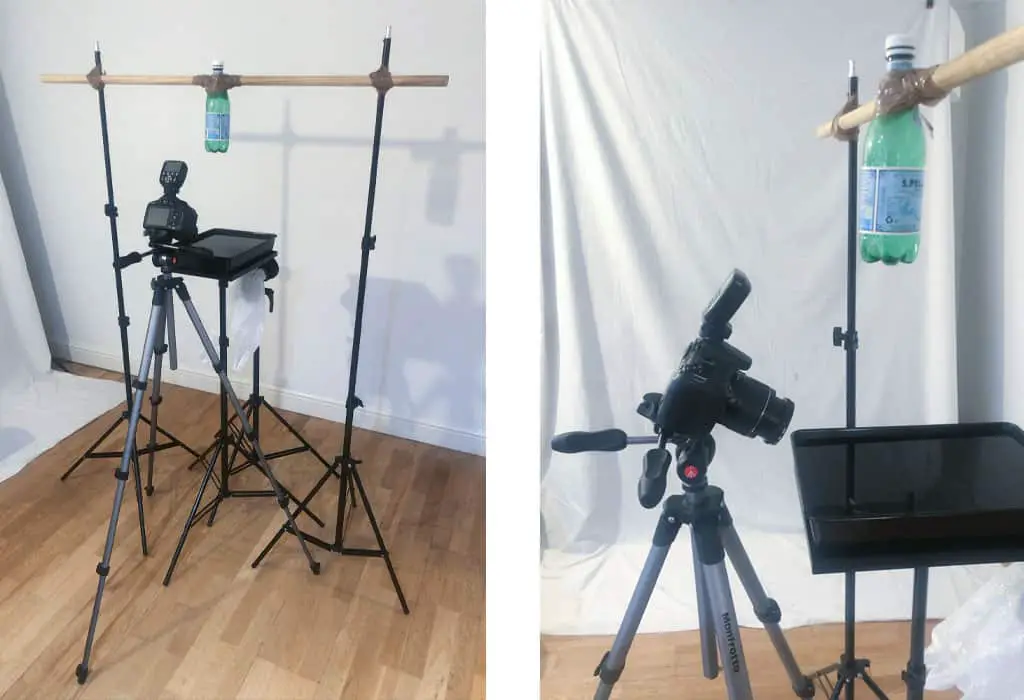
Controlling The Water Drops From The Bottle
Using a 500ml plastic water bottle allows us to control the speed of the water dripping to some degree. If you fill the bottle to the top and remove the lid, there will be a near-constant stream of water issuing from the pinhole. If you now replace the lid, the water drops will trickle and then stop altogether. Open the lid slightly to allow some air in and the water drops start again at a slower rate. You can adjust the rate by twisting the screw-on lid back and forth until you find a satisfactory speed.
Alternatively, pour half of the water out, fix the lid back on then slowly unscrew it and you will see dripping at a much slower rate than with a full bottle. Shut the lid tight then squeeze the bottle and you will get a powerful water jet for very violent and dramatic water drop splashes.
So you can see that by adjusting the volume of water and the degree of opening of the screw-on lid, you can achieve a very wide range of water drop frequencies and effects.
To get larger or smaller water splashs, adjust the height of the bottle above the water in the tray.
Setting Up The Speedlite Flash
Place the Speedlite on a stand, at a level below the level of the water tray and facing towards the wall, pointing upwards a little and facing away from the camera.
Cover the body of the Speedlite in a plastic bag to stop the worst of the splashes of water from wetting the electronics of the light. Don’t cover the head of the flash though (It should remain unaffected as it will be pointing away from the splash zone ).
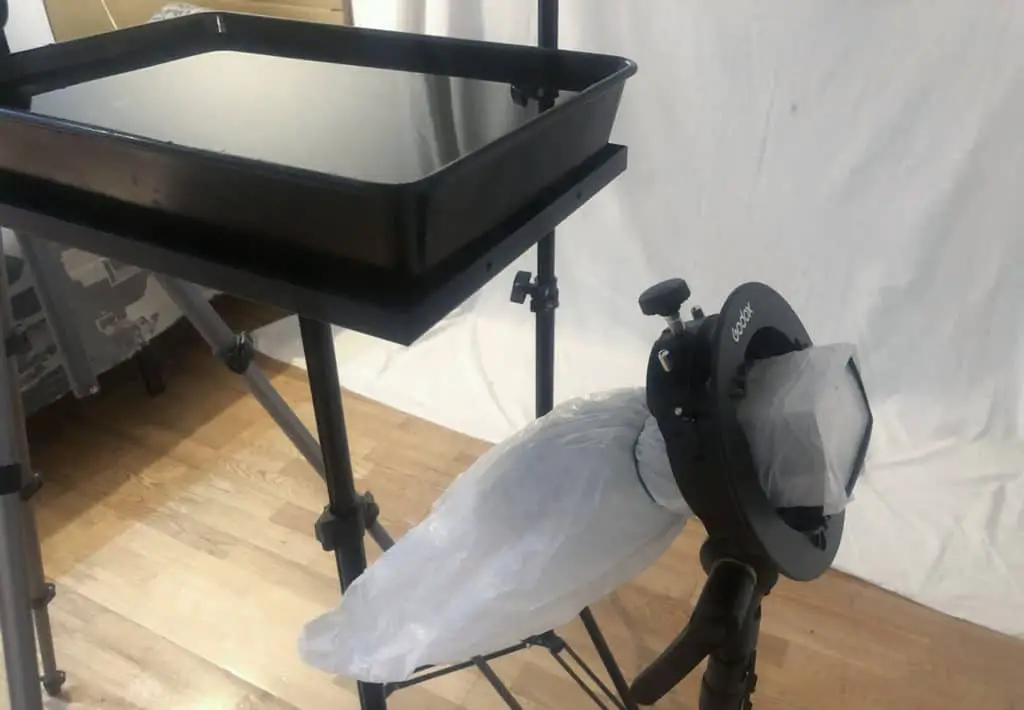
We want to bounce light off the wall so it reflects back and backlights the emerging water droplet eruptions and adds shadow texture to the ripples spreading from the drop zone. This will minimise the issue of specular highlights or hotspots on the subject if we were to light it from the front.
After turning on the flash, make sure it is set to Group A and channel 1. Set the trigger mode on the flash to RX (radio receiver mode).
Fix the radio trigger in the hotshoe of the camera, switch on the camera then switch on the flash trigger.
Make sure the trigger is set to edit Group A and is set to the same channel as the flash, ie channel 1. Initially, set the flash power to 1/64th (this will give a flash duration of approx. 1/14000th of a second). Initially, chose the widest flash zoom setting (24mm).
Setting Up The Camera
Set the camera on a tripod, slightly higher and looking down onto the splash zone. Zoom in the lens to the max 55mm then adjust the tripod back and forth to eliminate all the edges of the tray (we want it to look like an endless ocean of water). Frame the scene to place the splash zone roughly in the middle of the image.
Place an object like a battery at the splash drop zone in the water to help focus the camera on the exact point then switch to manual focus to lock it (you don’t want the camera to attempt to refocus once we start the water drops). Reframe the scene to leave some space above the splash drop zone.
- Set the shooting mode to Manual (M).
- Set the aperture to F8 which will give a mid range depth of field.
- Set the shutter speed to flash sync speed (usually 1/60, 1/200 or 1/250).
- Set the ISO to 100 to minimise the noise.
Start Shooting
We are ready to take our first water drop photograph. Open the screw top lid a little to produce a slow but steady rhythm of droplets. To make the next part easier but it’s not essential, dig out your cable remote control shutter release. To make the shutter response time a little faster, lock your mirror up or put the camera into live view mode.
Get in sync with the rhythm of the water drops then try and press the shutter button just before it strikes the water; the slight delay of your finger hitting the button should capture the water drop as it splashes into the water and the surface tension causing an eruption to bounce back out of the water.
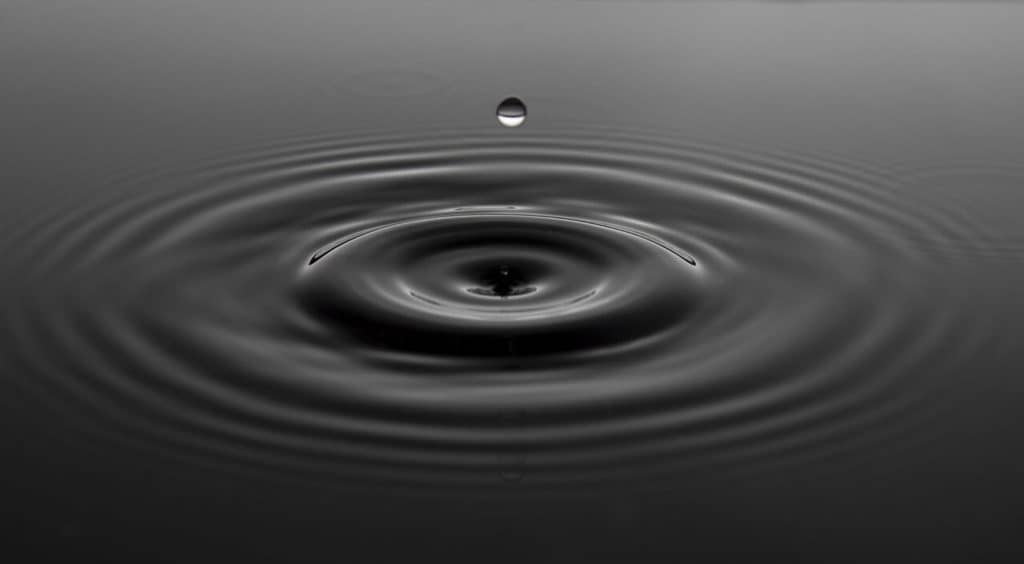
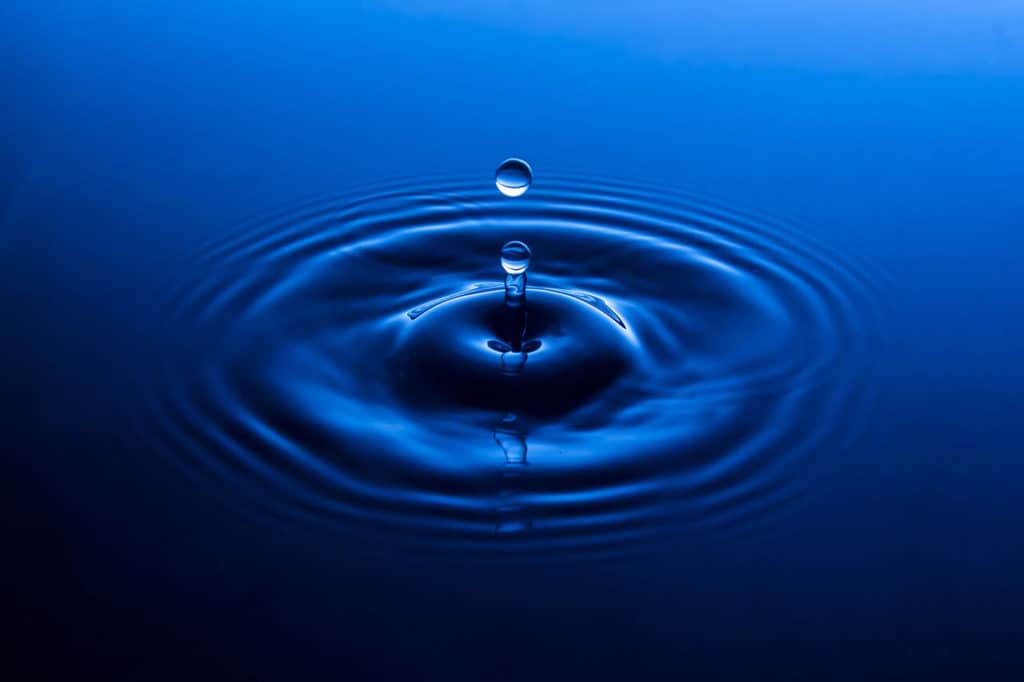
The bounced flash should freeze the action perfectly, backlighting the water drops and adding shadows to the ripples making them appear more 3 dimensional.
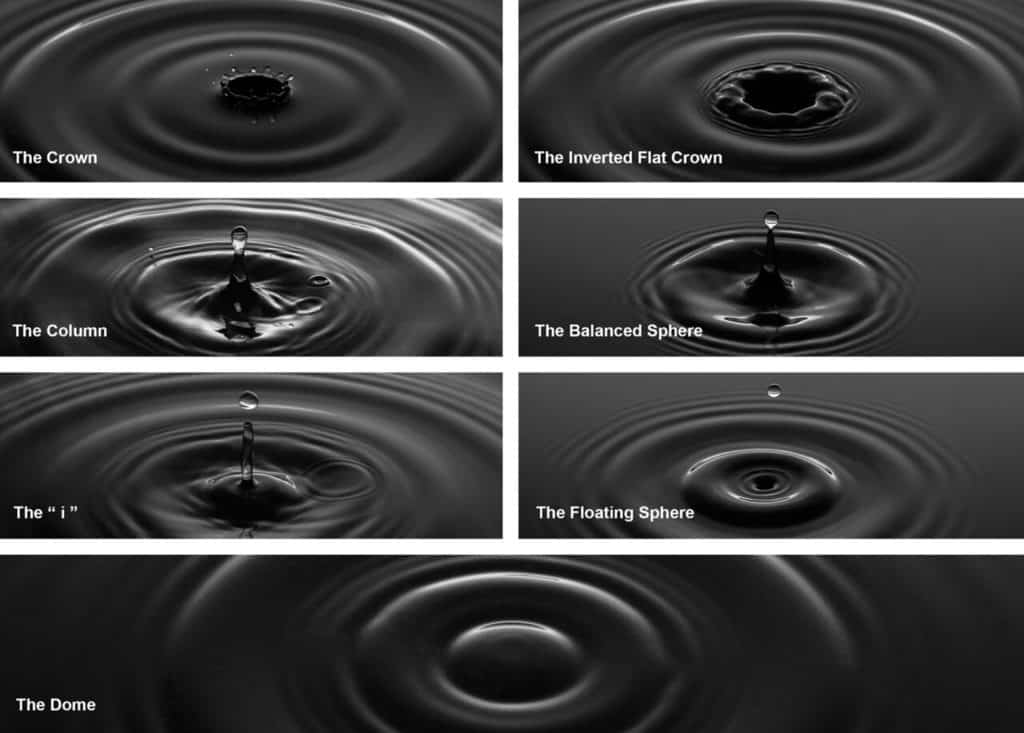
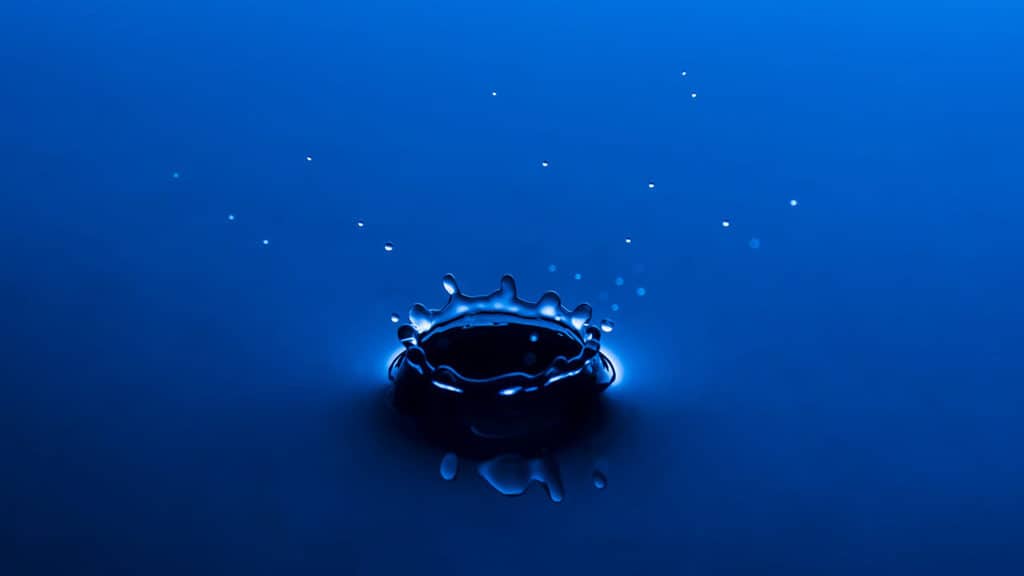
Try different timings to capture the various stages of the water drop splash. With luck you might see:
- The Crown
- The Inverted Flat Crown
- The Column
- The Balanced Sphere
- The “i”
- The Floating Sphere
- The Dome
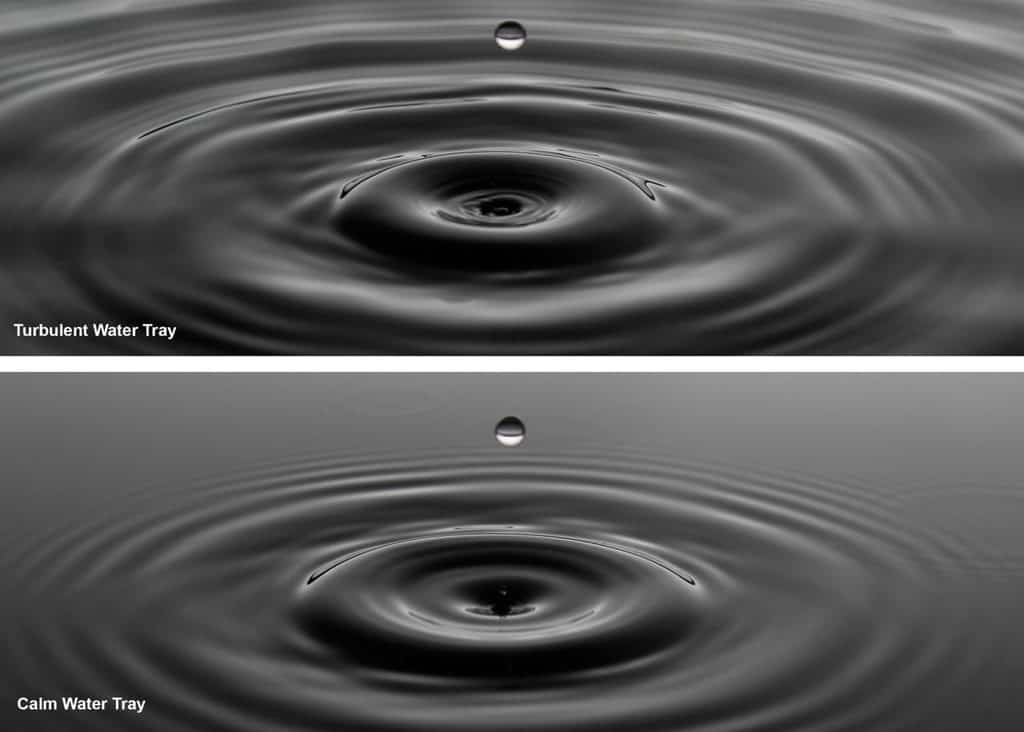
The constant dripping of rapid water drops may cause some turbulence in the water tray that could make the concentric ripples look a little imperfect. To minimise this, slow the dripping down to a snail’s pace by tightening up the lid on the bottle a little. This will allow the surface of the water to calm before the next drop appears. Otherwise, you could just hold a plate or cup beneath the drops to catch a few and let the water settle down to a perfectly smooth surface. Then remove the plate and start shooting again. Do this periodically to calm the storm in the tray.
Review The Photos
Checks your results, there’s every chance that some of them captured the waterdrop right at the most interesting moment. If the photos are too dark or too bright, adjust the flash power accordingly. Stay at or below 1/8th power to keep the flash duration speed to a minimum for perfectly sharp water drop splashes.
In-Camera Hack to Make The Photos Look Awesome
There is a simple way to adjust the colour balance in-camera to give the water the most amazing, inky, almost “Lapis Lazuli” deep blue hue. It is perfect for the water medium and gives it a mysterious oily quality.
All we have to do is use the power of the White Balance function on the camera and manipulate it to compensate in the opposite direction. We actually inform the camera that we are shooting in Tungsten light which naturally has a very orange tint of around 3200K colour temperature.
To compensate for this orange tint, the camera will apply an opposite hue, in this case, blue in order to try and neutralise the colour cast to a neutral white balance. Because we are using pure white flash light of around 5000K, with no colour to compensate for, the result is this wonderful deep blue that requires only minor tweaking in post-processing.
Related Subjects
Amazing Splash Photography Without Flash, Using One Simple Hack!
You can achieve very convincing water splash photographs without the need for large flashguns or studio strobe lights! The powerful, constant light source that is used is freely available to everyone although its appearance can be somewhat elusive in certain parts of the World. You can discover the simple lighting hack and read our comprehensive shutter speed case study right here on Photography Skool.
How To Use Yongnuo YN660 Flash And YN560-TXii Trigger, Helpful Illustrated Guide!
These are the budget flash and trigger that I used in this shoot. If you would like to read an in-depth description of the functions, how to connect them and how to use them in photography, click here to read our helpful illustrated guide right here on Photography Skool.
Ice Cube Splash Photography, Pro Results on a Budget!
It is possible to capture very professional-looking Ice Cube Splash photographs using very minimal and inexpensive equipment and a budget, entry-level DSLR. To find out more simply click here to read our in-depth article in Photography Skool.
What is Composition in Photography and How to Perfect It?
Where and how you place the water drops and splashes in your scene determine how they appear in your image; that, is composition. We have written a comprehensive, illustrated article to guide you through the established rules of composition, which goes on to show you how to break those very rules. You can find it right here within Photography Skool.
