This can produce some of the most surreal-looking images of all of the styles of photography. The pictures created through this process can look unearthly and strange. It’s a slightly involved process when you use a camera that is not dedicated to taking infrared photographs and there is an extended process of taking the photos and then editing them in post-processing.

You can produce black and white or colour infrared photos. The best results are captured in the presence of green foliage in strong sunlight. The exposure times will vary depending on the strength of the sunshine so be prepared to experiment with the very slow shutter speeds.

To take infrared photos with a standard camera, set it on a tripod. Use Manual mode. Frame up a sunny scene with foliage and blue sky. Autofocus the scene then lock focus. Fix an IR R72 filter to the lens. Set ISO to 400, set shutter speed to 15 seconds. Take the photo then edit in post processing.
You may have to play with the timings and ISO settings to get a decent exposure. You will end up with a completely red, dull-looking image. It’s not the end of the world though. There are a few more processes to go through to get it looking like the infrared images we have all seen online with the snow-white leaves and fluffy white clouds. Follow the guide below to learn how to set up, capture and post-process an infrared filter photograph.
Steps to Taking a Great Infrared Photo With a Screw-on Infrared Filter
Suitable Subject
Infrared photography produces the best results in clear, bright sunshine. Living things like green tree leaves and other green foliage reflect the most infrared light especially when they are in direct, strong sunlight. Therefore, great subjects for this type of photography would occur in summer or spring if the sun is bright.

The most infrared light occurs during the golden hour (just before sunset and just after sunrise) Best results occur when foliage is bursting with green chlorophyll as it is during the growing season. A good composition might include some man-made objects like buildings, walls, roads or vehicles to add some structure and contrast with the soft foliage.
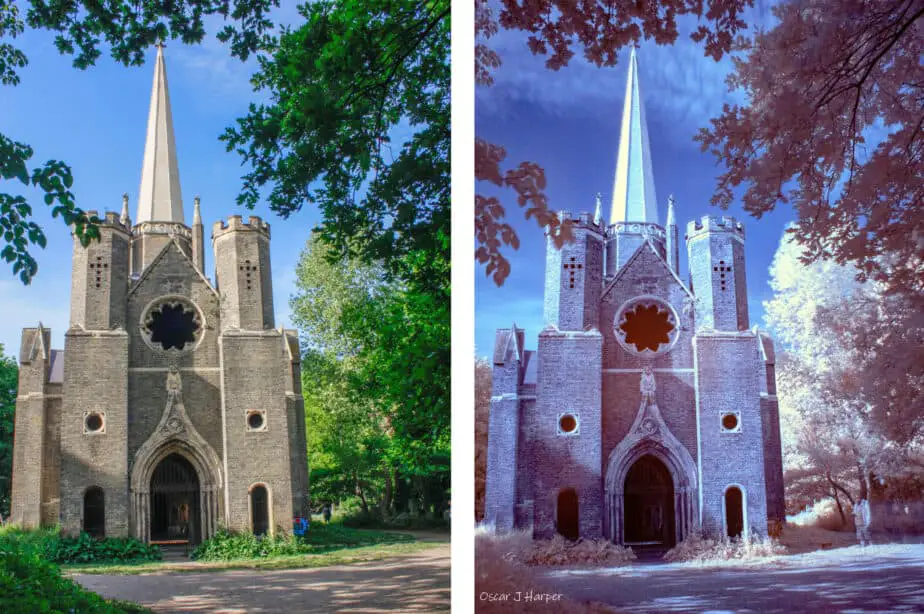
A castle covered in green ivy, a church set in a woodland; would be great subjects for infrared photography. Once processed in photoshop blue skies and water take on a more dramatic saturation. Human skin tones are smoothed out and begin to look like the people are carved out of alabaster stone.

Photo by Oscar J Harper
How to Get Infrared Light Into An Unmodified Camera
Your standard DSLR sensor is actually very good at receiving and recording infrared light but the manufacturers have installed a very good infrared blocking filter over the sensor. This lets very little infrared light through so that the sensor can deal with visible light only. So, when trying to produce an infrared image on these standard, unmodified cameras, you are fighting against the built-in blocking filter.
The only way to overcome the resistance of the blocking filter is to use a very long shutter duration to allow enough infrared light through the screw-on infrared filter and through the blocking filter to register on the sensor.

Camera Set-Up For Black And White Infrared Photographs
The shutter opening times are going to be very long so a sturdy tripod is an essential piece of kit. Lowering the tripod can make it more stable for very long exposures. As you’re probably going to be photographing green landscapes, use a fairly wide-angle lens from 18mm to 50mm for example. Frame up a scene that has a good selection of green foliage, varying textures and interesting non-organic objects. Strong cloud formations will stand out very well against a blue sky.

One thing to note is that screw-on Infrared filters (those that only allow mostly infrared light through) are very dark. When you put them on the camera you won’t be able to see anything through the viewfinder or the live screen view. So, once you have framed up the scene, focus it then lock the focus before carefully screwing on the Infrared filter.
Camera Settings For Black And White Infrared Photographs
When the camera is physically set up and the scene framed, it’s time to adjust the camera settings. It is advised to shoot in RAW if possible as this will offer more latitude when post-processing later. We’re going to use the Manual mode and select an ISO of 400 to start with. Set the Aperture to a suitable opening that suits the subject matter.
If you are shooting a landscape chose a smaller aperture to achieve a good depth of field; not too small though as this will vastly increase the exposure time and more potential for motion blur. Start with an Aperture of about F8. If it is a bright sunny day, which is best for reflecting infrared light off foliage, set the shutter speed to 15 seconds. Using the self-timer or a remote shutter button, take the first shot. Here’s a summary of the initial settings:
- Set to record in RAW
- Set to Manual Mode
- ISO 400
- Aperture – F8
- Shutter Speed – 15 Seconds
- White Balance – Auto

Review the picture in the rear screen of the camera. If it looks too bright or dark adjust the timing of the shutter speed and take another photograph. It’s good to have a few different exposures and if you can use a faster shutter speed it will help prevent motion blur of the trees moving in the breeze. The images will look completely red and pink but there will be some good detail. Once you are happy that you have recorded a good exposure, it’s time to move onto the next step.

Post Processing, Photoshop, Black & White Infrared
There is still a little more work to do before you have a great looking, surreal infrared photograph. I would suggest opening up the RAW version of your best exposure in Photoshop and this should open it in the “Camera Raw” application which is the software that resides between your RAW image and Photoshop. In this software, we can make some adjustments before we open it up in Photoshop. You could also open it up with Adobe Lightroom.
You will see that it is very red in hue throughout the whole image. We can cool this down a little by moving the “Temperature” slider towards the blue end of the scale. This will probably make the image a little darker and less defined so let’s make the image brighter by sliding the “Exposure” slider to the right. Slide it until the scene looks bright overall. Now you might see that the bright parts of the scene look blown-out. We can recover some of the detail by moving the “Highlight” slider to the left. Re-adjust the “Exposure” and play around with the “Contrast”, “Shadows”, “Whites” and “Blacks” sliders until you are happy with the overall exposure.

Now let’s ditch the colour cast altogether by making it into a black and white photograph. We do this by moving the “Saturation” slider all the way to the left. Re-adjust the other sliders if the image exposure has changed after desaturation.

Photo by Oscar J Harper
In the past, when infrared photography was exclusively carried out with infrared film it produced prints with a soft quality and we can replicate that with the “Clarity” slider in “Camera RAW” or “Lightroom”. Simply adjust the Clarity slider to the left to soften the image slightly.

Custom White Balance Method, Colour Infrared Photo

If you want to produce colour infrared photos using the screw-on filter method you need to take a photo with some colour variation. To successfully achieve this you need to use an Infrared filter that allows a little visible light through such as the Hoya R72 filter (allows light to pass through at 720nm wavelength and above). This allows some visible light through as well as the infrared light from 760nm to 860nm.
It is possible to produce some colour contrast with this filter but there are a few extra steps to take. When you are out on location in a sunny spot you need to create a custom white balance profile for the camera to use. First, set your camera to Manual mode and screw on the R72 infrared filter. Here’s a summary of the settings to take the Custom White Balance Image:
- Choose Manual Mode
- Set to record in RAW
- ISO 400
- Aperture – F8
- Shutter Speed – 15 Seconds
- White Balance – Auto
You need to take a custom white balance reference photo of something that is well sunlit and “living green” like a grass lawn or a tree canopy. Point the camera at the sunny green target and press the shutter button. The exposure will be several seconds but there’s no need to focus or even avoid camera shake. You’re just looking for a well lit, ambient exposure. Now we have the photograph we need to set the custom white balance. We do this by pressing the Menu button on the back of the camera to find the WB settings in one of the menus.

Locate the “Custom White Balance” setting and select it. You will now be asked to choose an image to set the custom White Balance. Choose the image that you just took of the green foliage. It won’t look green because of the red tint of the IR filter but choose that one anyway. You may now be reminded to set the White Balance to “Custom”. You can do this by pressing the “WB” button and selecting the “Custom” option.

The custom white balance is set. We can now go ahead and set up the camera and tripod to take a photograph. Take the photograph as described in the “black & white infrared” chapter above.

Photo by Oscar J Harper
Post Processing, Photoshop, Colour Infrared Photo
Open up the RAW file in photoshop and it will appear in the “Camera Raw” editor. Because we have white balanced for the green foliage through the deeply red IR filter the resulting image in-camera will have some colour contrast which we can work with when we post-process. When you open the RAW file in “Camera RAW” or “Lightroom”, the software will apply a red cast to the original photo. You can spend a little time playing with the exposure, highlights, shadows, whites and blacks to improve the general exposure of the image.

Photo by Oscar J Harper
To achieve a successful colour infrared image, you need to create some colour contrast between the sky and foliage/structures. So, make sure the “Temp” slider is all the way to the left in the blue zone. Now, adjust the “Tint” so that you can see some colour contrast between sky and foliage. The sky should have a slightly reddish-orange tinge and the foliage a slightly blue tinge. At this point you can play with the other main sliders to improve the look of the image:
- Exposure
- Contrast
- Highlights
- Shadows
- Whites
- Blacks
- Dehaze
You can now enhance the colour contrast by clicking on the “Calibration” tab and moving the “Blue Primary” Hue slider all the way to the right (+100). There should now be a definite colour difference between the sky and the foliage.

To get a classic looking infrared colour picture you should now open the image in photoshop by clicking on the “Done” tab in “Camera RAW”. Once in Photoshop, go to the “Image” tab, then “Adjustments”, “Channel Mixer”. Now choose the “red” channel and adjust the red slider from “100” to “0” and adjust the “blue slider from “0” to 100. Switch to the blue channel and do the opposite.
This will effectively swap the red and blue colours on the image. The sky will now be a believable blue colour, as it would be when we observe visible light. The foliage will be a yellow/orange hue which we can further edit with “Hue, Saturation, Lightness” controls in photoshop or Lightroom.

Alternative Method, Modify Your Camera to Take Infrared Pictures at Normal Shutter Speeds
If you want to avoid all of the faff associated with using a screw-on IR filter; the super long exposure times, possibility of motion blur, the manual focusing and locking, the extra post-processing steps etc., you could buy a converted Infrared camera or have your own camera converted to take IR photos easily.
The process involves removing the Infrared blocking filter that sits in front of your camera sensor and replacing it with an infrared transmitting filter. There are some great benefits to this drastic action. You will be able to use your camera normally and see through the viewfinder. You can use normal shutter speeds and apertures; no long exposures risking camera shake and motion blur and you will be able to focus as you do with a regular camera.
The downside to this approach is that the conversion is quite expensive and there aren’t many specialist firms that can do it so you may have to ship your precious camera and risk damage in transit. You won’t be able to take any other types of pictures except infrared so that the converted camera will be dedicated to that narrow type of imagery.

Related Questions
What is RAW in Photography? Comparison With Jpeg
RAW is a file format that has no compression and retains all of the data captured by a camera sensor. Images look dull at first but there is amazing scope for improvement in post-processing. To learn more about this versatile file type in photography, click here to see an article on this subject in this blog.
What is White Balance in Digital Photography?
Getting the correct white balance in different kinds of natural and artificial light can make your photographs look more natural and appealing. There are a few things to understand about light colour temperature though. Click here to find out more.