Expose To The Right. This is a controversial subject in digital photography and has polarised opinion regarding its validity in the age of modern sensor technology. If it is carried out correctly it can definitely reap small rewards but if overdone it could blow the highlight details and make them unrecoverable. So, what is Expose to the right, ETTR in photography?
ETTR is the process of taking an overexposed photo at Base ISO by moving the peak of the Histogram to the right without clipping highlights. More detail can be recorded within the brighter stops of the cameras dynamic range. Post-processing reveals more tonal information and less shadow noise.

The original photo above was showing very little detail in the shadows of the lower statue and the top of the column. Overexposing the scene reveals the shadow detail but washes out the sky and bleaches the column. In post-processing, you can see that it is possible to retain the shadow details in the statues and also restore the colour in the column and the sky.
It is a fairly simple technique but you have to choose the right type of image and get the other camera settings right to avoid disappointment. The following guide explains in more detail, what it is, why you should consider it and how to do it successfully to improve your image quality.
Illustrated Guide to ETTR (Expose To The Right)
How The Dynamic Range Works
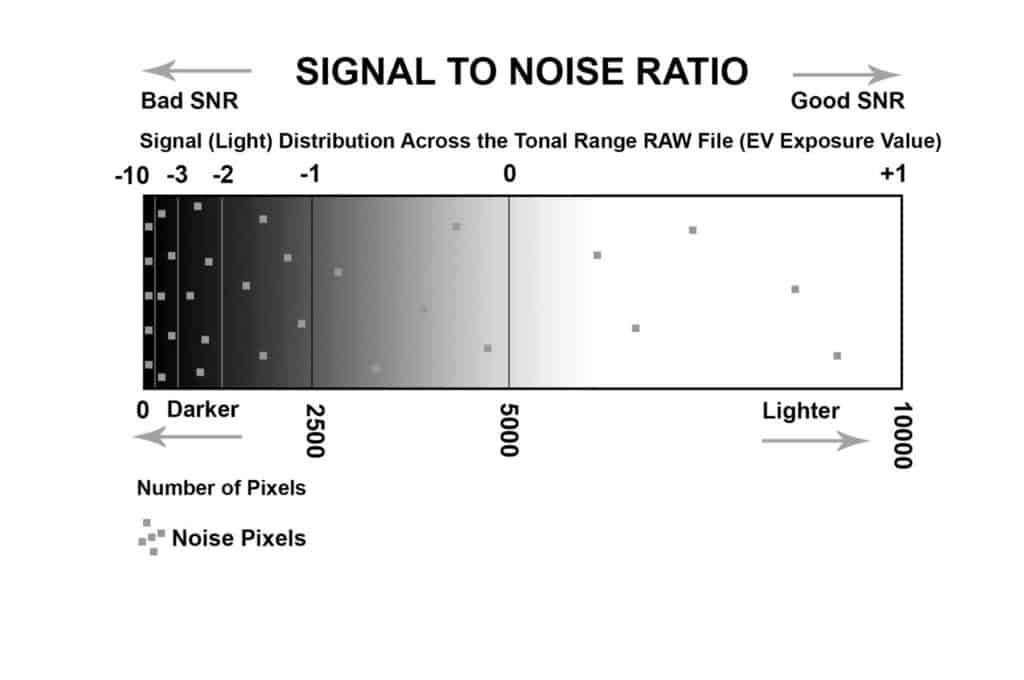
Modern camera sensors can capture a large latitude of dynamic range from 7 to 10 stops but they are imperfect and also record some noise. The light data collected within each Stop (EV Exposure Value) though is not equal as they have a logarithmic relationship, starting with the brightest Stop or EV (Exposure Value), which can collect the largest number of light data.
This also produces a very good “Signal to Noise” Ratio (High amounts of data and low noise). The next Stop down can only record half of the “Signal” or light of the first one. This goes on as you go down the stop values, each time the amount of light recorded is half that of the previous stop.

When you have passed through 7 to 10 stops by halving the data at each step, there is very little data being recorded in the very dark stop values but there is still some noise. This means that you have a bad “Signal to Noise” Ratio, even with Low noise levels. This explains why much of the visible “Noise” or grain can be found in the shadows of an image.
So, we know that the lighter “stops” of the dynamic range can record more data. To increase the amount of data (light) captured for a scene you need to ensure that more of it is captured in the brighter end of the cameras dynamic range. You do this by slightly overexposing the image.

Over exposing reveals a great deal of detail in the shadows while the post-processing will recover the details apparently lost in the highlights.
Overexpose The Image
The first thing to say is that this technique is only worth doing at Base ISO of 100 or 50. If you are starting with an overexposed image at a high ISO and you hope to pull it back by one stop to correct it in post-processing, the image quality gains will be unnoticeable. As the goal is to post-process the images to correct the exposure and retain image quality it is very important to set your camera to capture images in the RAW file format.

So, setting the program to Manual and the ISO to 100, overexpose your image by 1 or 2 stops by opening up the aperture or slowing down the shutter speed. Adjust the setting that will compromise the image the least.
If you require a large depth-of-field don’t change the aperture, adjust the shutter speed instead. Conversely, if you need to avoid motion blur, don’t slow the shutter speed, open up the aperture instead. The best images to try this out on are fairly low contrast images with some dark shadow areas. A high contrast image may already have some blown-out highlights so overexposing them will degrade the detail further. In this case, you might want to consider bracketing on a tripod then merging the three images together in post-processing to create one HDR image.

Move The Histogram Peak to The Right Without Clipping
This process of adjusting the camera’s exposure settings to overexpose the image will visually shift the main peak of the histogram “To The Right”. You can take a test photo then review the histogram on your camera to check that the peak has indeed moved to the right. Check that the solid part of the histogram graph has not slammed into the extreme right axis though as this will indicate clipping of the highlight areas and unrecoverable detail.


You can also use the visual “highlight alert” tool to spot areas of extreme overexposure and clipping. These are sometimes called “Blinkies” as they flash black patches on blown-out overexposed areas of the image. On some cameras, you can also check the histogram in the “Live View” on the screen. Switch to “Live View” and you will be able to see in real-time, the histogram as you adjust the exposure and before you take the photograph.

Post-Process The Image
Once you have your overexposed RAW image with the extra tonal data in the light parts of the dynamic range, download it and open it up in Adobe Lightroom or Photoshop (Camera RAW). Now, you’re free to correct the exposure by adjusting the exposure sliders in the “Develop” tab of the software. You can play with the Exposure, Contrast, Highlights, Shadows, Blacks and Whites until you have a well-exposed image with great detail in the highlights and shadows along with minimal noise in the dark areas.

As the dark areas were lighter to start with, they, therefore, have the capacity to record more data which improves the “Signal to noise ratio”. As you darken the shadow areas in post-processing, more detail is retained due to the increased data. Also, as the “signal to noise” ratio is improved, the appearance of visible noise is reduced.


Photo by Oscar J Harper
When Not to Use ETTR
Although you could assume that this technique could be used for every image there are instances when it would have little or no benefit. If you are shooting with anything higher than your cameras best quality ISO setting usually 100 or 50, the benefit would be negligible. The extra noise produced by a high ISO number would obliterate any gains made by darkening the overexposed image in Lightroom.
If the only way to overexpose the image is to change the ISO to a higher number then don’t bother because the extra noise will defeat the point. For example, if there is no option to open the aperture because it would blow the depth-of-focus (depth-of-field) or there is no option to slow the shutter speed because it would introduce motion blur, then don’t increase the ISO number for the reason explained above, just go with the exposure that the meter is offering.
If your camera only shoots in Jpeg there is very little point in employing the ETTR method as the file type is already highly compressed and therefore has much less detail to try and extract.
There is a growing opinion that due to the quality of modern sensors, the RAW uncompressed file type and smart software like Lightroom, there may not be much to be gained by using the ETTR method. It’s much easier nowadays to recover detail and colour from shadows and highlights using the simpler method of editing RAW in Lightroom.
If a scene already has very high contrast and blown out highlights, there is little point in “exposing to the right” as it will render even more of the highlights unrecovereable.
It is a useful skill to know and it will also give you a deeper understanding of how exposure is handled by your camera across the whole spectrum of its dynamic range.

Related Questions
What is Exposure Compensation in Photography?
ETTR is a form of exposure compensation albeit, deliberately overexposing a scene to gain some image quality and to recover some shadow and highlight details. There are other ways to achieve exposure compensation depending on the luminance of the scene. It can involve overexposing or underexposing to correct the exposure that the light meter often gets wrong. You can read our illustrated guide right here.
How do You Read a Histogram in Photography?
This is very much related to “Expose To The Right”. You can read our full guide on this subject in this blog by clicking here.
How do You Take High Key Photos?
Understanding exposure will allow you to be creative with the extreme ends of the dynamic range of your camera. This article explores how you can achieve the result of high-key photographs. These are photos that are typically bright, upbeat and with low contrast. You can read more about this fascinating subject right here on Photography Skool.
How do You Use The in-Camera Light Meter?
To understand ETTR it’s important to also understand how to read and manipulate the camera’s light meter. You can read all about its use and setup in our useful guide right here in Photography Skool.