High key photography is characterized by an abundance of light and minimal shadows. It’s all about reducing the tonal range by minimising the contrast in a very bright environment. Ideally the majority of the tones should be lighter than the mid-tones. The “Key” tones of the image are in the “Higher” end of the tonal range at the lighter end of the scale. This was once a necessity as early movie and TV cameras did not cope well with high contrast scenes.

(This post may contain affiliate links which means I may receive a commission (at no extra cost to you) for purchases made through links. Learn more on my Privacy Policy page.)
The images produced in high-key are upbeat and positive with soft, shadows and bright backgrounds. The process is relatively simple but you need the right equipment and some knowledge of exposure to get a great High Key image.
To take a High Key photograph you need a lot of light to reduce the contrast. Minimise any shadows created with a secondary softer light source or reflector. You need a bright, well-lit background that doesn’t compete with the main subject. Overexpose a little to push the brightness.

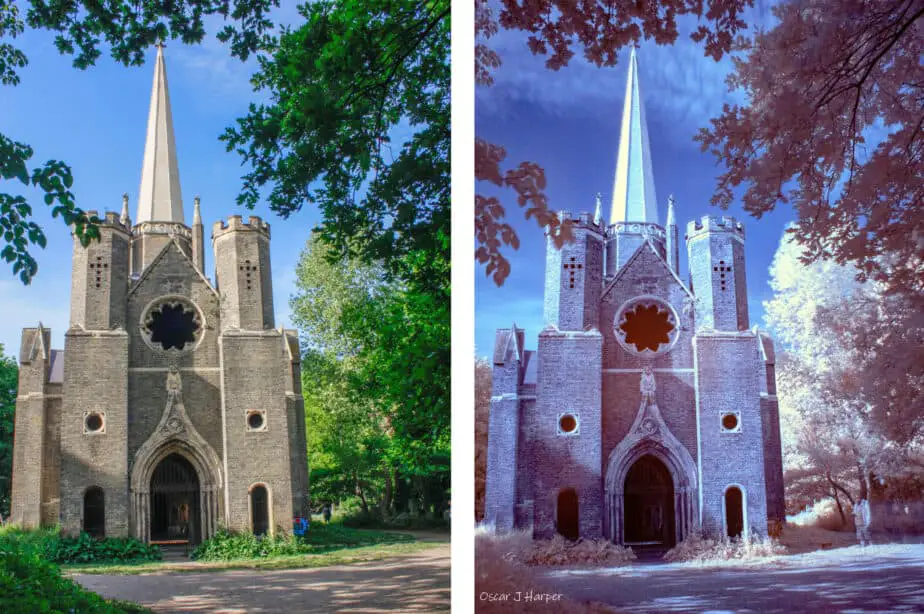
Photo by Oscar J harper
There are a few things to consider with a high key photograph in order to pull it off successfully. The results can be mysterious and intriguing sometimes with a dream-like quality due to the high levels of light and minimal shadows. The following guide highlights the steps to take to ensure a well-executed High-Key photograph.
“As an Amazon Associate, I earn from qualifying purchases.”
Check out our list of affordable gear to help you achieve a high-key lighting effect here.
The Steps to Achieving a Well Executed High-Key Photo
What’s a Good Subject For a High-Key Photo?
These are the opposite of Low-Key photographs which are moody, dramatic and sometimes, sinister. High-Key pictures can portray happiness, upbeat positivity and light-hearted fun. That would be great for photographs of children, pets and smiling grandparents. Living models can take on the impression of being angelic.

High-Key images can also convey mystique, magic, intrigue and enchanting qualities. This could prove to be beneficial for flowers, fashion or spiritual subjects. In product photography, they can present the items as high quality, well built and sleekly minimal making them appear more desirable. The products are isolated from the background focussing attention on their presence and design without distraction.

How Much Light do You Need For a High-Key Photo?
You almost need to overwhelm the subject with light without totally dissolving it away. The idea is not to create a totally flat and lifeless image but to subtlely moderate the contrast to soften the contouring but not obliterate it. Soft shadows can be present but not dominating. Light sources should be close enough or powerful enough for bright illumination but varied in distance and positions to create a subtle tonal difference.
The exposure settings of the camera can be employed to maximise the light received by the sensor. A large aperture would provide abundant light with the added advantage of blurring the background due to the shallow depth of field. In contrast a slow shutter speed would allow for a small aperture to create a deep depth of field if the far background is key to the composition such as a snowscape or a bright sundrenched dessert of white sand. In this case, a tripod may be an essential piece of kit.

The high amounts of light and white areas in the scene could easily confuse the light meter of the camera which could force the exposure to be much darker than it should be. Experiment with spot metering on the main subject or placing an 18% grey card in the location of the subject. To produce perfectly white exposures be sure to set your cameras WB (White Balance) to the correct colour temperature of the light source that you will be using:
- Daylight
- Shade
- Cloudy
- Tungsten
- Fluorescent
- Flash
If none of those produces satisfactory results, set a custom white balance by photographing something white in the location of the main subject, then setting that as the default white reference image in the menu settings.
How do You Reduce Shadows in a High-Key Photo?
A single light source from one direction will create strong shadows on the opposite side of the subject. These shadows will be very definite with a harsh light source and softer with a diffuse light source. Either way, they will be too pronounced for a high-key image.
To produce the desired, softer effect you need to deliver or bounce light of slightly lesser intensity than the main light source into the shadows areas. This will balance and minimise the contrast without flattening the subject completely.

How do You Take High-Key Photos Outdoors?
Outdoors you can take advantage of the powerfully bright sun. You can face the subject into the sun and also bounce light with a soft reflector into the inevitable shadows that will be produced. The background could be a bright, white, cloudy sky or a white painted wall. Watch out for shadows though; try changing your position to eliminate them from the scene. Snow and fog would work well as backdrops which could be additionally lit, close up, by a flashgun off the camera and connected by a long cable or triggered by a slave unit.

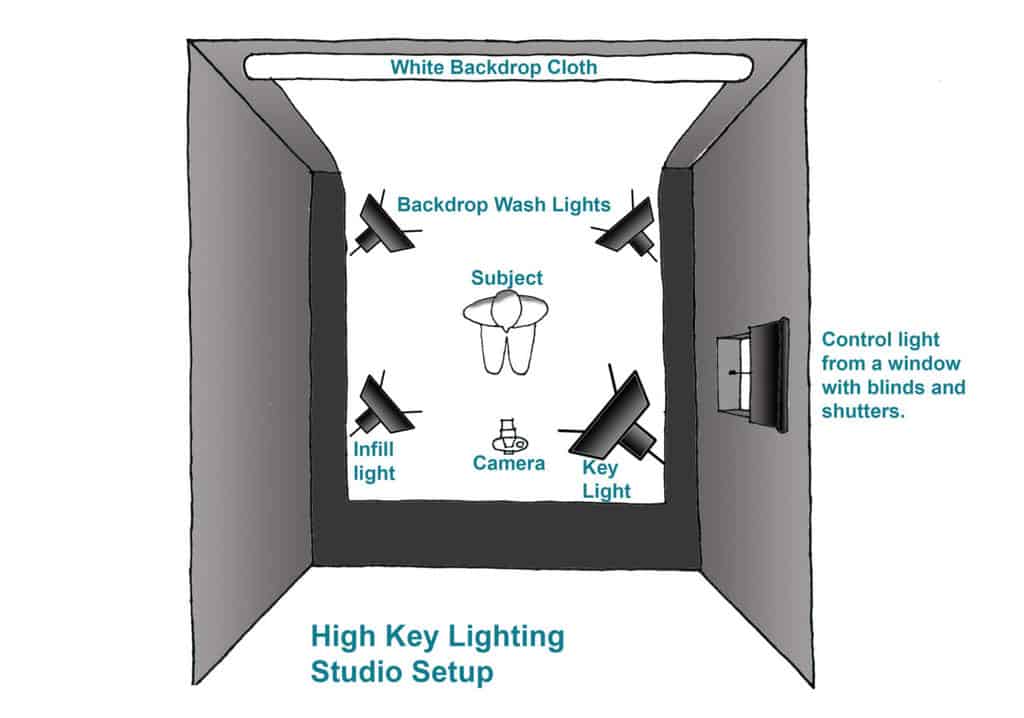
How do You Take High-Key Photos Indoors?
Indoors you can employ a full studio lighting set up with multiple lamps. They can be either continuous lighting so you can see the shadows and contrast in real-time or flash lamps that only reveal the results after taking the shot. Modelling lamps on the flash heads will help you visualise the degree and positions of any shadows. On the subject, you would aim the main key light source at the front and to one side of the subject.
At the front and on the opposite side you would direct a less powerful lamp to balance out the shadows created by the main lamp. You could move this secondary lamp further away to decrease it’s power also. Now you need to ensure the background is highly luminous as well, so point a couple of lamps directly at it while being careful that they don’t appear in the frame.

Do You Need to Overexpose a High-Key Photo?
Your camera can attempt to scuttle your hard work so far by trying to underexpose the very bright, overwhelmingly white scene. This is because the in-built light meter will try to average out the measured light and produce an average light exposure. This will make your lovely bright scene look a little dull and grey. You may have to try the spot metering function and select a part of the scene that you wish to focus on.
If this still produces unsatisfactory results you can switch to Manual mode. Here you will have much more control over the exposure and will be able to set it without the movement of the camera changing any of the settings. Now you can zoom into the subject to fill the frame with the tones that you want to define the exposure. Adjust the aperture and shutter speed to achieve a centre-balanced exposure on the light meter (i.e. not indicating any under or overexposure).
Now, zoom back out and reframe your scene as it was before the zoom-in. You may notice that the light meter now reads a little on the plus side of the meter indicating that it believes you are about to overexpose the image. Don’t worry about this though, the meter is just recording the extra light reflected off the white background that wasn’t present when you metered off the zoomed-in subject with little of the background in the frame.
So, do you need to overexpose a high-key photo? The answer is that it appears that way but you are simply counteracting the camera’s tendency to try and average out the whole scene between shadows and highlights and produce a mid-grey. You could actually place an 18% grey card (that’s the tone that the light meter sees as an average reading) in the scene in front of the subject to set the meter reading and exposure. If you are still not seeing the magical, mysterious high-key, blown-out effect that you imagined, try pushing the exposure up by a stop or two by overexposing even more.

High Key Effect in Post-Processing
Notwithstanding all of your great efforts to produce a perfect high key photo in-camera, the results are not quite satisfactory. All is not lost though, especially if you have been shooting in RAW, which is recommended. Here’s where we can take advantage of the power of Adobe Lightroom or PhotoShop (Camera RAW) filter.
Simply open up the image in one of those software’s and manipulate the image using the sliders in the Basic panel. You can immediately set the white balance by selecting the WB Eye-Dropper tool and picking a white pixel in the image. Then adust the main sliders to achieve the high key effect that you desire. You can adjust the following sliders to maximise the high key effect:
- Exposure
- Contrast
- Highlights
- Shadows
- Whites
- Blacks
You can really push these settings to produce the high key, blown-out, mystical image that is often associated with this style of photography.

Related Questions
How do You Take Low Key Photos Indoors And Outdoors?
The opposite of High Key photography, this technique is at the other end of the tonal scale and involves deep shadows and dark brooding scenes resulting in very dramatic compositions. It’s a very striking method and you can read all about it in our illustrated guide, here.
What is White Balance in Digital Photography?
This is an important technical aspect to understand when trying to produce a great High Key photograph. Find out more on this website by clicking on our illustrated article, here.
What’s the Best Time for Newborn Photos?
High Key photography could be very relevant in newborn pictures as it creates a very angelic, pure and magical quality. For more detailed information on photographing Newborns, see our helpful tips right here on Photography Skool.