Correct exposure is one of the most important things in photography. The camera sees the world of light differently to us but to level the playing field you can allow it to look at something that it understands – the “grey card”. How is it used to improve the exposure of your photographs?
To use a grey card in photography place an 18% grey card in the scene. Set camera to Manual. Fill the viewfinder with grey. Adjust the exposure until you have a central light meter reading. Remove the card, reframe and refocus. The meter will move to +ve or -ve but leave it and take the photograph.

It is a simple way to fix exposure readings especially in difficult lighting conditions with multiple sources of light. There are a few steps to take to ensure that the card is being used correctly. The following illustrated guide explains how to use the grey card for perfect exposures and white balancing.
Illustrated Guide to Using a Grey Card in Photography
Why Use an 18% Grey Card?
The 18% grey card which is also known as the mid-grey is the tone that we perceive to be roughly halfway between pure black and pure white. The 18% represents the amount of reflectance the grey card will produce in visible light. That is to say, it will reflect 18% of all the incident light that it receives. The way that we perceive light is non-linear and so the 18% reflectance is perceived as approximately 50% brightness. This can best be shown on a logarithmic graph.

It’s the tone that the cameras light meter wants to achieve as it sees it as the neutral level of light. It will attempt to underexpose or overexpose the scene to achieve it. So why not give it what it wants and show it the grey card; it will improve your exposure and white balance every time.
It probably makes sense that the camera’s light meter favours a mid-grey exposure as it will suit the majority of well lit photographic scenes. It also leaves the photographer with the options of correcting the exposure either up or down in tricky, high-contrast lighting situations.
How to Fix The Exposure With a Grey Card
The light meter will try and push the exposure towards its understanding of a “good” exposure which involves getting it towards a mid-grey tone. Unfortunately, this means that intentionally dark or bright scenes will be pushed towards a disappointing grey tone, reducing the strong shadows or greying the white highlights to an unwanted low-contrast composition. The light meter is searching for its ideal mid-tone to expose for and if it can’t find it, it will attempt to create it by adjusting the exposure to get close to it.

Correctly Underexposed Dark Scene (Right Image)
Photos by Oscar J Harper
If you present the light meter with the perfect mid-tone grey it exposes it perfectly for whatever light it is bathed in. If you are struggling with the exposure of an image due to difficult lighting or a difficult subject try using an 18% grey card within the scene and under the same luminance and sources of light as the main subject.
The process is quite simple and just involves a few simple steps. You don’t need a tripod unless the scene is quite dark or requires a slow shutter speed. Make sure you are in manual mode and select a suitable ISO setting, (not Auto ISO). This is to ensure the camera doesn’t try to override your exposure once you have set it with the grey card.

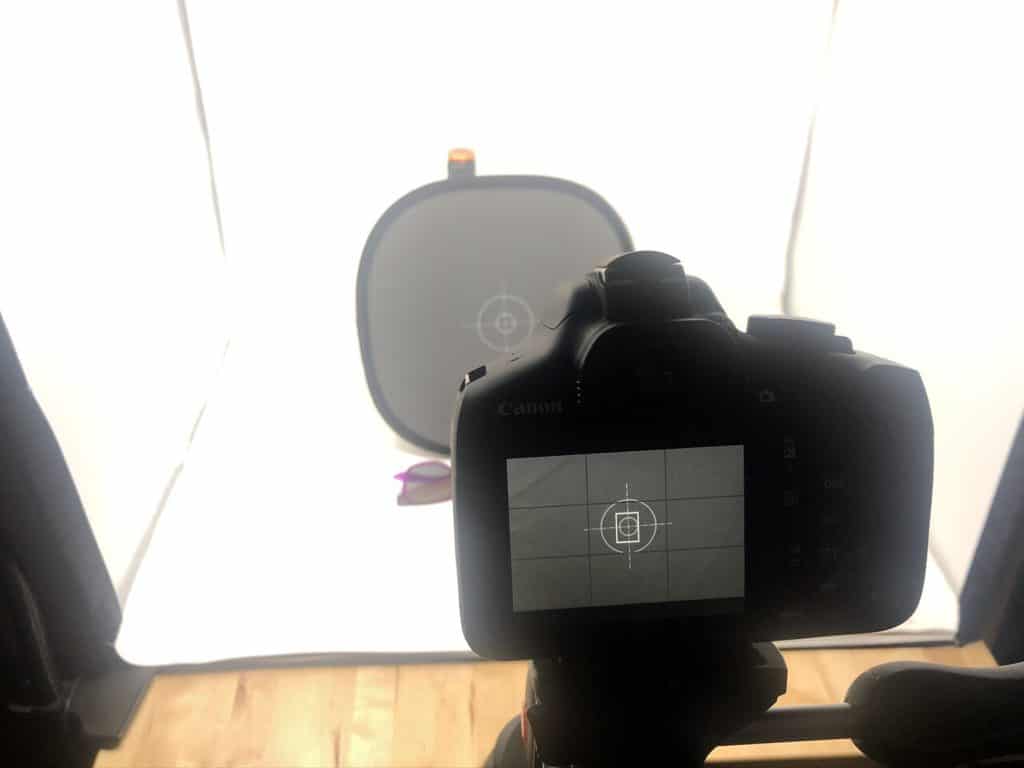
Place the grey card within the scene, under the same lighting conditions and without shadows falling across it. Now fill the frame fully with the greyness of the card and don’t include any of the peripheries of the scene. Zoom in or move closer if you have to. If that is not possible switch to spot metering and centre focus on the grey card.

Now, adjust the exposure settings, aperture and shutter speed to suit the type of image you want and to achieve a central, neutral light meter reading. You can now remove the grey card from the scene. Reframe the image and refocus. You will notice that on the removal of the grey card the light meter will probably have bounced towards the negative side or the positive side.
This is normal because we are in Manual mode and the light meter is just informing us that it thinks the image will be either overexposed or underexposed compared to the correct exposure of the grey card. If you were using any other program the camera would automatically correct the exposure towards a mid-grey tone. You can now take the apparently overexposed or underexposed picture and it should produce a great exposure for the available ambient light.

Neutral Exposure Produced With The Aid Of A Grey Card (Right Image)
Photos by Oscar J Harper
You can see that the exposure of the photographs above is much improved with the use of a grey card. The white backdrop appears to be well lit and “white” instead of the dull grey of the image on the left. On the left, the cameras light meter was confused by the predominantly white (high-key) scene and attempted to darken the overall scene resulting in a murky grey “white”.
How to Correct The White Balance With a Grey Card (Compared to a White Card)
Let’s first have a look at how the Auto White Balance handles a scene that is lit by a warm tungsten lamp. Using Manual mode, set the light meter reading to a neutral, zero setting with appropriate “Aperture” and “Shutter Speed” settings.

There Is A Distinct Orange Cast And A Dark Exposure.
Photo by Oscar J Harper
Now let’s have a look at setting a Custom White Balance with a “White” target in the ambient light of the scene. Zoom in to fill the frame with the “White” of the target. Set the White Balance to “Auto”. Again, using Manual mode, set the meter reading to a central neutral position. Take the shot then navigate to the “Custom White Balance” menu and select this image to define the “Custom White Balance” parameter. (This is the procedure for a Canon Camera. For other makes of camera, check your instruction manual).

Zoomed In To Fill The Frame With The White Card (Right Image)
Photos by Oscar J Harper
Now, go to the WB menu and select “Custom White Balance” from the options. Remove the white target from the scene, reframe, refocus and take the shot.

White Card Removed (After Correcting WB With A Custom Image) Right Image
Photos by Oscar J Harper
In the photos above, you can see that the use of a “White” target card has performed a reasonable job of eliminating the orange cast of the tungsten lamp. It is however still a little underexposed, a little dark. This is because the light meter was confused by the all-white target card and pulled down the exposure to underexpose the scene towards it’s preferred mid-grey tone.
Finally let’s have a look at setting a Custom White Balance with a “Grey Card” within the ambient light of the scene. Fill the frame with the “Grey” of the card by zooming into it and set the White Balance to “Auto”. You should still be in Manual mode. Set the meter reading to a neutral, zero position. Shoot the image, navigate to the “Custom White Balance” menu and select this new image to define the “Custom White Balance”.

Zoomed In To Fill The Frame With The Grey Card (Right Image)
Photos by Oscar J Harper
Choose “Custom White Balance” from the WB options menu. Remove the Grey-Card target from the scene, reframe, refocus and take the shot.

You can see that using the Grey Card, fixes the exposure, as well as doing a very good job of colour correcting the white balance. This method is particularly useful for very high-key, predominantly white scenes.
The 18% grey card is a neutral colour containing equal parts of RGB (red, green, blue). It is a very reliable reference for a perfectly neutral colour exposure because it has no colour bias.
Types of Grey Card
There are many handy grey card accessories on the market that are easy to carry around, offer accurate neutral grey and some have additional uses:
Collapsible Grey Card & Sun Reflector

These are basically very compact sun reflectors with an 18% grey side and a white, reflective side. Once unfurled you can use the grey side to set your exposure calibration in a scene. The grey side also has a faint white target to make focusing easier. You can get your model to hold it for the exposure set up if you are shooting portraits. Flip it over to the white side and it becomes a very handy reflector for soft infill light on the shadow side of the model. They are very lightweight, about 30cm (12 inches) in diameter when open and collapse down to a small size of about 12cm (5 inches). They stow away into a compact carry case.
Credit Card Grey card

This type of grey cards are truly pocket-sized and can fit into your wallet. They are usually in sets of three comprising an 18% grey card, a white card and a black one. Very convenient if you’re not carrying a camera bag.
If you place the black and white cards in a test photo you could use them in post-processing to set the black and whites using the “Levels” or “Curves” tools.
White Balance Grey Card

These are special grey cards for white balancing in digital post-processing. They are a lighter coloured grey than the 18% grey card. They are a very pale grey, almost off white and they are certified, neutral. To make the best use of them, you take one photograph with the card in the scene, remove it then continue shooting the scene as normal. Later, open all the images in Lightroom, find the one with the grey card in it and select it for editing in the “Develop” tab. Use the eye-dropper in the White Balance tool to select a pixel on the grey card.
This should magically correct the white balance and colour-shift all the other colours in the image to look natural. Now you have this “white balance” setting you can also apply it to all the other photographs that were photographed in the same lighting session. Just select all of the other photos in the sequence by pressing “Ctrl-A”, then click on the “Sync” button when it appears. This will apply the “white balance” you have just established to all the other images in the sequence, saving a lot of time in the workflow.
Related Questions
What is The Exposure Triangle?
To create a good neutral exposure it is worth knowing about the Exposure Triangle. This explains the three elements of exposure: Aperture, Shutter Speed and ISO. We wrote an illustrated article all about this subject which you can read here.
What is Exposure Compensation in Photography?
If you find yourself without a grey card to help correct the exposure of a scene, you can adjust it by applying the rules of Exposure Compensation. You can discover more in our complete guide on this website, by clicking here.
How do You Take Photos in a LightBox, AmazonBasics Studio?
You can use a grey card to help set the exposure and not underexpose the scene in this bright, white, mini studio lightbox. Check out our illustrated guide right here in Photography Skool.