The Canon EOS Rebel T6/1300D is an entry-level DSLR but it is quite a capable camera. It has many of the functions that higher-end DSLRs have but maybe not quite to the same specification. It is fairly lightweight compared to the semi-pro and professional Canon cameras and therefore easier to carry around.
It’s a great camera to learn about the different Canon shooting modes and other essential settings. The camera has all of the usual “Creative” shooting modes and a selection of “Basic” scene modes. The “Creative” modes give you more control over the exposure and the “Basic” modes provide you with ready-made exposure packages for specific situations.

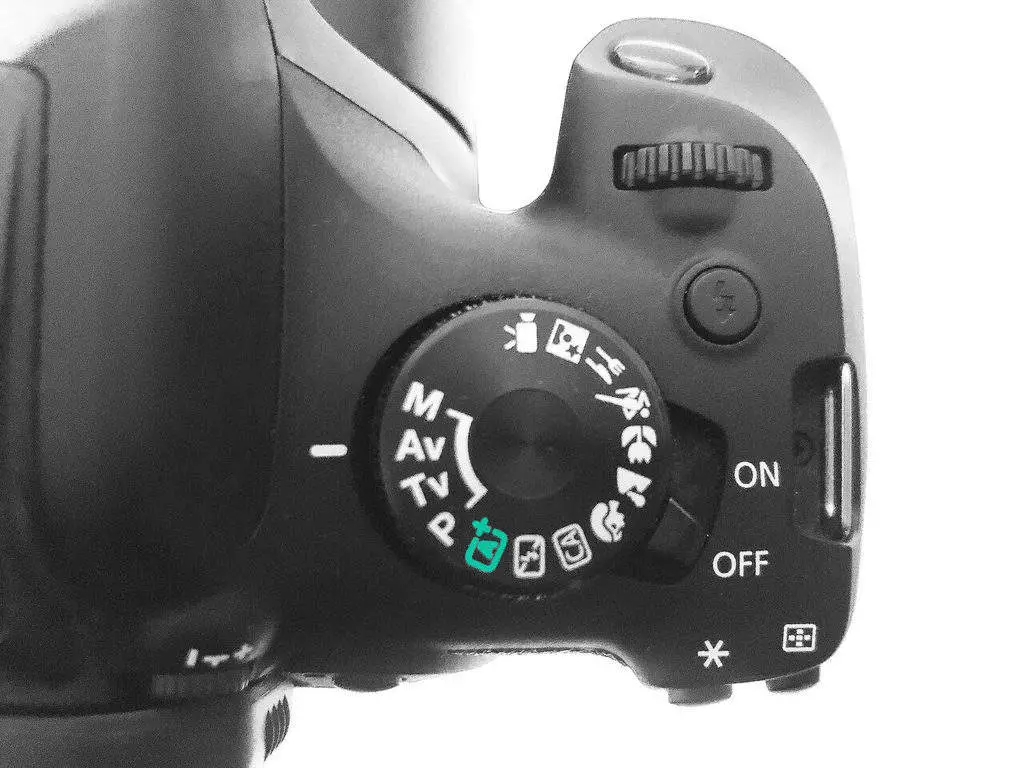
Here is a list of the shooting modes of the Canon EOS Rebel T6/1300D/Kiss X80 with brief descriptions:
- M (Manual) – Creative Mode – Full Control
- Av (Aperture Priority) – Creative Mode – Can fix the aperture
- Tv (Shutter Priority) – Creative Mode – Can fix the shutter speed
- P (Program) – Creative Mode – Can shift shutter/aperture exposure
- A+ (Automatic) – Basic Mode – No control of any settings
- Disabled Flash – Basic Mode – Automatic with no flash
- CA (Creative Auto) – Basic Mode – Control of some creative settings
- Portrait – Basic Mode – Sets a big aperture for blurred background
- Landscape – Basic Mode – Attempts a small aperture for big DOF
- Close-up – Basic Mode – Fast shutter speed to minimise camera shake
- Sports – Basic Mode – Fastest shutter speed and continuous focusing
- Food – Basic Mode – Allows control of colour tone, warm or cool
- Night Portrait – Basic Mode – Slow sync flash fore/background well lit
- Movie – Video mode with 24 or 50 frame capture speed
Let’s have a look at these shooting modes in more detail. Keep reading to discover how and when or even if, to use any or all of these modes:
Illustrated Guide to Canon EOS Rebel T6/1300D Shooting Modes, Exposure Settings, Autofocus And Drive Settings
First, let’s take a look at the “Creative” modes. These are the programs that you should aim to use if you want to begin to take control back from the camera. They offer much more flexibility and influence over the creative results of your photography. As well as varying degrees of control over the Shutter Speed and Aperture they also allow you to decide on the ISO, Autofocus, White Balance, Motor Drive, Bracketing, Flash Power and Light Metering settings.
M (Manual) – Creative Mode – Full Control

This is the most daunting mode to use as the camera relinquishes full control of the management of the exposure over to the photographer. It will still offer help in the form of guidance and warnings from the light meter if it believes your image will be under or overexposed. It won’t try to override your decisions though. This mode is probably not for beginners but this guide will be here when you feel ready to return to it.
You will have the freedom to select the Aperture opening size based upon your creative decision about the depth-of-field that you want to see in the photograph. The depth-of-field is the amount of the scene that you want to be in sharp focus. You can choose to make the whole scene from foreground to distant background in focus by selecting a very small Aperture opening. Conversely, if you want to pick out a single feature to be sharp against a blurred background, you can select a wide-open Aperture.

The light meter will indicate if your chosen Aperture produces a correct exposure. If it isn’t you can balance the exposure by adjusting the shutter speed until the meter is happy in the middle. You still have full control over the ISO setting if you need further assistance in shifting the exposure bias one way or another. Compensation Bracketing is allowed in this mode.
Av (Aperture Priority) – Creative Mode Aperture Control

“Av” stands for “Aperture Value”. This mode is for those occasions when control of the Aperture is more important than the Shutter Speed. This is the first of what we call the “Semi-Automatic” modes. So-called because you only have to think about one of the settings and the camera will set the other one to balance the exposure. In this case, you choose the Aperture opening setting to suit your creative desire and the camera will select the correct shutter speed to return a balanced exposure.
One important thing to remember when you have control of the Aperture is to keep an eye on the setting that the camera has chosen for the Shutter Speed. If you choose a very small aperture the camera may select a very slow shutter speed to compensate and balance the overall exposure. If it is very slow, less than 1/30th of a second, you will need a tripod to keep the image free from camera shake. Again, you still have full control over the ISO setting if you need further assistance in shifting the exposure bias one way or another. You can also Bracket in Av mode or employ the Exposure Compensation feature to force the camera to under or overexpose the image.
Tv (Shutter Priority) – Creative Mode – Shutter Speed Control

“Tv” stands for “Time Value”. Use this when the Shutter Speed should take priority. This is the second of the “Semi-Automatic” modes. This time, how you record the speed of the action takes priority. You have full control to set and fix the Shutter Speed and the camera will take care of the aperture setting to achieve a balanced exposure.
This knowledge will help you to freeze some fast-moving action with a super-fast shutter speed or allow some motion blur to develop on the image with a very slow shutter speed. Always keep monitoring what the camera is selecting for the other setting, in this case, the Aperture. If you have chosen a very fast shutter speed to freeze some manic action, the camera may have been forced to select a large Aperture which could leave most of the scene out of focus.
So, these semi-automatic modes are brilliant at releasing you from having to think about too many variables but just always be sure you are happy with the overall result. If the ideal picture just isn’t working out you still have the freedom to adjust the ISO setting to pull the exposure range to a place where you can achieve the desired effect. It is possible to use Bracketing and Exposure Compensation in Tv mode.
P (Program) – Creative Mode – Can Shift Shutter/Aperture Exposure Pairs

“P” stands for “Program” or “Program Shift”. This program looks at the luminance of the scene, takes a meter reading and assigns relevant Aperture and Shutter Speed settings based on a calculated “Exposure Value” by an internal algorithm. This will provide the best outcome that the camera believes it can achieve according to the light in the scene. You have effectively handed over control of the exposure to the camera, temporarily.
The way in which this mode becomes a semi-automatic mode is through the innovation called “Program Shift”. If you look through the viewfinder, half-press the shutter button to cause the camera to meter the scene it will then assign a Shutter Speed and Aperture value to produce a balanced exposure according to the algorithm and the particular lens you have attached.
If, however, you don’t like the choice of any of the settings because of the nature of the contents of the scene, you can shift exposure pair to a more favourable position. You do this by simply half-pressing the shutter button again, then rotate the spinning wheel and you will see the exposure settings both changing to maintain the balanced exposure. So, if you want a smaller aperture to increase the depth-of-field, dial the aperture number up and you will observe the shutter speed getting slower to maintain the balance.
You also have full control of the ISO setting in this mode to give even more latitude in controlling the exposure. Leaving the ISO setting on Auto will usually choose the right level of light amplification for a wide range of scene luminances. This is a very useful mode to retain some creative control of the exposure but also get a good exposure without thinking too much. Bracketing and Exposure Compensation are permitted in this mode.
Other Settings Controlled by The Creative Modes
All of the creative modes M, Av, Tv and P have full control over some other important settings on the camera. These settings are found on the rear of the camera on the circular disc made up of four buttons that also double up as arrow keys for navigating around menus:
- ISO – You can select Auto ISO if you want the camera to assess the light meter reading and select an appropriate amount of ISO amplification for the scene. If you want to take control and guarantee a picture with low noise you can also select fixed ISO settings from 100 doubling up all the way up to 6400 for very dark scenes. Using the very low ISO settings may require you to use a tripod or a large aperture in order to get low-noise images. Having this control will allow you to push the exposure capability further in low light effectively shifting the dynamic range of the camera.

- AF (Autofocus) – You can take control of how the camera focuses. There are three focusing modes to choose from.
- One-Shot Autofocus – In this mode, the camera will focus and lock on to the point that is within the chosen focusing frame. There are 9 of these frames to choose from or you can have all of them active and the camera will focus on the nearest object to cross one of the focusing frames. It can be beneficial to select the centre focus point, focus the scene with it, lock the focus then reframe the scene.
- AI Servo – The mode that is designed to track moving subjects and so it continuously re-focusses. It will allow you to take a photo even if it is not quite in focus. For this reason, it’s best to use continuous shooting with this Autofocus mode. It has the ability to analyse the movement of the subject and focus where it predicts it will be when you take the shot.
- AI Focus – This is Canon’s Artificial Intelligence Autofocus. This is quite clever. This can detect if the subject at the focusing point is moving or stationary and will set the Autofocus to suit. So it will switch between One Shot and AI Servo Continuous Autofocus. This is very helpful if you are tracking an erratically moving subject.

- White Balance – Control of this setting can produce a natural-looking colour balance to your photographs in the ambient light that you are shooting in and therefore eliminate any distracting colour cast. You can choose from Auto, a selection of set colour temperatures or you can program in a custom white balance.
- Auto White Balance – This will meter the colour temperature of the ambient light and set the WB to achieve the best result it can. It may get a little confused if there are multiple light sources of different temperatures. In tungsten light that has a warm orange temperature, it will retain some of the warmth unless you override it to produce a clean white balance
- Daylight – This setting is for outdoors in the sunlight (5200K)
- Shade – Outdoors but in the shade (7000K) Cooler light
- Cloudy – Outdoors under an overcast sky (6000K) Cool light
- Tungsten – Indoors under incandescent light (3200K) Warmer
- White Fluorescent – Indoors under tube lights (4000K) Greener
- Flash – Using the onboard flash a neutral white light
- Custom – Set a photo taken of “white” in the scene as the default

- Drive / Self-timer – There are several drive settings you can choose when working in the creative modes:
- Single Shooting – Takes one shot and stops shooting
- Continuous Shooting – Shoots while shutter held down
- Self Timer 10 – 10 second self-timer
- Self Timer 2 – 2 second self-timer
- Self Timer Continuous – 10 secs self-timer takes up to 10 shots

Other Settings Controlled by The Creative Modes Without a Dedicated Button on The Back
The Creative Modes can also control how the camera will interpret the light delivered to the light meter via the mirror. It doesn’t have a dedicated button on the back of the camera but you can access them by pressing the “Q” button (Quick Menu Access) then, navigating to it by using the arrow keys.

There are three metering modes to choose from:
- Evaluative Metering – This takes a light meter reading of the whole scene but in addition, it applies greater importance to the tones around the point that the camera happens to be focussed on. This could be any of the different focusing points, not just the central one. The camera also attempts a degree of Exposure Compensation in this mode to correct the exposure in tricky lighting conditions.
- Centre-Weighted Average – This takes an average of the whole scene with a bias towards the tonal range it finds in the central part of the scene. No exposure compensation is attempted.
- Partial Metering – This reads only the tones it finds around the centre focusing point (about 10% of the whole scene). This allows you to fairly accurately pinpoint a small area of the scene to be evaluated by the cameras light meter.

One last setting to mention that the basic modes cannot affect but the creative modes can is “Flash Exposure Compensation”. This allows you to dial the power of flash up or down depending on how harsh or soft you want to have it. You can dial the power up or down by +2 or -2 stops.
You can easily find the controls for this setting by pressing the Menu button and navigating to first Red menu; the Flash Control menu is located at the bottom of the list.

Now select the “Built-in flash func. setting” then select “Flash exp. comp” then you can dial in the degree of flash power compensation using the Left and Right movement buttons.

Let’s move on to the Basic modes where you have little or no control over the exposure settings.
A+ (Automatic) – Basic Mode – No Control of Any Settings

This is the most basic system on the camera. It is what is known as “Scene Intelligent Auto” mode. It will literally take care of everything after you half-press the shutter button to meter the scene. It will choose what to focus on based on what it sees in the focusing matrix. It will then choose the Aperture, Shutter Speed, ISO and Flash settings to achieve the best exposure that it can. There is really nothing for the photographer to do. The only thing you can change is “Motor Drive” from “Single Shot” to “Self Timer” or “Continuous Shooting” on a “Self Timer”.
It doesn’t offer any sort of creative input from the user. It’s really just for beginners who have never used a DSLR camera before. It will produce reasonable results with good exposures and it will get the newbie used to holding the camera and learning where the various buttons are. It shouldn’t be long though before an inquisitive photographer gets bored with same-ey looking snaps and will want to move onto one of the “Scene” modes or even one of the semi-automatic modes.
Disabled Flash – Basic Mode – Automatic With no Flash

This is basically the same as the A+ (Automatic) mode described above. The only difference is that the flash is disabled and will never pop up. This might be useful in situations where a flash might be disturbing like in a museum, church, theatre or sporting event. Maybe you want to ensure that the flash won’t fire in a lowlight scene and destroy the dark ambience such as a candlelit scene, a cave entrance or a private moment.
Because the flash will definitely not fire you will have to be careful in low-light scenes that you don’t underexpose the image. You will be given a warning by the light meter in the form of the Shutter Speed flashing if there is not enough light for a good exposure. So this program mode is ideal for beginners who don’t want to use the flash where it is frowned upon or prohibited.
CA (Creative Auto) – Basic Mode – Control of Some Creative Settings

This is a basic mode with no control over the exposure settings: Aperture, Shutter Speed and ISO. It does, however, it does give you some superficial controls over the ambience of the image by allowing you to fiddle with the colour intensity with settings such as:
- Vivid
- Soft
- Warm
- Intense
- Cool
- Brighter
- Darker
- Monochrome
It also allows you to change the degree of background blur by adjusting the Aperture.
You can also change the motor drive modes from: Single Shot, Continuous, Self Timer or Continuous on a self-timer. Finally, this mode allows you to control the flash in three ways: Automatic, Always On or Always Disabled. That’s it for Creative Auto. A few superficial perks but nothing to inspire the creative photographer. It might be a good first step for a beginner to escape the fully automatic modes.
Portrait – Basic Mode – Sets a Big Aperture For Blurred Background

This is a mode that is designed to help your portraits look a little more professional. Because this mode likes fast shutter speeds to freeze the model, It naturally selects a large Aperture opening to blur the background. It will also automatically engage the flash when the light is low or if there is a strong backlight which could wash out your carefully arranged ambient lighting scheme.
Like the Creative Auto mode above, you will have control over the Colour Intensity. In this mode, you also have a degree of control over the white balance by choosing a colour temperature for the predominant ambient light that you are photographing the model in. You have the choice of selecting: Default, Daylight, Shade, Cloudy, Tungsten, Fluorescent and Sunset light.
This will help to give the skin tones a more natural colour and tone. The motor drive mode is set to Continuous so you can hold down the shutter button and keep capturing the changing expressions and poses of the model. You can also select the self-timer for capturing selfie portraits.
Landscape – Basic Mode – Attempts a Small Aperture in Bright Sunlight for big Depth-of-Field

This is a very presumptuous mode. It assumes that you will be trying to take your landscape photograph by hand holding your camera and therefore it will attempt to keep the shutter speed at 1/60th of a second or faster. This is not always great if you need a very small aperture to keep the depth-of-field deep and everything in the landscape in sharp focus. This mode can only do that if there is an abundance of sunlight.
The ideal landscape set up would be to put the camera on a tripod, choose a very small aperture, a slow shutter speed to blur the sky or water and take the photo that way. You can select the ambient light type to set the white balance. This “Landscape” mode, despite its name, does not allow you to do this in low light scenarios.
Close-up – Basic Mode – Fast Shutter Speed to Minimise Camera Shake

This mode is for use when you are getting very close to a subject and focusing at near the closest limit of your lens. It would be more effective if you have a macro lens. The depth-of-field tends to decrease at these close ranges. You might think that the camera in this mode would select a smaller aperture to counteract the narrow depth-of-field but instead, it chooses a faster shutter speed, it tries for at least 1/60th of a second.
It will also fire the flash in low light situations to bring the shutter speed up. So, again it assumes that you will be handholding the camera. Shallow depth-of-field can be very suitable for macro photography but it would be better to have a choice and this mode does not give you that option. You can amend the ambient colour or convert the images to monochrome, black, blue or sepia.
You also have some control over the white balance by choosing a colour temperature for the ambient light that you are photographing the subject in. You can choose from the following: Default, Daylight, Shade, Cloudy, Tungsten, Fluorescent and Sunset light. You can shoot a single shot or use the self-timer or the self-timer with continuous shooting up to 10 frames.
Sports – Basic Mode – Fastest Shutter Speed And Continuous Focusing

This is a mode that is programmed for action and speed. It will always attempt to achieve a fast shutter speed if the available light permits; 1/500th of a second or faster in strong light. The goal is to freeze the action and movement that is associated with most sports. To keep track of the dynamic action the Autofocus is set to continually re-refocus on moving objects.
You will hear the lens motor continuously chirping way as you follow a moving subject. So you don’t miss any of the action, the default setting for the drive is Continuous Shooting but you can select the self-timer too. Everything is geared towards giving you the best chance of capturing a moving subject successfully. The flash will never fire in this mode to avoid distracting the athletes or drivers etc.
You have the usual control over the ambient colour and the white balance presets but you can’t set a custom white balance. This mode is not intelligent enough to know how fast the action is moving and if it’s moving past you or towards you. This limits the possibilities of creating great panning shots with a sharp subject and a blurred background.
Food – Basic Mode – Allows Control of Colour Tone, Warm or Cool

A mode that is specifically designed to help you photograph food. The colours of the food are very important so they always look appetizing and attractive. It tends to favour a large aperture opening and a faster shutter speed. This mode gives you the option to alter the colour cast to warm-up or cool-down the overall ambience of the scene.
There is an easy way to brighten or darken the images; it changes the ISO but with easy-to-use sliders on the rear screen menu. You can even turn the image monochrome black, blue or sepia, though why you would want to see monochrome food is anyone’s guess. You can adjust the tone from warmer to cooler with the provided slider. The only other options in this mode are the self-timer and flash disablement.
Night Portrait – Basic Mode – Slow Sync Flash Fore And Background Well Exposed

This is specifically for taking night shots with the flash but with a slower shutter to expose the background that is out of range of the flash. This mode effectively captures two differently metered exposures. One for the flash light on the foreground subject and a second exposure for the ambient light of the background.
The shutter speeds at night can be quite long to expose the background correctly so the use of a tripod is highly advised. This method is most effective when there is an interesting, well lit, distant background like a sunset, illuminated architecture or city street scene at night. The ambient colour of the scene is adjustable as is the intensity of the variation. Monochrome black, blue or sepia are also possible to shoot live.
Single shot or self-timer are the motor drive options. This is quite a useful mode to improve your night photography with flash and it is easier than attempting a slow-sync flash in Manual mode. You often just see a very black background with a flash shot at night but this technique can inject some colour and life into the backdrop.
Movie – Video Mode With 24 or 50 Frame Capture Speed

This is the only video mode available on the camera and it switches immediately to “Live View” mode on the cameras rearview screen. In the settings menu you can choose the the image recording size for the video thus:
- 1920 x 1080 at 25 Frames per second
- 1920 x 1080 at 24 Frames per second
- 1280 x 720 at 50 Frames per second
- 640 x 480 at 25 Frames per second
The recording microphone is built-in and very tiny and there is no option to plug in an external microphone. You can choose a custom white balance in the settings menu.
Related Questions
How to Connect Canon EOS Rebel T6/1300D/Kiss X80 to iPhone
Here’s a useful function of this camera. You can connect the camera to an iPhone via the cameras own onboard wifi hotspot and take full control of shooting and copying images, remotely. We wrote a useful guide on how to do this and you can read it by clicking here.
How to Set Custom White Balance Canon Rebel T6/1300D/X80
Knowing about this will improve how natural the colours will look in your photographs. It’s a fairly easy process and you can read how to do it in an article we wrote for this blog, here.