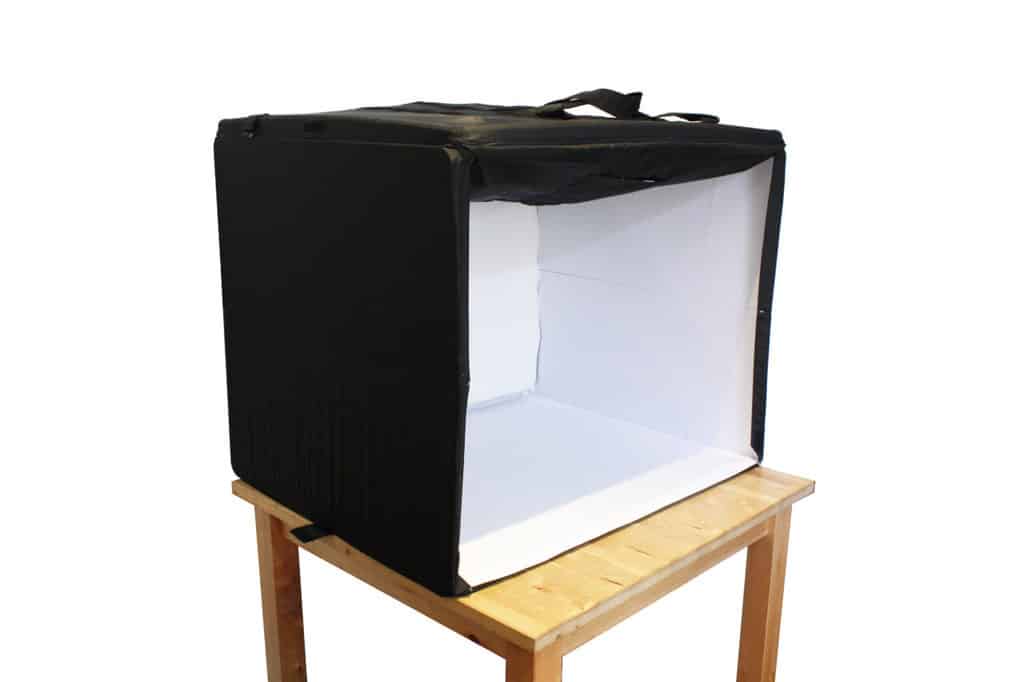
A light box is like having a mini photo studio in your room. It gives you full control of the lighting and context and is perfect for photographing products, still lifes or any small to medium-sized items. You can take professional looking pictures in a very controlled manner that will look stunning for your portfolio or a client.
To take photos in an AmazonBasics Portable Photo Studio you only need a camera. Pop open the studio; sets up in seconds. Unfold the white backdrop. Plug in and the built-in daylight LED lights come on. Set the white balance on the camera. Place an object and shoot away. Overexpose if necessary.

(This post may contain affiliate links which means I may receive a commission (at no extra cost to you) for purchases made through links. Learn more on my Privacy Policy page.)
“As an Amazon Associate, I earn from qualifying purchases.”
Check out our list of affordable gear and the AmazonBasics Mini Studio featured in this article, here.
The AmazonBasics portable photo studio is so easy to use, set up and store away as a flat pack just a few inches thick. Everything is included in the compact system: the lightbox cube with six sides, several magnetic opening flaps on the front door panel, an opening on the roof for overhead photos, two banks of 5600k daylight balanced LEDs set in the top-front and top-left, a smooth white seamless backdrop and floor. It’s quick and easy to use but there are a few things to consider to get the best out of it and to produce perfectly exposed photographs. See the guide below to ensure great results when photographing items in this light box.
Guide to Setting up And Using AmazonBasics Portable Photo Studio
Unboxing And Setting Up The Light Box Studio
Straight out of the delivery box, this mini-studio couldn’t be easier to set up. It arrives flat-packed, no more than a couple of inches high. Unpeel the two velcro retaining flaps on either side. Grab the handle on the top and start to pull the top section directly upwards. As you raise the top panel the side panels start to unfold and begin to form vertical sides. The side panels are stiff boards made of two hinged panels that spring up to form one side panel.

The back panel is made of black light-blocking fabric and it starts to unfurl as the top is raised. The back panel is attached by elastic to a stiff, swing down panel stowed underneath the top panel. The elastic starts to tug on this panel and swings it down to form a stiff back wall of the cube. The front fabric door flap is stowed beneath the top panel which can now be released from its velcro securing tabs and lowered down then folded back and outside onto the roof of the cube.

The folded backdrop is now visible and can be lowered to the floor to form the seamless, continuous smooth white backdrop/floor.

The power pack is stowed neatly in a zipped compartment on the roof. Remove it from there and plug it into the light box connector hidden behind a velcro flap on the left side of the roof panel. Now, plug the other end in the power socket on the wall and switch on.

What Equipment is Built Into The AmazonBasics Photo Studio?
There are two banks of powerful 5600K daylight-balanced LED light that spring immediately into life after plugging in. The lights are all fixed to the ceiling of the cube. One bank of lights is fixed across the front of the roof to give an all-around general front lighting to minimise any shadows in front of the subject. There is a second bank of LEDs fixed to the roof and along the left side. This can provide some modelling light to add interest and depth from the left-hand side.


Every interior surface of the cube, including the inside face of the front door flap, is covered with a blight white fabric that can bounce the light around in every direction to minimise shadows and produce a high-key effect. There is a detachable seamless smooth white backdrop/floor panel clipped to the back of the roof that draped down the back wall and across the floor of the lightbox.

The support hooks can also be used to hang different coloured or patterned backdrops. Visible access can be achieved when the front door flap is closed down via a series of small, openable magnetically fixed flaps. These can be opened individually and at different heights to vary the angle of the photograph while minimising reflections onto the subject from outside the cube.

Gif by Oscar J Harper
In the roof, there is a zip-open access hole to allow overhead photography of subjects while minimising reflection from outside. Keeping the room outside the cube, dark, will also help to minimise reflections onto a shiny subject.

How do You Take a Photo in The AmazonBasics Portable Photo Studio?
Once the studio is set up and the lights are on, it’s time to choose a subject to be photographed. The internal dimensions are quite generous for a light cube being 2 feet high 2.5 feet wide and 2 feet deep. It could therefore easily accommodate an object that is approximately 15 inches high and 15 inches wide with enough room around it to show a white background. You may have to edit the corners of the cube out when photographing the larger subjects but that is very easy in photoshop.

Now we have to set the white balance of the camera for the LED lighting within the light box. Make sure any lights in the room are turned off so that there is no stray light of different temperature leaking into the studio. You could just choose the “Daylight” setting in the “White Balance” menu on the camera.

A more reliable method would be to use a “Custom White Balance”. You can do this by taking a photo of the empty light box with the LEDs on. Now, find the “Custom White Balance” menu on your camera. Set the photo you have just taken as the “Custom White Balance” target and the camera will use that as the base white and render all other colours according to it. What I have found to be even more accurate is to photograph an 18% grey card as the custom white balance.

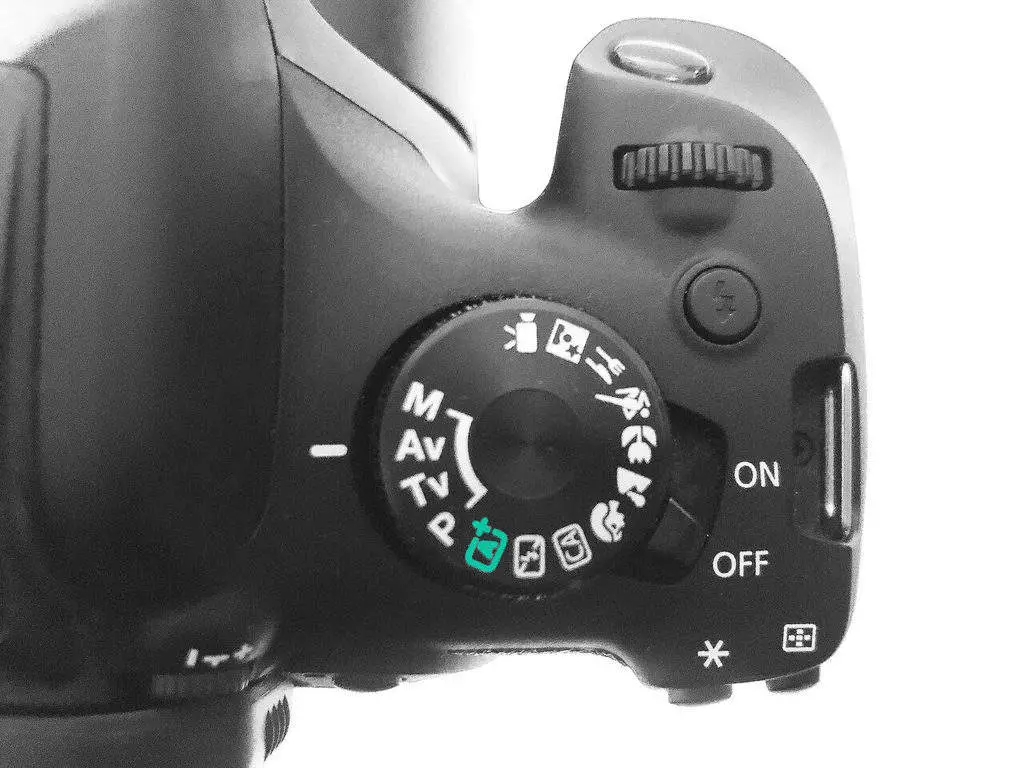
We can now place a subject in the light box. Place it roughly in the centre of the floor of the cube so it receives even light from the front and side banks of the LEDs. You probably won’t need a tripod because of the abundance of light but feel free to use one if you prefer. To start with, choose Aperture Priority mode and set your camera to autofocus and spot metering. Frame up the subject, focus and press the shutter button. If this produces an unsatisfactory result with a grey hue to the white background we need to have more control over the exposure. Switch to the “Manual Program”.

Select an aperture that gives you the desired amount of depth of field. Now, zoom into the main subject until all the white background is eliminated. With the front spinning wheel adjust the shutter speed until the light meter shows a central, neutral reading; neither under nor overexposed.


Zoom back out and reframe the subject with some surrounding white background. The light meter reading will now probably have a reading on the positive side indicating some overexposure. Don’t worry about this though; it is simply reading the whole scene including the brighter white background. You know that the main subject, which is darker than the white background is perfectly exposed and it doesn’t matter if the white background will be a little blown-out as it will only look brighter and cleaner. So go ahead and take your first photograph in the lightbox. It should look bright and sharp with a perfectly white background. If it is not quite perfect then simply adust the shutter speed with the front wheel to increase or decrease the amount of overexposure and shoot again.


Photos by Oscar J Harper
Can You Change The Backdrop in an AmazonBasics Portable Photo Studio?
The photo light box, as supplied by Amazon only comes with one backdrop which is a matt white vinyl seamless sheet. There is, however, nothing to stop you from acquiring your own different coloured or patterned, fabric backdrops though. They could easily be clipped to the rail of the supplied backdrop with small bulldog clips.

Before buying fabric for a backdrop measure the width of the box and make sure the length will be enough to cover the back wall and the floor of the box so that you have a seamless covering.
You could choose any type of fabric; whatever works for the subject. A primary or secondary plain colour or any number of patterns and textures could be used. If you want a black background that will appear very inky black just choose a very dark black matt fabric like cotton or velvet. You want something that is not reflective.

Photo by Oscar J Harper
How do You Take a Photo on a Black Background in a Light Box?
Taking photos on a very black background requires a slightly different approach to exposure than with a very white background. This time, still using the “Manual Mode” choose a suitable aperture then frame up the subject as you want to see it in the final image. Zoom into the subject to eliminate the dark black backdrop and start adjusting the shutter speed with the spinning wheel until the light meter shows a neutral reading in the centre.


Zoom out again and reframe the scene until you are happy. You will notice that the light meter is drifting off into the negative side of the meter indicating the scene is underexposed. Again, don’t worry, it’s just the camera re-evaluating the scene with all the extra dark black background and believing it to be underexposed. Because we are in “Manual Mode” it won’t try to correct the exposure by brightening it up. So, go ahead and take the shot. You should find that you will have a well-exposed subject and an inky matt black background with no detail or shadows. Adjust the shutter speed to tweak the exposure if it is not quite perfect. This will really make the main subject stand out against the backdrop as the black void appears to recede away.


Photo by Oscar J Harper
Related Questions
How do You Use a Grey Card in Photography?
A grey card can be used to correct the exposure and white balance in tricky lighting conditions. You can read our illustrated guide on this subject, here.
What is White Balance in Digital Photography?
This is a simple process but it can transform your photographs by correcting the colour balance to a more natural-looking result. To learn more, click here to read our illustrated article on this website.