Take control of your studio flash lighting with this very precise add-on piece of kit. Pick out and illuminate just the elements that you want to see to add drama and contrast to your photographs. It is a simple light modifier but it can totally transform the mood of the compositions.

(This post may contain affiliate links which means I may receive a commission (at no extra cost to you) for purchases made through links. Learn more on my Privacy Policy page.)
You may not know what a Snoot is or what it is used for in photography but the following simple explanation should make it all clear:
A Snoot in photography is a tube that fits over a constant studio light or Speedlight flash. It guides the direction and restricts the uncontrolled spread of light to a narrow beam. It can pick out a precise portion of the subject for illumination and cast the surroundings into deep shadow.

“As an Amazon Associate, I earn from qualifying purchases.”
Check out the Neewer Snoot that I use, on Amazon US here.
Check out the Neewer Snoot that I use, on Amazon UK here.
It is a very useful device to have in your kit and can transform portraits or still-lifes by isolating certain aspects of your composition from the surroundings with a controlled pool of light. It can also be used along with other lights to add highlights or to help balance the illumination from a key light.

If you would like to learn more about this very useful modifier, continue reading our comprehensive guide below.
Illustrated Guide to Using And Understanding The Output of Your Snoot in Photography.
What Types of Snoot Are There?
A snoot is simply a tube that fits over a light. There are several types of snoot that can be bought or made:
- Metal, stepped, conical snoot (Bowens attachment)
- Wrappable fabric snoot (Velcro attachment)
- Homemade cardboard tube (Gaffer tape attachment)
Metal Conical Snoot
This is a solid and robust metal snoot that can be attached to a studio light that has a Bowens type fitting. It can also be attached to a Speedlight with an appropriate Bowens adapter clamp. It is conical in shape to step down from the width of the Speedlite to a small exit aperture.

“As an Amazon Associate, I earn from qualifying purchases.”
Check out the affordable Yongnuo products I use, on Amazon US here.Check out the affordable Yongnuo products I use, on Amazon UK here.
Wrappable Fabric Snoot
This is a very lightweight and portable snoot that also unfolds to become a reflector. They are usually made of black nylon fabric with a silver liner. They simply wrap around your Speedlite flash head and form a tube fixed with velcro.
Homemade Cardboard Tube Snoot
These can be made with any thick cardboard simply folded, wrapped and taped around your flash head. You can make them any length and with any size of opening.
An almost ready-made tube that you can get at any store is a particular baked-chip tube. You just have to cut off the bottom end then reshape it to fit over your flash head. To add a cheap honeycomb grid, just pack the tube with straws cut down to half size.


When And How Should You Use a Snoot?
When the overwhelming power and coverage of a flash or constant light is overpowering the whole scene, making it appear flat and dull, you may want to tame the light source by applying a snoot. This will immediately restrict the unfettered spread of light and make it into a very directional beam that can be carefully placed precisely where you need it.
It will prevent light spill from falling onto backdrops and surroundings helping to create a higher contrast image if that is required. A snoot is a perfect add-on to help you create the following lighting outcomes:
- Low Key
- Rim light
- Hair Light
Low Key Photography With A Snoot
A snoot can assist you in creating all types of Low Key photographs. As the goal of a Low Key photograph is often to achieve a dark and mysterious effect, the snoot can assist by isolating an element in a pool of shadows.
The snoot could be directed towards one side of a face to pick out some particular features while adding depth and contrasting shadows to the opposite side. The light would be controlled and focussed, illuminating the intended target and avoiding light spill on the backdrop and surroundings.
Equally the concentrated spotlight could be used to pick out any object in a dark void adding instant drama and brooding shadows.

Photo by Oscar J Harper
Rim Light With a Snoot in Photography
This refers to edge lighting which is best achieved by locating the lights behind the subject to highlight the edges with a partial halo. The snoot would assist in minimising the spread of light and preventing lens flare if the light source is pointing in the direction of the camera.
You could place the snoot lights behind and to the sides of the subject to illuminate more of the edges or directly behind for a different effect.

If you were to place the subject between the light and the camera, if it’s a solid object, to block the direct light from the snooted lamp, it would create a perfect rim-lit halo. This works best if the rim is a soft or translucent material.
You could add colour gels to the snoot exit aperture to give the rim-lit edges an added degree of interest.

Photo by Oscar J Harper
Hair Light With a Snoot in Photography
This is a variation on the rim light and helps to add detail and allow the hair to stand out on the shadowy side of the composition when it’s against a dark background.
Usually, in portrait photography, it is used in conjunction with a key light, which is placed at the front and to one side. The snoot, or hair light, is placed on the opposite side and behind the subject. The snoot should be slightly elevated and aimed at the back, top and side of the head.


This partially fills in the shadow on the dark side from the key light. It serves to highlight the hair and fills in the shape of the head against the very dark background, adding some balance and shiny detail to the form.
What Affects The Spread of Light From a Snoot? A Snoot Lighting Case Study!
The output light of the snoot can be affected by many factors which can be utilised to modify the outcome. Here is a list of the elements that can affect the spread of light from the snoot:
- Aperture at the exit end of the Snoot
- Length of the Snoot
- Distance from the Snoot to the subject
- Zoom of the flash attached to the Snoot
- Interior colour of the Snoot
- Power setting of the flash
Let’s take a look at these aspects in more detail. For the purposes of this case study, we will be using an 8 inch (200mm), metal, stepped snoot with a 2 & 1/4 inch (55mm) final exit aperture. The internal lining is matt black paint except where we test white and silver linings.
The length of the tube is 8 inches except where we test a longer tube by extending it to 12 inches with a 4-inch extension. The distance of the subject from the wall is consistently 3 feet (914mm) and the distance from the snoot to the subject is 3 feet except where we increase it to 9 feet in one test.
How Does The Size of The Exit Aperture of The Snoot Affect The Spread of Light?
The size of the opening at the end of a snoot determines how much light can escape to illuminate the subject. The smaller the hole in the snoot, the smaller the disc of illumination will be. This will remain relatively smaller no matter what the distance of the snoot from the subject.
A smaller aperture in the snoot will affect the exposure of the photo as there will be less light hitting the subject. It may therefore be necessary to:
| Action | Consequence |
| Move the snoot closer to the subject | Could make the spread of light too small |
| Open up the camera’s aperture | Reduces the Depth-of-Field |
| Slow down the shutter speed | Could cause motion blur |
How Does The Length of The Snoot Affect The Spread of Light?
The longer snoots have the effect of concentrating the beam of light as they tend to line up the light rays into a parallel arrangement. This also has the effect of producing slightly sharper edges on the light disc and the subject.
The shorter snoots produce a wider beam as the shorter distance between the lamp and the exit opening allows for more bounced light beams to escape that are not parallel to the main axis of the snoot tube. This will produce a softer edge to the light disc emitted from the snoot.

In the tests shown above, you can see that the spread of the light disc on the wall from the 8-inch snoot is about twice the width of that from the 12-inch snoot. The intensity of light is about the same in both cases and the sharpness of shadows on the subject remain about the same.
How Does The Distance From The Snoot Affect The Spread of Light?
As you move the snoot further away from the subject the radius of the disc of light gets larger so it can illuminate a greater area. The larger disc of light is less powerful though in accordance with the inverse square rule which shows that light fall-off increases rapidly with distance.
The further away the snoot light source is, the harder the light becomes, producing sharper edges to the shadows produced by the subject itself. Effectively, the more distant snoot light source appears to be smaller and therefore the light beams are more parallel with less interference from stray beams causing the edges to look sharper.
So, the following three things occur as you move the snoot further away from the subject:
- The light disc gets larger
- The light disc gets dimmer
- The shadows of the subject get slightly sharper and smaller
The reverse is true if the snoot light source gets closer to the subject. This knowledge can help you plan where is the best place to locate your snoot.


In the test example shown above, you can see that the light disc on the wall gets larger, softer and dimmer as the distance from the subject is increased. The shadows of the subject on the wall are, however, noticeably sharper and smaller at 9 feet than the shadows produced at 3 feet.
How Does The Zoom of The Flash Attached To The Snoot Affect The Spread of Light?
If your flash/Speedlite has a built-in zoom feature you will be able to narrow the beam of light exiting the flash head. Setting the flash to the maximum telephoto zoom (105mm or 200mm) will force the light into a more narrow shaft. This will increase the intensity of the light by pushing all the light into a narrower beam over the same distance.
Setting the flash to a wide angle of 24mm will cause a much wider spread of light out of the flash head, causing some light beams to hit the sides of the snoot obliquely and not to escape the exit aperture. This results in a slight dilution of the light intensity and a dimmer disc of light on the wall behind the subject.


It is clear from the example above that the long zoomed flash head produces a slightly brighter and wider light disc on the wall than the wide-angle zoomed flash. This is probably due to the higher intensity of light hitting the subject and the wall as more light escapes the exit aperture of the snoot due to the more direct path of the light beams.
How Does The Interior Colour of The Snoot Affect The Spread of Light?
A matt black interior colour of a snoot should set up fewer internal reflections and bouncing of light beams producing a sharper edge to the light disc and a faster drop off into the surrounding shadows. This is because there are fewer stray beams emerging off-axis of the centre of the snoot tube.
A white interior to the snoot (we used white paper) should increase the intensity of the light by allowing more bounced light to escape the exit aperture. In addition, the amplified bounced light should create a softer edge and a gentler fall off in the penumbra at the edge of the light disc.


In reality, there is very little difference in the snoot output between the black and white interior lining colours. We did notice that the reflected light emerging from the back of the snoot, around the Speedlite, was much more with the white lining than the black lining. This may cause reflected light pollution of the scene if there was a white wall immediately behind the snoot.
Let’s now compare the black lined snoot with a shiny silver foil-lined snoot.
If you line the snoot tube with silver foil there is even more opportunity for uncontrolled bouncing around of light beams and an increase in the spread of the output light. This should result in an even softer edge and a smoother fall off into shadow from the edge of the light disc.


The result of lining the snoot with very shiny silver foil is a great deal of unwanted light pollution in the shadow areas outside of the main light disc. This is caused by the uncontrolled bounced reflections escaping very widely from the end of the snoot aperture.
So it seems that for maximum control over the output of your snoot it is best to use a black lining to focus the beam and prevent extraneous light pollution in the shadow areas.
How Does The Power of The Flash, Attached to The Snoot Affect The Spread of Light?
Increasing the power of the Speedlite will naturally increase the spread of light exiting the snoot aperture. This is because there is more light supplied by the flash head and it increases the intensity striking the subject and the wall beyond.

You can see in the test examples that the higher the flash power the wider and softer the light disc on the wall. Also, the lower power flash produces a larger and sharper shadow on the wall. This is because the lower power flash light appears to be a smaller source and therefore light beams that are apparently closer to being parallel.
Can You Zoom The Flash Instead of Using a Snoot?
The result of removing the snoot and zooming-in the flash head is an unrestrained spread of light that is far more difficult to control and direct. There will be light spill everywhere as the undirected light hits other surfaces and surroundings, setting up multiple reflected light pollution sources.


You can see that when you remove the snoot and use a wide-angle flash head, the light received by the wall is almost completely even across the whole wall.
When you zoom in the flash to the maximum narrow beam (199mm in this case) you do get a degree of focusing of light in the centre but it is far less controlled and more unpredictable than with a snoot.
It is an unrefined solution that gives much less precision than the snoot option. If you don’t have a dedicated snoot for your flash, it’s very easy and inexpensive to make one out of cardboard or a toilet roll tube as shown earlier in this article.
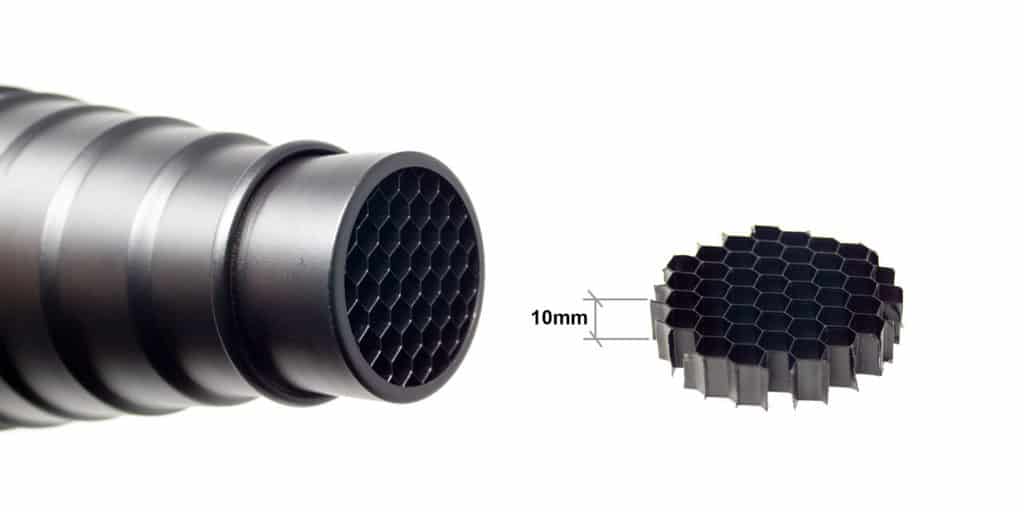
What is The Effect of a Honeycomb Grid on A Snoot?

Adding a honeycombed grid to the end of your snoot should make it even more directional and focussed. The grid is like a surface of tubes bonded together helping to direct the light in an even tighter beam. This should help further with precision and directional control of your light source.


The reality is that there is very little difference with or without the grid as can be seen with the comparison photographs above. This may be because the honeycomb grid is very shallow, only 10mm deep. For a more dramatic effect, you could try a much deeper grid of several inches like the homemade snoot with plastic straws packed inside.
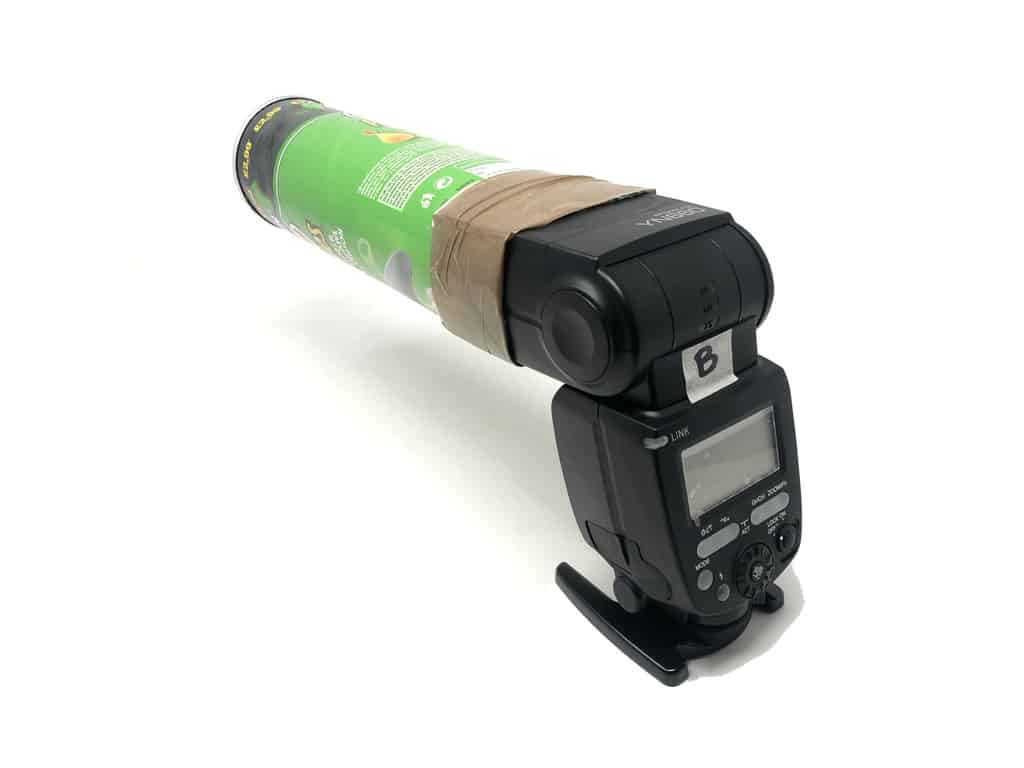
Homemade Cardboard Snoot With Plastic Straw Honeycomb Grid


In the test above you can see that using a 10 inch (250mm) cardboard baked-chip tube without a grid does produce a focussed spot light disc but there is a great deal of secondary fallout polluting the surrounding shadows. This is because the exit opening is relatively large (3 inches, 75mm) and the tube is silver-lined causing bounced reflections to escape into the surrounding shadows.
As can be seen above, there is a massive difference in control when you introduce a 5 inch deep, homemade, plastic straw honeycomb grid. The light is now highly focussed into a small spot and there is no light leakage into the dark shadows. This is because the only light beams escaping from the flash head have nowhere to go except along the narrow straw tubes which guides them to be parallel and focussed.
There is some light intensity lost when you use a deep honeycomb but this can be compensated by increasing the flash power by a Stop or 2.
So it can be shown that for extreme control over the spread of light of your flash, it is best to use a very deep honeycomb grid that only allows parallel light beams to escape and hit the subject.
Related Questions
How do You Take Low Key Photos Indoors And Outdoors?
The Snoot is an ideal tool to help you create Low Key photographs with the associated dramatic and gloomy shadows. There are other ways to achieve a low key effect both indoors and outdoors. We have written an in-depth illustrated guide to help you navigate this fascinating aspect of photography and you can find it right here on Photography Skool.
How to Paint With Light in Photography!
You can paint a controlled pool of light into a scene with a snoot but there are many other ways to paint with light. For more information, you can read our comprehensive guide here in Photography Skool.
What Is A Gobo In Photography And How To Use It?
Like a snoot, a Gobo is a device to add control to the areas of light and shadow within a scene. You can find out more about this fascinating intervention in our fully illustrated article right here in Photography Skool.