Using this technique can transform a very static looking flash-photograph with no background detail into an artistic looking image. It also has the ability to add motion blur trails to a pin-sharp main subject. It may be something that you were unaware of but it is fairly simple once you know how to set it up.
To take slow sync flash photos, avoid automatic modes. Use a tripod. Use a slow shutter speed (1 or 2 Seconds) in Shutter Priority or Manual mode. Set the flash to sync with the beginning or end of the slow shutter opening. Use rear shutter sync to freeze the subject at the end of a ghostly trail.

There are a few different possibilities with slow sync flash photography. There are several different places during an exposure where you can set the flash to fire. Each one can have a different creative outcome. They are not complicated to master but they require knowledge of a few simple steps to perform them correctly. Read on to discover more about this useful method and how to succeed with slow sync flash photography.
Guide to Taking Great Slow Sync Flash Photos?
What Are The Types of Slow Sync Flash Photography?
- Flash Fill
- Front Curtain sync (or First Curtain Sync)
- Rear Curtain Sync (or Second Curtain Sync)
Flash Fill Photography
In low light or at night, this type of slow sync flash fill is best used for static subjects where you want to illuminate the main subject in the foreground with the flash light but also expose the dark background longer with a slow shutter speed to pick up some of the details. It is best carried out by setting the camera onto a tripod so the background will not suffer from any effects of camera shake during the long exposure. This technique of static flash will work with the standard “front curtain flash sync” or the “rear curtain flash sync”. More on these two types of flash sync later.

The other very useful application of the “Flash Fill” is when the subject is strongly backlit by the sun or some other strong light source. Without the flash, the camera would meter for the very bright light source and throw the main subject into a deep, dark silhouette. If we now use the flash fill method along with a tripod, the main subject will be sharp and well lit and the background would be exposed longer with the slow shutter to pick out some detail. A much more balanced exposure across the whole frame.

If you find that the flash light is overexposing the foreground subject, some DSLR cameras allow you to dial down the flash power to give a softer tone on the near subject. You can find this setting in one of the camera control menus, scroll down to the “Flash Control” menu, “Built-In Flash”, “Flash Exposure Compensation”. Here you will be able to experiment and increase or decrease the flash power for a perfectly exposed flash fill photograph.

What’s The Difference Between Front & Rear Curtain Flash Sync?
On most DSLR cameras the flash can be triggered at two different points during the exposure; the start or the end of the operation of the shutter. There are two curtains making up the shutter mechanism; the Front Curtain and the Rear Curtain:
Front Curtain Flash Sync
This is useful for catching movement trails after the initial flash when the subject is in motion. The “Front Curtain Flash Sync” fires the flash when the first shutter curtain has just, fully opened, so there will be a fully flash-exposed sensor at the beginning of the shutter exposure.
This can be used when you wish to catch a sharp, frozen image at the beginning of a movement trail. It works well in low light or the dark as long as there is enough ambient light to illuminate the moving subject during the non-flash section of the slow shutter exposure.
Best-practice is to set the camera on a tripod, use a dark background and bright clothes that can catch and reflect the ambient light.

The Ghostly Trail Is The Movement In Ambient LED Lamp Light After The Flash At The Start
The Flash Is An Off-Camera Speedlite With A Softbox Aimed At The Subject And Away From The Black Background.
Photo by Oscar J Harper
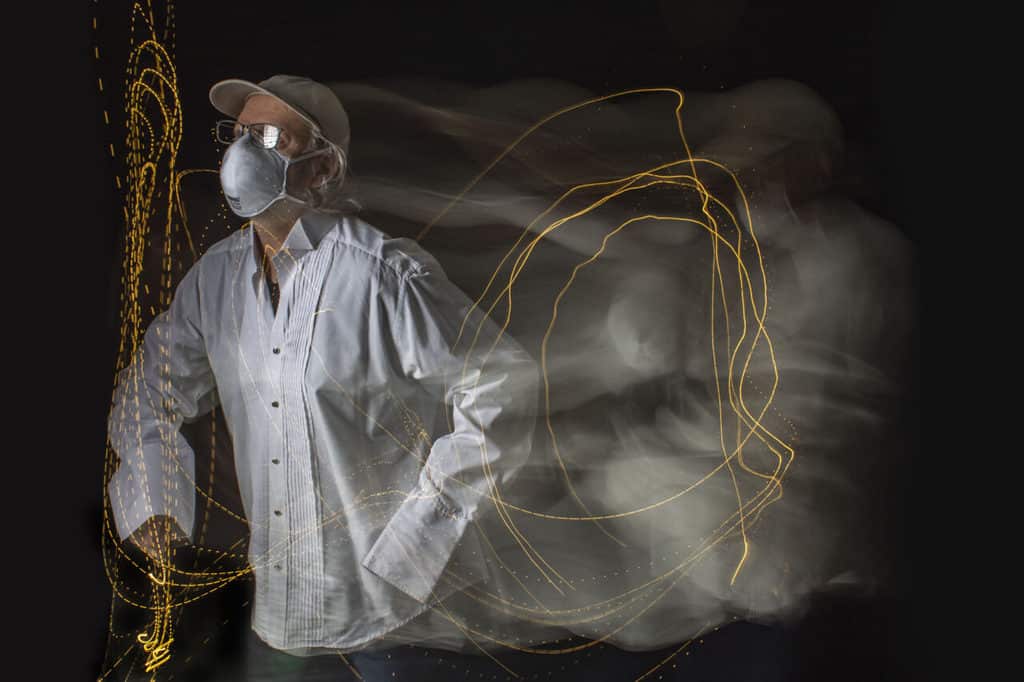
Rear Curtain Flash Sync
This setting does the opposite and is useful for capturing motion blur at the end of the ghostly trail. This time the flash is fired when the second shutter curtain is just about to close at the end of the slow exposure. This means that there will be a sharp, flash-lit image at the end of any motion trail picked up by the slow shutter speed. The effect is best seen at night or in low light provided there is sufficient ambient light to record the movement trail when the flash is not firing.
For best results ensure you have a dark backdrop and clothes that stand out against it, in the ambient, constant lamplight.

The Ghostly Trail Is The Movement In Ambient LED Lamp Light Before The Flash At The End
The Flash Is An Off-Camera Speedlite With A Softbox Aimed At The Subject And Away From The Black Background.
Photo by Oscar J Harper
The default setting for flash sync is the “Front Curtain Sync”. You can change the “Curtain” flash preference setting in one of the camera control menus, scroll down to the “Flash Control” menu, “Built-In Flash” or “External Flash”, then “Shutter Sync”, “2nd Curtain”. Use a tripod to keep the motion trail smooth and the background free of camera shake.

What Camera Shooting Programs Work For Slow Sync Flash Photos?
To take control of the camera and achieve a good “Slow Sync Flash” photo you need to avoid the fully automatic programs as you won’t be able to control the shutter speed, aperture or the ISO. It will select everything for you. If you pop the flash up it will select a flash sync shutter speed of 1/60th or 1/200th. That will give you no chance of creating a “slow flash sync” photo. Avoid the (P) program also as it offers less control over the exposure. Avoid all of the “Basic” programs as well such as:
- Portrait
- Landscape
- Close-up
- Sports
- Food
- Night Portrait
The programs that you can exploit successfully for “Slow Sync Flash” photos are:
- Shutter Priority (“Tv” on Canon “S” on Nikon)
- Aperture Priority (“Av” on Canon “A” on Nikon)
- Manual (M)

Should I use a Tripod For Slow Sync Flash Photos?
If your goal is to achieve a well-balanced flash fill photo with a bright, sharp foreground subject and a well-exposed background then go ahead and use a tripod for a great result. Equally, if your goal is to achieve a smooth trail culminating with a sharp main subject using a “Rear Curtain Flash Sync”, frame it up and use a tripod.

Photo by Oscar J Harper
If however, the slow shutter sync is 1/15th of a second or higher, you may be able to go ahead and try and hand-hold the camera.
If you want to get creative and zany, you may choose to hand-hold a much slower shutter speed and not worry about the blurry, shaky background; the flash will still freeze the main subject to give a focal point in the swirling cloud of chaos. It could prove to be very interesting.

Photo by Oscar J Harper
What Shutter Speed do I Need For Slow Sync Photography?
The shutter speed will depend upon the level of ambient light, how far you want to push the ISO, the level of background detail required or the length of the motion blur trail you wish to see.
For a long visible ghostly trail, it may be necessary to extend your shutter speed to between 1 and 2 seconds.
In lower light, it may be necessary to increase the shutter opening time even further as well as asking your moving subject to move a little slower along with mounting the camera on a tripod of course. Experiment with different shutter speeds and with a tripod or no tripod. See what works best for you.

Other Creative Techniques
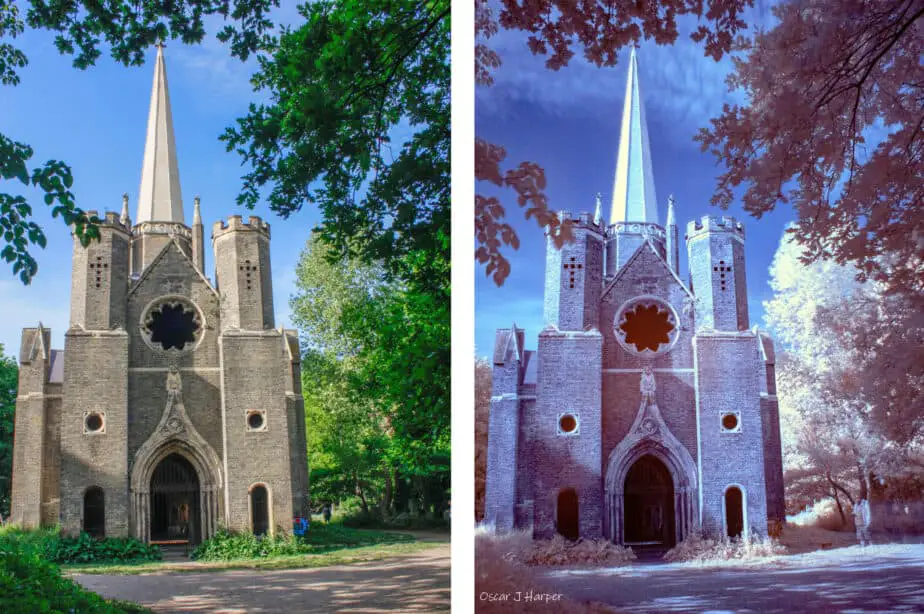
Infrared Photography With Filter on DSLR
This technique can produce some bizarre but interesting looking photographs. It’s not as straightforward as other techniques and requires a little post-processing but it’s all explained in our guide that you can find here on Photography Skool.
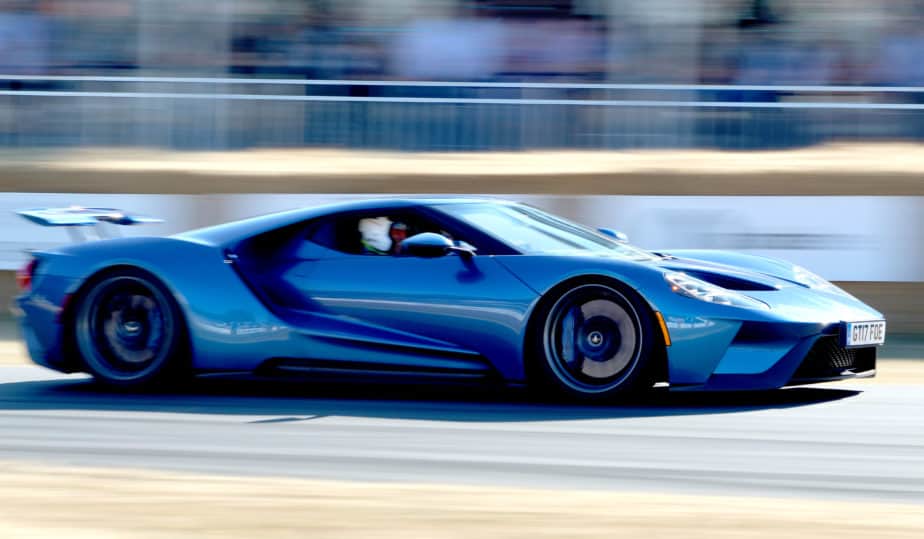
Freeze Moving Objects While Blurring The Background
Another great technique that can add a dynamic sense of speed to your photographs. It takes some practice to get it just right but when you perfect it, the results can be stunning. Our illustrated guide explains the sequence in methodical steps and can be found right here on Photography Skool.
How to Use a Fog Machine to Create a Foggy Street Photo Indoors!
Slow sync flash technique can add a foggy, misty trail to the moving subject in your photographs but you can introduce real fog to create stunning, mysterious images. To find out how to utilize this tool to create an outdoor street scene in a small indoor room, check out our article, here in Photography Skool.