This is a cool effect if you want to add another dimension to your photography. You can force action and dynamism into a static looking image. It’s a fairly simple technique with a few basic steps to take.
To take a zoom blur photo, choose a subject in low light or with bright point lights. Use Shutter Priority Mode. Use a slow shutter speed, 0.5 to 2 seconds. Use a low ISO and a small aperture to avoid overexposure. Use a tripod and zoom in or out smoothly while pressing the shutter button.

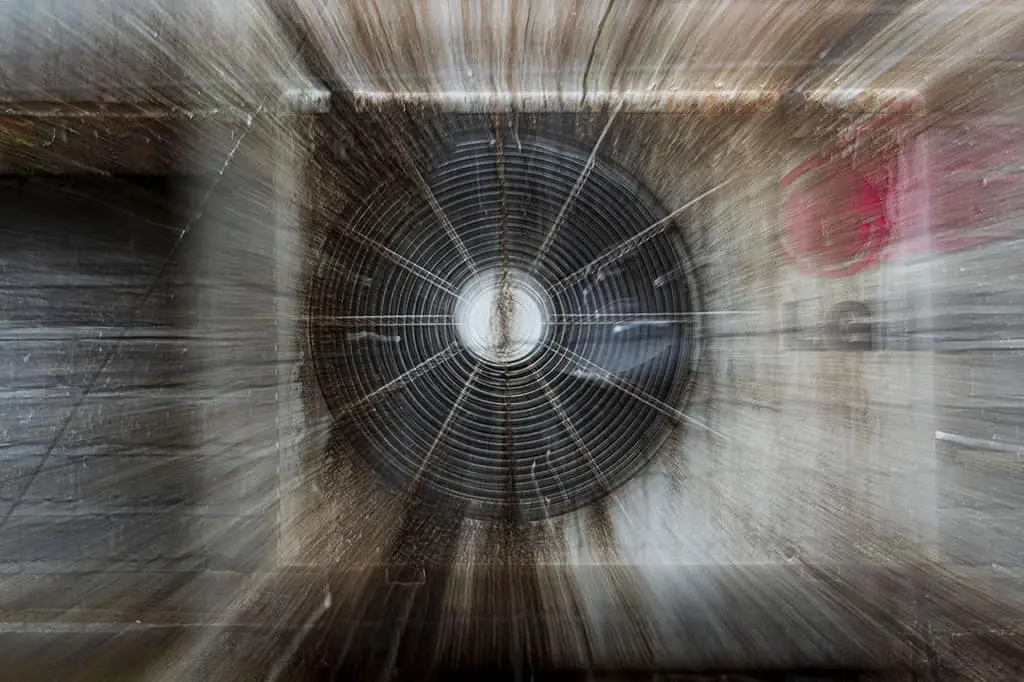
Photo by Oscar J Harper
Although it is a fairly simple technique there are a few steps to take to improve your chances of a successful zoom blur. The main problem is the issue of overexposing with long exposures. The following illustrated article will guide you through the steps necessary to produce a great result.
What Are The Steps to Producing a Great Zoom Blur Photograph?
How to Choose a Suitable Subject And The Right Lighting Conditions For A Zoom Blur Photo!
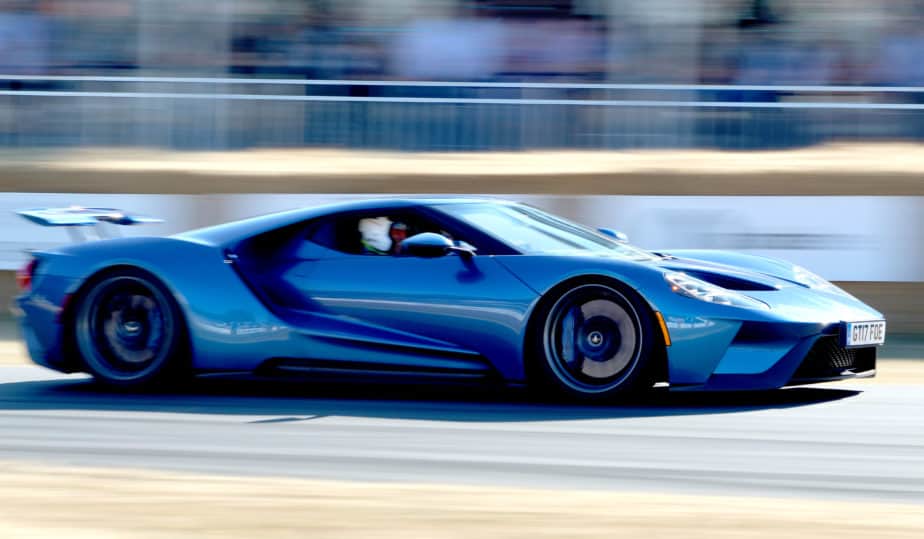
Almost anything would make a suitable subject for a zoom blur but some subjects will yield a much more dramatic result. Strong points of light produce very striking beams of light, exploding from the centre in a zoom blur.

Zooming into a sharp focal point like an eye, face or a circle can give the composition a reason and a goal instead of a random collection of streaking linear blur lines.

Strong contrast in the scene can produce a more defined zoom pattern. This technique might be quite difficult to achieve in very bright or sunny conditions as you would not be able to force the shutter speed to be slow enough to reveal the degree of motion blur that is required.

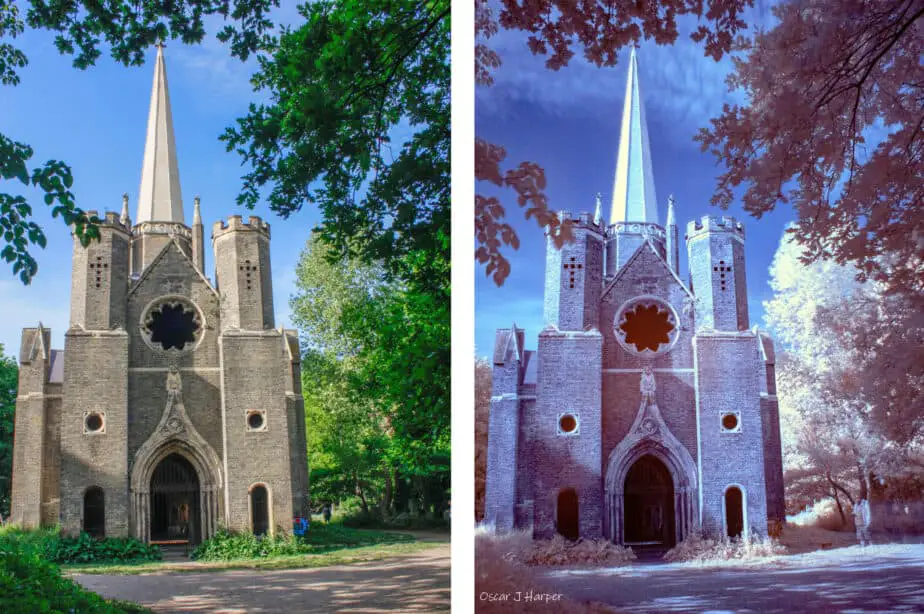
Photo by Oscar J Harper
So, it would be best to try this effect in dim conditions or if you are outside, on a grey and overcast or stormy day. Lightening would be a great subject…. very difficult to catch though.
Do I Need a Tripod For Zoom Blur Photos?
A stable base for your camera will help your zoom blurs to appear smoother and more intentional. It will help to force the zoom lines to be straighter and give them a linear perspective. It will also free up your hands to concentrate on performing a smooth and steady zoom and pressing the shutter release button.

You could use a full-sized tripod; that can be a pain to lug around or a tabletop, pocket-sized tripod that would be more convenient. Either one would work and both will improve the appearance of your zoom blurs.

Should I Use Shutter Priority Mode For Zoom Blur Photos?
This semi-automatic program on the main dial of your DSLR camera will assist you by eliminating the need to worry about the aperture setting. It will speed things up as you will only have to think about the shutter speed which is the creative aspect of zoom blurs. You can still employ Exposure Compensation but you will have to keep an eye on the exposure, making sure you don’t overexpose the scene.
Hopefully, if the scene is dim enough to use a slow shutter speed you will have the flexibility to try different shutter speeds and the Shutter Priority program mode will set the appropriate aperture opening for a perfect exposure.

If you are comfortable with it and you wish to have more fine control over the exposure, you could go ahead and use the Manual (M) mode.
Which Shutter Speed is Best For Zoom Blur Photos?
Shutter speed is the single most important setting for a zoom blur. If it is not slow enough it will not register the zoom blur motion. Provided that the lighting conditions are favourable you should be able to work with a range of shutter speeds.
You could try shutter speeds of 1/5th of a second, 1/2 a second, 1 second or even 2 seconds if you can maintain a long steady zoom. Experiment with shutter speeds and zooming until you find a great result.
It is essential to use a very slow shutter speed for this technique to be successful but this could vary depending on the lighting conditions and subject matter.

What ISO Setting is Best For Zoom Blur Photos?
If your camera allows you to control the ISO setting and you can turn off the automatic ISO control, this will be a great assistance when attempting to lower the shutter speed and maintain a good exposure. You will be able to select a lower ISO number like ISO 100, 200 or 400 which will lower the amount of amplification applied to the sensor. This in turn will allow you to select a slower shutter speed to allow a slower shutter and more light into the camera.
Remember, the goal is to achieve a slower shutter speed to create those telltale zoom blur trails. The beneficial side effect of having a low ISO is that that there will be less noise (grain) in your photographs, particularly in the darker areas of the image.

What Aperture is Best For Zoom Blur Photos?
Your other best friend that will help you to achieve a slow shutter speed is control of the aperture opening. Reducing the amount of light that can peek through the hole in your lens will allow you to adjust the exposure to favour a slower shutter speed. Depending on the ambient lighting conditions you will be able to change the aperture size to tailor the exposure towards a slower shutter speed.
If it is a bright but cloudy day you may need to select the smallest aperture that your lens can muster such as F22 or F32. If it’s a stormy grey day with heavy steely clouds, you may get away with a slightly larger aperture opening of F16 or F11. The advantage of using smaller apertures is the depth of field will be very deep and this may add definition to your zoom blur trails.

Do You Need Neutral Density (ND) Filters For Zoom Blur Photography?
If it is simply too bright to achieve a very slow shutter speed, even with the smallest aperture and the lowest ISO, then it may be time to introduce a Neutral Density filter. These effectively darken the scene, like putting a pair of sunglasses over your lens. They reduce the intensity of all the wavelengths (colour) of light equally, so they have no effect on the final outcome except making the scene appear darker.
This in turn allows you to slow the shutter speed in order to assist you in achieving a satisfactory zoom blur of 0.5 to 2 seconds. There are various degrees of darkness of ND filters and they can be stacked to achieve higher Stop numbers depending on the brightness of the ambient light in the scene.

What’s The Technique For Great Zoom Blur Photos?
Best practice for a great looking, smooth zoom blur is to mount the camera on a sturdy tripod. Practice the zoom motion with your left hand while holding your right index finger over the shutter release button. Try zooming at different speeds until you are comfortable with the action. Try not to jerk the movement as that surge will be recorded in the zoom blur trails.
When you are ready for a take, zoom in and focus the lens then switch to manual focus to lock it. Now, gently zoom out to the max width then prepare to take your first shot. As you are mounted on a tripod you can use the shutter button directly or set it to shoot on the 2 second timer. Either way, when the shutter opens start your zoom-in and try to be as steady and smooth as possible.
Review your results to check how successful you have been. Adjust the exposure if you have over or underexposed. The chances are that your first effort won’t be perfect. Try a few more times, varying the speed of the zoom. Time your zooming action to coincide with the chosen shutter exposure time. It will take a little practice but eventually you will see a result that is very pleasing.
If you want to intentionally add in some staccato jerk movements to a long slow zoom blur, you could try varying the speed of the zoom or try pausing the zoom for a tiny moment. Experiment with different techniques while the camera is on the tripod; be creative, learn what works and what doesn’t.

If you want to produce some very abstract looking zoom blur images you could go completely freestyle and take the camera off the tripod. Try walking forwards or backwards while performing a hand-held zoom blur. Try rotating or panning the camera during a zoom.

Bright colours or strong contrast will probably record better in the final image when performing these extreme zoom combinations. Try not to overdo the technique though as you might just end up with an indistinct smear in your final image.
How Can I Make Zoom Blur Easier? Add a Handle, Hack!
Some zoom lenses, particularly the cheaper kit lens can have a sticky, jerky zoom action. That might make it difficult to achieve a smooth, even zoom, if that is your goal. One hack you might like to try is to effectively increase the physical diameter of your lens.
You can achieve this by tying some string loosely around the zoom ring of your lens.

Next, insert a chopstick or similar under the string and twist the stick around like a tourniquet on a bleeding leg until it tightens up on the zoom ring.

Make sure the stick is jutting out perpendicular to the camera lens. You can now use this extended handle to rotate the zoom ring with much more control and a smoother, more even zoom blur. Have fun and go wild.

Other Creative Techniques
How to Capture Motion Blur in Photography!
Zoom blurs are one aspect of capturing motion in photography but there are many other ways to add movement and a sense of speed to your images. You can read about these other techniques right here on Photography Skool.
How Do You Get Lens Flare in Photography?
This is a technique that can add a cinematic quality to your photography. It is the exploitation of an effect that we usually want to eliminate but it can add drama and mystery. We have written an illustrated guide on this technique which you can read here on Photography Skool.
What is Bokeh in Photography?
The defining quality of the out-of-focus portions of an image is often described as Bokeh. It is the very definition of blurred backgrounds and you can read all about it right here in Photography Skool.
How do You Paint With Light in Photography?
Zoom blur is one way to paint with light but there are many other ways to achieve it. For more information, you can read our comprehensive guide here in Photography Skool.
How do You Blur The Foreground With a DSLR?
Zoom blur is an exciting and dynamic blurring technique but simply blurring the foreground in-camera can add an interesting additional layer to your photographs. For a fully illustrated guide on blurring the foreground see our article here in Photography Skool.