Low key photographs are characterised by dark, gloomy lighting that only partially illuminates the subject adding mystery and drama. There is a prevailing presence of dark or muted tones and negative space. They are often not elaborate or showy but modest and brooding. They can have high contrast but can drift into realms of muddy gloominess with low contrast. The predominant elements are an abundance of shadows and blacks. What little lighting there is, is suggestive rather than illuminating. Low key images can convey the idea of alienation and isolation.
To take Low Key photos indoors use a black or dark backdrop and a controllable light source that can be natural or artificial. The subject should be partially lit and avoid light on the backdrop. Use a low ISO to minimise the noise in the shadows. Meter off the bright areas to avoid overexposure.

To take low key photos outdoors look for gloomy or subdued lighting conditions; look for a partially illuminated subject against a dark background or a strongly silhouetted, back-lit subject. Use a tripod, manual mode and low ISO. Underexpose to maximise the low key effect.

This is a slightly involved technique to get right and requires a little practice and trial and error. It can be achieved indoors with artificial lights that you can control and direct or with natural light from a window that you can also control with curtains or shutters. Outdoors it is more difficult because of the overwhelming amount of ambient light. You can get lucky though with a stray beam of sunlight into a darker scene or the presence of moonlight in a naturally dark, night scene. Carry on reading to see the illustrated guide to capturing great Low Key Photographs.
Illustrated Guide to Low Key Photography
Indoor Low Key Photography

Indoors is the place where you will have the most control over how you light your subject especially if you are lucky enough to have a studio type set-up. Here you can shut-out any unwanted daylight or shut off indiscriminate ceiling lights and only use the very precisely controlled key light to pick out the exact portion of the subject that you want to express with Low Key lighting. Indoors the light won’t increase, decrease or move like sun and moon would do outdoors.
Equipment You Will Need
It is essential to create a dark environment in the room so 4 white walls, a light ceiling and floor will be less optimal as light could be bounced and reflected everywhere. A dark backdrop and floor would be ideal. This can be achieved with a seamless fabric or paper roll hanging from supports and draped down the wall and across the floor. The backdrop should be black or at least very dark. It should not reflect or bounce light. It could be a black or dark grey painted wall, black velvet curtains or a very dark tarp fixed on the wall. It should be big enough to fill the background in your chosen scene.
As we will be working in relatively low light we may need slower shutter speeds and therefore it would be useful to be able to mount your camera on a tripod.

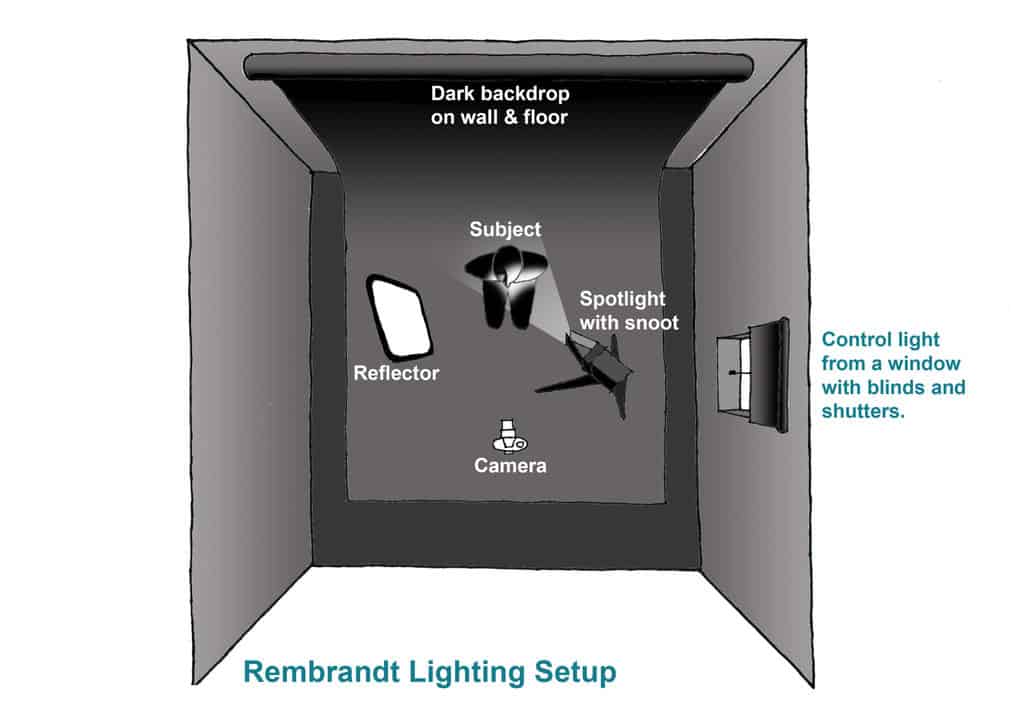
See Further Down For A Full Description Of The Rembrandt Lighting Technique
Diagram by Oscar J Harper
We definitely will need a controllable light source for the main key light. It should be mounted on a height-adjustable pole and ideally be fitted with gates or a snoot to direct and control the precise location and size of the light source. They could be diffuse, continuously-on lights or flash lamps with softboxes fitted. One light is usually enough but if you use a second for infill light it must be of much less intensity or further away to keep the infill light very subtle. You could also replace the second lamp with a simple reflector to bounce subdued light into the dark side of the subject.
You could use a window as the light source provided that the direction of the sun entering it hits a favourable position in the studio. Further modification of the window light source could be achieved by employing the use of curtains, shutters or blinds.

That’s really all you need apart from your subject and a camera with a Manual program and a controllable ISO setting.
Camera Set-Up
Set your camera on a tripod, and switch to Manual mode. Choose the lowest ISO setting that your camera has. This will ensure that the noise, which is more visible in the shadow areas, will be as minimal as possible. Choose a large Aperture opening to start with as we will be working in low light and it will help to keep the background out of focus. It will also help to keep the shutter speed higher. That will reduce noise in the shadow areas. Set your camera to spot metering or partial metering.
Lighting Strategy, One Light Source

Place your subject in the scene and place the key light to one side and slightly higher, pointing downwards at an angle; this helps to not illuminate the backdrop. Manipulate the light source to create the Low Key effect you want. You might have to move it around, lower or raise it and play with the flap gates to get the light precisely where you need it. Make sure no stray light is falling on the backdrop or hitting the camera lens directly which could cause a lens flare.
Frame up your composition. Now we need to ensure that the exposure is perfect. If we were to use the Average light meter reading, it would see all of the huge areas of black shadow and it would want to try and lighten up the scene so it would encourage us to change the exposure to the neutral centre and this would overexpose the scene. This is why we should adopt the use of the Spot Meter. With the spot meter activated, focus on the highlighted area of the dark scene. If it is far away or small in the viewfinder, zoom in to make it bigger. Now, focus in and take the light meter reading.
Leaving the Aperture opening as large as possible, balance the exposure by changing the shutter speed to move the light meter reading to the centre. Now, zoom out again reframe and refocus. The meter reading may now show a little on the negative side indicating underexposure. We know that the main subject will be well exposed and the underexposure will only serve to make the background darker, which is a good thing. Take the first picture and review it on the rear screen. If the blacks aren’t deep enough, adjust the shutter speed to be slightly faster and try again. This will underexpose the scene slightly and make the shadows a deeper, more satisfying black.
If you want more of the subject in focus, choose a smaller aperture opening such as F8 or F11 then adjust the shutter speed to achieve the desired exposure.
Alternatively, we could set up the exposure with an 18% grey card. Place the card facing the camera in the highlighted zone of the scene, zoom and spot meter the card, filling the frame with the grey. Set the shutter speed for a neutral, central meter reading, zoom out, reframe and focus. Take the shot.
In all cases, if the blacks and shadows are not satisfyingly deep enough, try underexposing by adjusting the shutter speed to a faster setting.

Rembrandt Lighting
This is a variation of a one-light low-key picture if you are photographing a live model. Rembrandt was a master of using this technique in his paintings employing chiaroscuro (the combined use of light and shadow). The single light source is placed to one side and above the model. Adjust the light source until you see a small triangle of light underneath the eye in the shadow side of the face. This triangular pool of light is separated from the bright side of the face by the shadow of the nose.
You may also see a catch light glistening in the eye on the dark side of the face which helps to give it some life and balance with the other, well-lit eye on the bright side of the face. If the light source is a harsh, un-softened source the transitions between shadow and light will appear hard and blemishes and textures will be revealed. If however the light source is softened by a diffuser the transitions between shadow and light will have a smooth and soft penumbra or “Sfumato”!
“Sfumato” – Light and shade should blend “without lines or borders, in the manner of smoke”.
Notes on Painting, Leonardo Da Vinci

Photo by Oscar J Harper
Pushing The Boundaries, Rim Lighting
It is possible to reduce the subject to a glowing rim of light making it extremely minimal and very Low Key. This can be done with a single light source or two light sources.
- One Light Source – Place the subject between the camera and the light source so that the light is completely obscured by the subject. This should create a kind of eclipse halo around the subject; a thin rim line of light at the edges. Soft and fuzzy material like hair and clothes will enhance the halo. Make sure that no light escapes from the rear of the light source as that will illuminate the backdrop and spoil the inky blackness of the void. Equally, make sure the subject is not too close to the backdrop to cause light reflections back on to the backdrop.

Photo by Oscar J Harper
- Two Light sources – Place the two light sources on either side and slightly behind the subject and pointing towards it. Make sure the light sources are not visible in the camera’s viewfinder as you aim it at the subject. Also, ensure that no stray light is striking the lens as that could cause lens flare unless that is an effect you want to see. You may have to employ gates or “Horse Blinds” on the lights to stop light straying where it shouldn’t. This lighting will pick out the two edges of the subject and leave the central part in deep shadow. You can adjust the angle of the two lamps and rotate them back and forth around the subject to increase or decrease the rim lighting effect on either side. The dual lighting technique will create a more balanced shape than the single light source.

Photo by Oscar J Harper
In both cases, expose with the metering method described above and adjust the shutter speed to darken the shadows or lighten the highlights by under or overexposing.
Outdoor Low key Photography
Equipment You Will Need
You will need a camera capable of being used in manual mode. A tripod would be very useful as you may be working in low light. A long zoom lens could offer extra options for picking out distant details and cropping out extraneous details.

Camera Set-Up
Put the camera on a tripod, and switch to Manual mode. Select the lowest ISO setting. This will keep the digital noise to a minimum. Although you will be outdoors, we’ll be looking for gloomy light levels so start with a wide-open aperture. That will keep the shutter speed up to reduce noise created by long exposures. Use spot metering or partial metering on the highlight areas.
Lighting Strategy
Outdoors we will be relying on dark, heavy, brooding skies, deep shadows, steely shade and black silhouettes. You could even use the direct sun if it is low enough, as a backlight to create a strong halo around a dark silhouette. Anything illuminated by the sun but against a dark backdrop makes a very effective Low Key subject. Beams of sunlight breaking through dark clouds are very effective at picking out tiny details in a dark landscape.

Moonlight can produce some very low key scenes either by setting up silhouettes or providing the gloomy light levels for an eerie composition.
Taking pictures during the “Blue Hour” can set up some great Low Key opportunities. This is the time of day after sunset or before sunrise when most of the colour has leached out of the sky leaving an inky deep blue hue and maybe a faint crack of light on the distant horizon. You have the option to convert these images to black and white and you will have some very striking Low key scenes.
At night in an urban or suburban scene, lonely street lights can set up dingy pools of light that you can place a subject within. Isolated buildings, picked out by spotlights against a dark, leaden, stormy or night sky can produce the feeling of isolation and negative space of a great Low Key photograph. You could consider tiny points of light in a large landscape taken from above like a winding country lane illuminated by sparse, dim street lights, snaking its way through an inky carpet of darkness.

Editing in Post-Production
If your images didn’t quite turn out as the powerfully simple, Low Key masterpieces that you imagined, you can easily fix them in post-processing using Photoshop or Lightroom. The background might have some unwanted details showing in it for example. Just open them up in the software and adjust the exposure, shadows, blacks, highlights and contrast. Then, convert them to black and white by reducing the saturation to zero.

Increase Blacks And Shadows To Eliminate Extraneous Background Details
Related Questions
What is Exposure Compensation in Photography?
One way to take control of the dark essence of a low key photo is to understand the power of Exposure Compensation. This can help you to ensure that the background is inky black while the main highlight is perfectly exposed. To find out more you can read our in-depth illustrated guide on this website by clicking here.
What is The Blue Hour in Photography? How to Capture it!
The blue hour offers some great opportunities for outdoor Low Key photography. The inherently dark, steely light lends itself perfectly for the creation of some moody images in the cold, dark-blue hues. You can discover more about this special light which occurs at specific times of day by reading our illustrated article here.
How do You Take High Key Photos?
A related but opposite subject, this article explores how you can achieve the result of high-key photographs. These are photos that are typically bright, upbeat and with low contrast. You can read more about this fascinating subject right here on Photography Skool.
What Is A Gobo In Photography And How To Use It?
A Gobo can help to achieve a low-key image as it cuts out some of the light and introduces shadow and mystery. You can find out more about this fascinating intervention in our fully illustrated article right here in Photography Skool.