Sometimes you are presented with a scene that has difficult lighting conditions. It could easily confuse your camera’s light meter. It will be highly contrasted with strong shadows and highlights. How do you deal with this and produce an exposure that is acceptable? You can “Bracket”! You may have heard of this but you’re not sure what it is. It’s fairly straight forward. Here’s a simple explanation:
To Bracket in photography, take three photos with different exposures of a high-contrast subject. One is underexposed, one is overexposed and one is neutral. This will improve the chances of a good exposure. Choose how many Stops to Bracket by then use “Auto Exposure Bracketing” mode.

It takes some of the stress out of deciding how to expose a scene with lighting levels peaking at the extreme ends of the histogram. It doesn’t always solve the problem because areas of the photograph can still be either underexposed or overexposed. The following illustrated guide will take you through the steps to give you the knowledge to Bracket successfully in photography. Also, a neat way to effortlessly speed up the process will be revealed.
Illustrated Guide to Bracketing in Photography
What Subjects do You Need to Bracket, in Photography?
Every scene you frame up will not present you with a perfectly balanced set of tones across the image. Sometimes you have to work a little harder to pull out the best from the view. Well-illuminated scenes with no large areas in deep shadow or with dazzling highlights probably don’t require to be bracketed. The problematic scenes are those that have the potential to deliver strong contrast, as seen by the camera’s sensor.

Graph by Oscar J Harper
It may not look too bad to the human eye so take a test shot and review the result. If it looks highly contrasted, it may be time to consider bracketing. If you are outdoors, the periods that produce large areas of high contrast are around sunrise and sunset as the sun is low and visible in the sky. Shadows are long and deep, objects in the line of the sun are often silhouetted a deep black. Looking from dark to light areas can be confusing for the camera.

Of course, high contrast can occur outside at any time of the day if the sun is bright and the sky is clear. This type of sunlight has the potential to throw huge areas of the scene into deep shadow or blow out white areas that reflect the strong light or are backlit by the sun.
There can be situations like photographing from inside a cave to a bright outdoor scene or from inside a building looking out through a window or door. These are situations to consider bracketing in order to try and pull out some extra detail from the dark or light areas.

Photo by Oscar J Harper
Indoors, any strongly backlit subject or where strong light is pooling in dark areas is perfect for trying out bracketing…… unless you are going for the stark silhouette or low-key look.

What Types of Bracketing Are There?
You could say that bracketing in photography is a series of test experiments to establish which settings produce the most favourable result. It’s like hedging your bets when you can’t guarantee the final outcome. You can apply this system to many settings on the camera but the three most common types are:
- Exposure Bracketing
- White Balance Bracketing
- Focus Bracketing
Exposure Bracketing
You can select any of the three main settings on the camera to perform exposure bracketing: Shutter Speed, Aperture or ISO.
Shutter Speed Bracketing. This is probably the most practical type of bracketing as it doesn’t change the “depth-of-field” or the “grain” of the three images that are taken. In this case, you want to fix the aperture and vary the shutter speed. You can achieve this manually by Using the “Manual” (M) program. Set the camera to shoot in RAW and set the ISO to the lowest setting that’s appropriate to minimise the grain. Don’t use Auto-ISO as that will give you less precise control over the shutter speed bracketing.

You should probably use a tripod to fix the scene as it will take time between shots. Set up an exposure with the required aperture to record the desired depth-of-field, then adjust the shutter speed to achieve a neutral centre setting on the light meter. Take that shot then underexpose the scene by two stops by increasing the shutter speed. Take that shot then return to the neutral settings and overexpose that position by decreasing the shutter speed by two stops from the neutral settings.

Aperture Bracketing. To bracket the aperture you should choose the “Manual” (M) Program again. Set up the camera as described above then set up a neutral exposure with the desired shutter speed and adjust the aperture to bring the light meter needle to the centre. Take that shot then underexpose the scene by two stops by decreasing the aperture opening. Take that shot then return to the neutral exposure then overexpose it by increasing the aperture opening by two stops.

Photos by Oscar J Harper
The problem with Aperture Bracketing is that the three images will not only look different in terms of exposure but they will also have wildly varying depth-of-field results. This means that different parts of the images will have different degrees of blur. They won’t offer a fair comparison. So, unless the depth-of-field is not important or shutter speed is paramount, don’t use Aperture Bracketing.
A Note on AEB (Auto Exposure Bracketing)
Taking three different exposures manually takes a little time but there is a much faster way to do it by pressing the shutter button just once. That is by using AEB or Auto Exposure Bracketing. Choose a semi-automatic Priority program to make this easier.
Av or A – Aperture Priority Mode
Tv or S – Shutter Priority Mode

Whichever Priority program you choose the opposite exposure setting will be bracketed, which makes sense. So, to bracket the shutter speed you must choose the Aperture Priority mode.
This will fix the aperture and vary the shutter speed. When you are in Aperture Priority mode, use the navigation arrows to get to the Exposure Compensation/AEB meter. Select it then, using the spinning wheel selector, you can dial in the degree of bracketing, measured in “Stops”, usually one or two stops should suffice. Now we need to set the drive to “Continuous Shooting”.

First, choose an ISO setting as low as possible for the ambient lighting conditions; don’t select Auto ISO as it will interfere with exposure control. Set up your first Neutral exposure by choosing the desired Aperture, the Aperture Priority Program will then adjust the shutter speed to achieve a neutral image. You can now take the three pictures by pressing and holding down the shutter button or use a remote shutter release. The camera will now take three images:
One Neutral – (0) or (Central) on the light meter
One Underexposed – (-2) or (-1) on the light meter
One Overexposed – (+2) 0r (+1) on the light meter
You could also set the camera to self-timer. You will hear the camera take three shots automatically at different shutter speeds. Review the results, there might be a great exposure in amongst them.

If they are still not perfect you can actually tweak the bracketing to make all three images slightly darker or lighter while maintaining the distance of one or two stops between exposures.
You simply have to navigate back to the Exposure compensation meter on the rear screen menu and use the spinning wheel or arrow keys to nudge the three indicator bars left or right, towards underexposure or overexposure. This fine-tuning should yield a reasonable result and a decent exposure.

ISO Bracketing. For this bracketing, you should choose the “M” program on the dial and set the ISO to a number that allows you to go 1 or 2 stops above and 1 or 2 stops below it. When you have framed the scene, focused and metered for a neutral exposure, you can hit the trigger and take the first shot. Now select an ISO number that is 2 stops below the first and without re-adjusting the metering, take the second shot. Finally, take the ISO number 4 stops above the current number (ie 2 stops above the starting number) and take the last shot.

The problem with this ISO bracketing is that the image quality of the three images will be different due to the varying degrees of grain (or noise). So again, you have an unfair comparison. This method is probably best employed in low light conditions to see how far to push the ISO amplification of meagre light sources.
The conclusion regarding Exposure Bracketing appears to be that Shutter Speed Bracketing will give the most consistent results and the most comparable images. The other two versions deliver inconsistent levels of focus and image quality and should only be used in extreme conditions such as dark or windy scenes.
White Balance Bracketing
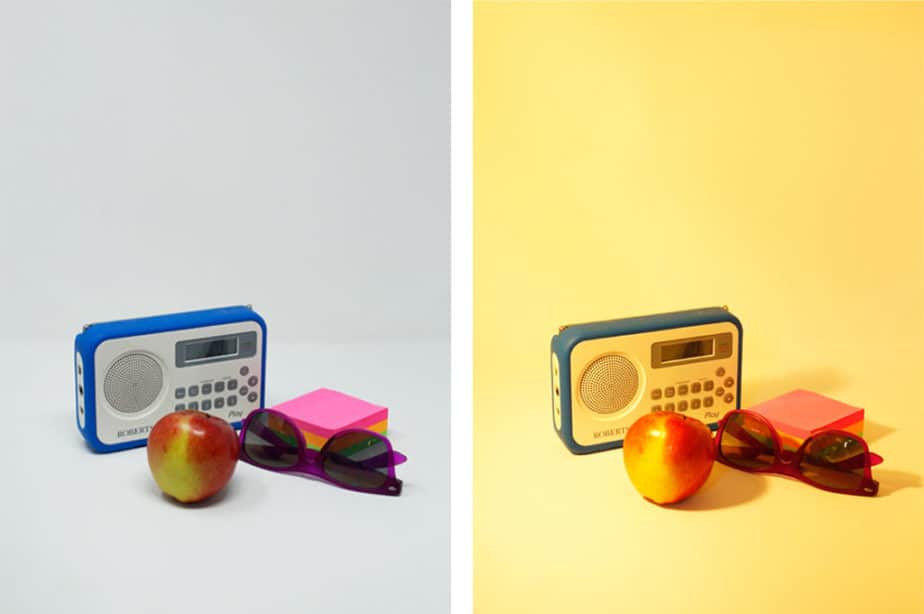
If you find yourself in a tricky lighting scenario with multiple light sources emitting different colour light temperatures you might want to consider using White Balance Bracketing. This will allow you to take a series of three photographs with slightly different colour biases. Remember that certain types of light will produce a colour cast in digital photography:
- Tungsten/ Incandescent Light is yellow/orange
- Midday sunlight in shade has a blue tinge
- Fluorescent light has a green hue

Knowing this should help to compensate for the colour cast generated by the different light sources and help to make a choice regarding the best White balance for the overall final image.
You can do this manually in your camera by going to the WB Shift menu on the rear screen and selecting a colour bias, such as Green, Magenta, Blue or red and take a test photograph to check the colour cast. Try several different colour settings, review the results and set the bias to the setting producing the best overall White Balance.
This is quite a long-winded way to do this but you can speed up the process. In the WB Shift menu, there should be an option to WB Bracket.

First, choose your desired exposure settings and set your camera to Single Shot. In the WB Shift/Bkt menu there will be a grid bounded by opposite colours: Blue & Red, then Green and Magenta. Now, using the spinning wheel you should be able to select colour bracketing points 1,2 or 3 points away from the neutral centre along either axis.

Set that then go ahead and take a photo by pressing the shutter button. It should produce a series of 3 photos from one shot. Review these and you should see that one of them produces the best white balance for the lighting conditions. If they are still unsatisfactory try repeating the process using the other axis in the WB Shift/Bkt menu.

Focus Bracketing
This is probably only necessary when you are forced to use a larger aperture opening as a very small aperture would keep most of the whole scene in focus. Set your camera on a tripod, choose your exposure settings to suit the scene and the necessary large aperture. Autofocus onto the main subject then take the photo. Switch the focus control to manual then refocus slightly in front of the previous focus point.
Shoot and refocus to a point slightly beyond the first focus point. Now you will have a series of photos with different focus points to compare and choose from. It is possible to combine these photographs in software like Photoshop or Lightroom to create a more complete focused zone. (More on this later).

Can You Can Bracket Anything In Photography?
There is no reason that you can’t bracket any setting on a camera in photography including flash power. Bracketing is just the exploration of options by choosing a neutral position and two other slightly extreme positions either side of the neutral one to maximise your chance of a great result. Anyone who takes their photography seriously would want to try and guarantee success and bracketing can help you get there.

When Should You Not Bracket?
It is not always sensible to bracket, certainly don’t do it for every picture; that would just fill up your memory card with plenty of unusable images. If the scene is fairly evenly lit with good overall light and very little high contrast areas, it’s probably inefficient to bracket the photograph. Check your histogram for this type of image on the camera, it should have a nice central hump with no peaks or run-off at the extreme edges.

One situation where bracketing can actually hinder your efforts is when you are shooting moving action. If you are tracking a moving subject and using continuous shooting, two out of the three images may be unusable and the camera may stop shooting after a few shots anyway due to recycling of the flash power. Just make sure you have set up a reasonable exposure for the type of image you want and just keep shooting with continuous drive and continuous re-focusing.
What Can You Do With Bracketed Photographs?
It is great to have the option to choose between a series of bracketed photographs. So, if you practice bracketing you will always have a choice from which to select the best possible version. There may still be issues but if you shoot in RAW you have a great chance to improve the image with the least tonal detail loss, in Photoshop or Lightroom.
If you want to go further and produce an image with High amounts of Dynamic Range (HDR), bracketed photographs, taken with a tripod are perfect for this process. To get the best out of this method ensure that you have taken the photographs using Shutter Speed Bracketing. This will guarantee that the aperture doesn’t change during the series of photographs which would maintain the depth-of-field and eliminate any overlapping blurred areas when you come to merge the photos.
To create an HDR image from three bracketed photos and improve the visible detail in the shadows and highlight areas, open then all up in Adobe Lightroom Classic, select them all then choose the “Photo” drop-down menu, then “PhotoMerge”, then “HDR…”. This will combine the images and select the best-exposed areas of each photo and combine them into a single image with High Dynamic Range.


Related Questions
How do you Read a Histogram in Photography?
This is the strange graph that you can view on your camera’s rear screen or in software like Adobe Lightroom. It may look baffling at first but once you understand its meaning, it can be very useful in assessing the exposure of your images. You can discover more by reading our illustrated guide right here on this website.
What is Dynamic Range in Photography?
Understanding the dynamic range of your camera will give you an insight into how to artificially improve it. Bracketing is a tool that can help you achieve an improved dynamic range in your photos by merging images with different exposures. Learn more in our illustrated article here on Photography Skool.
How do You Take Stunning HDR Photographs?
Bracketing is basically the technique employed to produce an HDR (High Dynamic Range) photograph. It involves merging multiple pictures taken at different exposures to produce an improved overall image and you can read more about this useful technique right here in Photography Skool.