HDR stands for High Dynamic Range. As a photographic technique, this means that through a blending of several photos taken at different shutter speeds you can achieve a single photograph with a much wider range of tonal detail and colour hues. Your own eyes can detect a much broader range of tonal detail in a scene than a single photo taken by a camera. The camera struggles with highly contrasting scenes. The HDR technique can replicate the view of a human eye and pull out more detail and colour from the dark shadows and bright highlights.
To take a great HDR photo use a camera with Aperture Priority, Auto Bracketing and RAW file type. Choose a scene with shadows and highlights. Using a tripod take 3 bracketed photos at -2, 0, +2 stops exposure. Combine and blend the 3 photos in Lightroom by selecting “Photo”, “Photo Merge”, “HDR”.

This can produce spectacular results; a photograph that would be almost impossible to achieve with one exposure. You will see far more detail in the underexposed and overexposed areas as well as a richer range of colours. It is a little more involved than taking a normal photograph but the following guide will explain all the steps required to achieve a great High Dynamic Range image.
The Steps to Achieving A Great HDR Photograph
What Is a Suitable Subject For HDR Photography?
Almost any subject would benefit from a higher dynamic range of detail but those scenes that produce problems for a camera’s light metering system would benefit most. We are talking about scenes that have a good deal of contrast as seen by the camera’s sensor. Strongly backlit sunsets and sunrises. Images with both deep shadows and highly lit areas. To the camera’s eye, these scenes become more binary and about deciding between dark and light.
The camera would be quite good at choosing either the shadows or the highlights and metering perfectly for one of them. The downside is that the other tonal range would either be underexposed or overexposed and the detail in that area could be lost. If you allow the camera to meter across the whole scene there is a danger that there would be loss of detail in the shadows and highlights and the overall impression would be flat and dull.
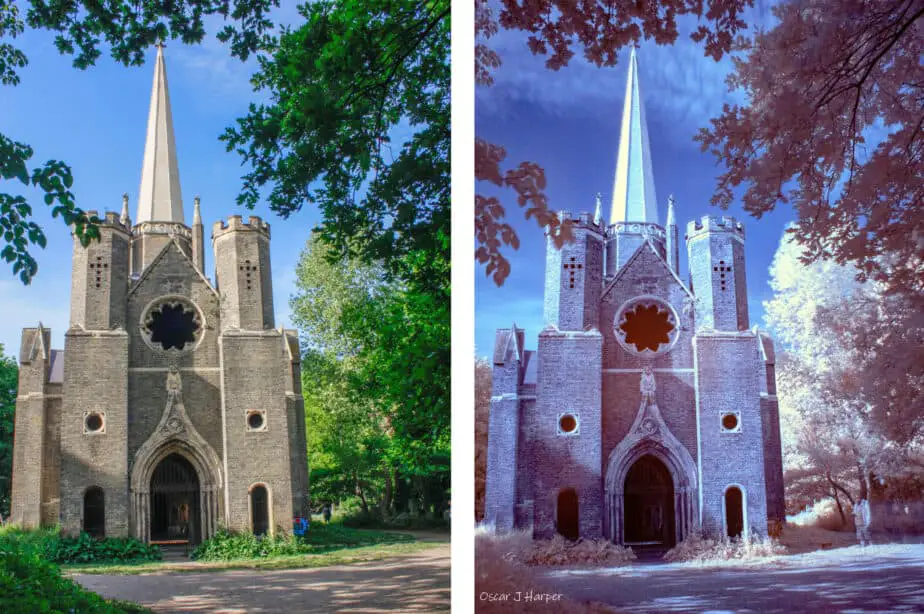
One way to decide if a scene could be improved with the HDR technique is to frame it up and take a single photograph with evaluative metering and review the result. If the photograph is disappointing, consider how you are seeing it with your own eyes. If there is a lack of detail in the strongly dark or light areas consider bracketing and employing the High Dynamic Range process.

Photo by Oscar J Harper
Which Shooting Mode Is Best For HDR Photos?
Why is it best to use Aperture Priority Mode? To create an HDR photograph we need to take multiple photographs with different exposures. Exposure can be altered by changing the Aperture or Shutter Speed. If we were to fix the Shutter Speed and bracket the exposure by two stops either side of normal, the best way to change those exposures would be for the camera to alter the Aperture opening by +2 stops and -2 stops. This would open up and close down the Aperture and vary the depth of field massively over the three exposures of the bracketing sequence.
This would mean that each individual image would have varying degrees of sharpness and blurring which would make it very difficult to blend the three together at the end during post-processing. The result could be quite a soft, blurry overall image, which is what you don’t want. The best way to guarantee that all three images will have the same degree of sharpness is to fix the Aperture by choosing an appropriate one in Aperture Priority Mode.

Photo by Oscar J Harper
Most HDR images will benefit from having sharp detail throughout the view so use a smaller aperture-opening to maximise the depth-of-field. If the scene is a wide landscape, for example, use a small Aperture-opening such as F16 or F22.
What Is Auto Exposure Bracketing And Why Use It For HDR Photography?
The real secret behind the production of an HDR photograph is the clever combination of a series of photographs with different exposures. Before you can combine them we have to produce the series, all with different areas of detail in different parts of the image. This is achieved most efficiently and with no time delays between frames by employing AEB, Auto Exposure Bracketing.
Most DSLR cameras will have this function with options to take between 3 and 9 different, bracketed exposures. Bracketing means to take different exposures either side of a normal exposure to create options if the lighting of the scene is somewhat difficult. You can decide how many stops to bracket by. You could choose to bracket by 1,2 or 3 stops either side of normal.

Photo by Oscar J Harper
So if you were to choose to bracket by 2 stops the camera would automatically take one photo that was -2 stops underexposed, one photo that was exposed correctly and one photo that was overexposed at +2 stops. This gives you three photos that have captured detail in different tonal ranges and once combined later will produce an HDR photo that will have good detail in all areas of the image. You are effectively increasing the dynamic range of the camera artificially.
Where Do You Focus For Best Results In HDR Photos?
It is important that the image is sharp in all the important areas. HDR images aren’t usually photographed with a shallow depth of field as the blurred background and foreground would render the process pointless as the goal is to pull out as much detail as possible from every area. Assuming then that you will be using a smaller aperture-opening to maximise the depth-of-field you need to decide where to focus.

If you are presented with a wide landscape you should focus on the mid-ground. The small aperture-opening will then ensure that the majority of the deep scene will remain in focus. Next, you need to make sure the camera doesn’t refocus between bracketed shots. That would be disastrous as the images would never blend together adequately if they were focussed differently. So, after you have framed up the scene and focussed on the chosen spot, switch the lens to manual focus to lock it at that focal point.

Choose RAW File Type For HDR Photogrpahy!
During the post-processing stage that comes after capturing the photos, you need to work with the maximum amount of data recorded within the image. The best way to achieve this is to set your camera to shoot in RAW file format. You can set your camera to record images in RAW. These files are large in size because they are unprocessed and uncompressed and have a lossless quality which is perfect for the HDR blending method.
They contain the exact image data as recorded by your camera sensor without alteration. They have the ability to store unseen details in the shadows and highlights which can then be pulled out in post-processing. The RAW file type also preserves the information that was captured by the sensor at the time of the image exposure and any changes made by editing are therefore reversible.

Use a Tripod For Perfect HDR Photos!
To create the HDR combined, blended photograph you need to take three or more consecutive photographs with different exposures but the exact same scene. The best way to achieve this is to use a tripod so that there will be no movement between frames and no chance of camera shake which could blur the images. Use a sturdy tripod or if yours is not rock solid, try lowering it by collapsing the legs down to the lowest position and tighten all the twist screw handles.

Choose a Low ISO Number For Detailed HDR Photos!
The best images for HDR will have the least noise or grain. The noise on an image is the digital aberrations caused when a higher ISO number is selected to create a brighter image in low-light situations. The higher ISO number is a measure of the amplification of the available light as the pixels group together to improve the brightness. The result of high ISO numbers is the presence of undesirable incorrectly recorded pixels that appear like dusty dots in the image.
The effect is made far worse with the very high ISO numbers and very long exposures. For this reason and to maximise the quality of your final HDR photo you should use a low ISO number to minimise the amplification of the noise. Using a tripod will help to keep the ISO low. Try using ISO 100 if possible. If it is just too dark to achieve this very low ISO number, push it a little to ISO 200 or 400.

How Do You Merge Images For HDR in Lightroom Classic?
Once we have our series of 3,5, or 7 bracketed photos of different exposures but the same depth-of-field and focus, we need some way of cleverly blending them together. There are several very good HDR software packages that you can use for the next stage of the process but I will focus on using Lightroom Classic as it is the one that most photographers will probably already have.

Launch Lightroom Classic and import your series of differently exposed images. You should have at least one well-exposed image, one overexposed image and an underexposed image. They will all have good amounts of detail if different areas of the image. This is where the magic of HDR starts to happen as we combine the best parts of each image.


Select all the images of the series in the library window. Now, go to the “Photo” tab on the top menu. Click on that then drop down and select “Photo Merge”. From there go across and select “HDR”. The software will now start to process the images together; it may take a while. At this point, you have the option to “Auto-Align” the images. You may want to activate this if you believe that there was any slight movement causing camera shake between frames or if you hand-held the camera without the benefit of a tripod.

You can also choose to deghost which will attempt to correct any tiny shifts it detects that will appear like a ghost image. You can choose to deghost to different degrees: low, medium or high. Now, you can go ahead and hit the merge button and Lightroom will intelligently blend the images to create a great image with a massive amount of Dynamic Range. It will now be possible to save the image in a useable format like Jpeg or Tiff.


Photos by Oscar J Harper
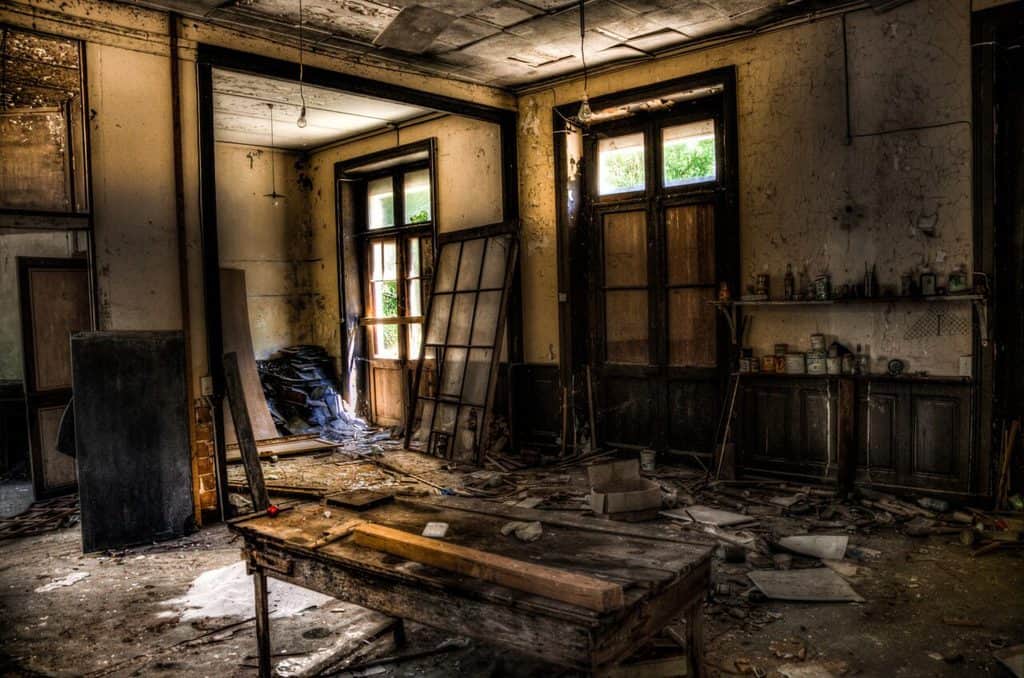
Is RAW Better Than HDR Bracketing Technique?
Modern cameras can record images in the RAW file format which is an unedited and uncompressed file. They contain a huge amount of data recorded by the sensor at the moment of the exposure. Some of that data and detail will be unseen on the first render of the image on the rear screen of the camera; it doesn’t mean it is not there though. This is particularly true with what appears to be a very high contrast image with very deep shadows and apparently blown-out highlights.
So before deciding to go to the trouble of taking a series of bracketed images on a tripod with continuous shooting and manual focus, take a shot of the scene and then have a good look at the histogram for that photo. If it is a high contrast scene there will be spikes near the far left and far right of the histogram diagram. These spikes correspond to the very black and very white areas of the scene as captured by the sensor.
All may not be lost though. If the spikes do not run off the edges on the far left or far right then there may be no clipping. Clipping occurs when areas of shadow or highlight go beyond the dynamic range of the camera’s sensor. The clipping indicates that any detail in those clipped areas may be permanently lost and no amount of post-process editing will ever bring them back.

Photo by Oscar J Harper
In the case of clipping, it may be worthwhile to take a series of bracketed photos as described above then create a blended HDR photo to pull the details out of the hidden, extreme tonal areas.
If the histogram looks fine and well exposed with a central hump in the graph and no edge clipping, then you can probably go ahead and edit the single RAW photo in Lightroom and produce a very impressive photograph.

Photo by Oscar J Harper
Related Questions
What is ETTR in Photography?
ETTR (Expose To The Right) is a way of sqeezing out the last ounce of quality and detail of an image by overexposing and taking advantage of the “Signal to Noise” ratio. If this seems confusing, all is explained in our illustrated article which you can find here on Photography Skool.
How do you Read a Histogram in Photography?
You may wonder, what is the bar-chart that you see on your camera’s rear screen when reviewing photos? You also see it when you open a photograph in Adobe Lightroom or Photoshop Camera RAW! It’s actually a helpful tool for understanding the exposure of your photographs. Find out all about it in our illustrated guide which you can conveniently find in this blog right here on Photography Skool.
How do You Successfully Bracket in Photography?
Bracketing is basically the technique employed to produce an HDR (High Dynamic Range) photograph. It involves taking multiple pictures at different exposures which can then be combined into an HDR image. You can read more about this useful technique right here in Photography Skool.
What is The Difference Between Saturation And Vibrance in Photo Editing?
Once you have assembled an HDR image, you may find that the colours need a little editing but what is the best way to do this in Photoshop or Lightroom? It’s useful to know the difference between Saturation and Vibrance when you are editing so you could dive into our comprehensive, illustrated case study which examines the effects of these settings on colours and skin tones, here in Photography Skool.