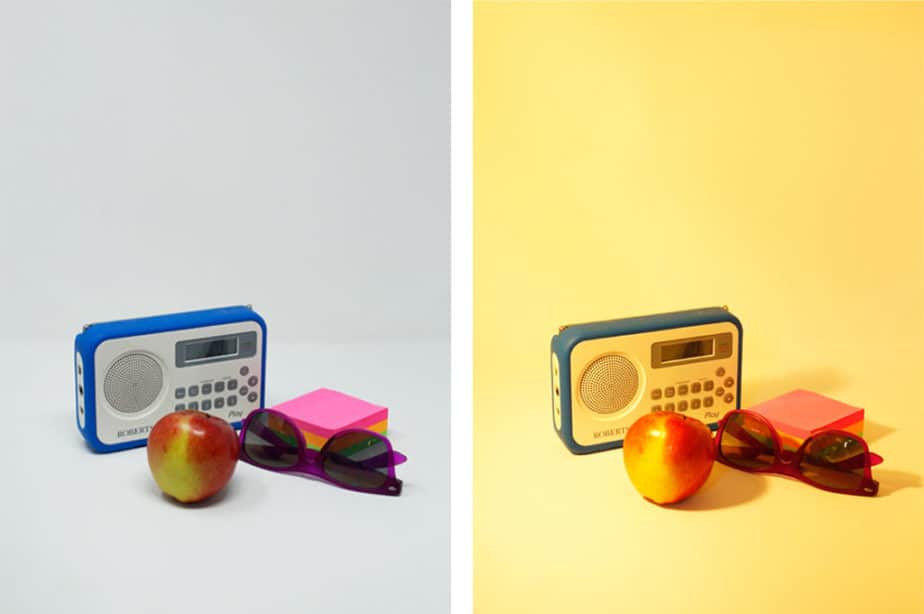
Your camera is colour blind! It can’t process light as well as a human eye. If you look at a piece of white paper indoors under tungsten light or outdoors at noon, to you, it will look white. For a camera though, it will look different due to the colour temperatures of the different kinds of light. It will have a yellow cast indoors and a slightly blue cast outdoors. The camera deals with this colour shift by compensating with the opposite colour to balance it out.

The above example shows the colour cast of an image shot in Tungsten light (on the far left), the corresponding opposite colour cast that the camera can impose to compensate and the resulting cast-corrected neutral image (on the far right). This only occurs if you tell the camera that the image was shot in Tungsten light.
White balance in photography is the removal of colour casts by compensating with a complementary colour to create a natural-looking white in different types of light. Other colours in the scene are rendered accurately by the established white reference. A camera has Auto, preset & custom WB.
Illustrated Guide to White Balance in Photography
“White Balance” is a fundamental concept to understand to assist you in producing great photos every time. The Auto white balance built-in to your camera does a fairly good job most of the time but it can get confused. The following article will help you understand the different colour temperatures of light and how to best use “white balance” in the more difficult lighting situations.
Colour Temperature of Light
Colour temperature of light is measured in Kelvins (K) and the lower numbers refer to the warmer colours such as reds and oranges (Candles 1000K). The higher Kelvin numbers refer to light in the blue range of colours (Clear blue sky 10,000K). We tend to call the reds and oranges the “Warm” colours probably due to their association with fire and the sun. The blue shades we refer to as the “Cool” colours as they reflect the idea of cold water and ice.

Photo by Oscar J Harper
There are many types of light that we encounter every day and they all have a different colour temperature that are virtually invisible to us but not to your camera sensors. There is the natural light like sunlight but this has various colour temperatures throughout the day. There are myriad types of artificial light such as incandescent, fluorescent, halogen and sodium lights. They all have different colour temperatures. To a camera sensor, that can detect these subtle colour temperature differences in light, they appear as a faint colour cast when viewed on our images. See the chart below for colour temperatures and approximate colour cast.

Given this confusing array of colour temperatures of light bouncing around everywhere, it is therefore quite reasonable to assume that the camera won’t get the white balance exactly right every time. Sometimes there are multiple light sources of different colour temperatures that can wreak havoc on your chances of a good colour-balanced image. Your camera does have some tools to help combat the colour cast issue though.
There are a series of preset White Balance settings designed to neutralize the colour cast of certain types of natural and artificial light. You can select the type of light you will be shooting in to inform the camera to correct the known colour cast for that type of light.

Here are brief descriptions of the usual preset White Balance settings on your camera.
Preset White Balance Settings
- Daylight
- Shade
- Cloudy
- Tungsten Light
- Fluorescent
- Flash
The following photographs are the colour temperatures of the available light, not the compensating casts imposed by the camera to correct them.
Daylight – This setting is used for shooting outdoors and will have a reasonable attempt at correcting the colour cast at all times of the day where the colour temperature will be varied from sunset to sunrise (2000K to 10,000K).

Shade – These are usually outdoor areas that are in light shade and not heavy shadow. The colour temperature is about 7000 Kelvins and is at the bluer end of the scale. The light levels are similar to an overcast day.

Cloudy – This setting is best used when the sun is behind the clouds creating an even and diffuse light. It is an outdoor light setting on the cooler, bluer side of the centre with a temperature of around 6000 Kelvins.

Tungsten – This is an artificial light produced by an incandescent lamp. It produces a colour temperature of around 3000 Kelvins which is towards the warm end of the scale with an orange/yellow cast. These types of lamps are used less and less as we move over to long-life bulbs and LEDs.

Fluorescent – These types of lamps can produce a variety of colour temperatures from 4000K up to 7000K, this makes them difficult to correct with this White Balance preset. They often produce a blue cast at the higher end of the temperature range but there are warm fluorescent tubes that can cause a yellow/green cast. Their colour temperature can also change over time making then inconsistent. Probably the best way to deal with a scene lit by these lamps is to set up a “Custom” white balance. (More about this later in the article).

Flash – This setting can be used with the built-in flash or an external flash fixed to the camera or remotely on a cable or slave trigger. It produces a very white/blue light of around 5500 Kelvins. It will usually overpower any other light sources in the scene making their colour casts negligible.

Auto White Balance
This setting may be used as a default for most normal lighting conditions within a range of 3000K to 7000K; the middle range of the scale. The camera will usually do a reasonable job in most unchallenging lighting situations. The setting works by trying to locate an appropriate area of well-exposed “White” in the scene and adjusting the cast to make it appear “white” and balancing all the other colours accurately.

Photo by Oscar J Harper
If, however, there is no “white” area anywhere in the scene or there is an abundance of one colour the camera can be fooled into applying the opposite cast to the abundant colour. This will obviously result in a false representation of the scene.
When to Avoid The Auto White Balance
If you are taking a series of photos and you desire to see a consistent colour balance across the whole range you should avoid the auto white balance in favour of a preset that suits the prevailing ambient light.

Although the Auto White Balance does a pretty good job in the middle range of light colour temperatures and when there is some “white” present in the scene, there are situations when you need to override it. When the warm tones of the “Golden hour” or the cool tones of the “Blue hour” are a huge part of the story, we don’t want the camera to attempt to correct the hue. So, in this case, you should set up a custom white balance.
Custom White Balance
This setting is very useful for tricky lighting situations like when there are several different types of fluorescent tube lights present or if there are daylight and artificial light present together in the same scene. You actually tell the camera what area in the scene is supposed to be white. You achieve this by taking a photo of a white object within the scene. Fill the viewfinder with the white area, it doesn’t have to be in focus but should be free of shadows cast by yourself.

Take a picture and it will be saved in memory. Open up the menu that has the “Custom White Balance” option. You will be asked to choose an image to set as the custom white balance. Choose the picture you just took of the white area. The camera will now assume that the area in the photo is pure white and shift all the other colours in the scene to appear accurate against the reference “white” area. Don’t forget to unset the custom picture when you change locations or you will have colour casting issues if the light source has changed.

Photo By Oscar J Harper
White Balance Bracketing
Like exposure bracketing (taking 3 photos with different exposures) you can also bracket the White Balance. This allows you to take three photographs with slightly different colour casts so you can choose the most appropriate white balance. Most DSLRs have this function and it is easy to set up. Navigate to the menu that has the white balance shift/bracketing controls.

Photo by Oscar J Harper
Open it up and you should be presented with a four-way graph bounded by the colours blue, red and magenta, green. You should be able to use the spinning wheel controller to set up the colour bracketing by 1,2 or 3 points along the x-axis (red and blue cast) or the y-axis (magenta and green cast).

Photo by Oscar J Harper
Once that is set, switch the camera to continuous shooting drive, choose your exposure, frame the scene then shoot off the three frames automatically by holding down the shutter button. Review the results and see if you have a reasonable white balance. If not repeat the exercise using a revised colour bracketing choice in the White Balance Bracketing screen.
Adjusting The White Balance in Post Processing
This is a very useful tool if you have messed up the “white balance” in-camera. If you have been shooting in the RAW file type you will probably be able to fix the “white balance” very successfully and very easily. Just import the RAW file into Lightroom or Lightroom Classic. Open it up and go to the “Develop” tab. In there you will see the sliders that control the “Temperature” and “Tint”. Play with those until you see a pleasing result.

An even easier and more precise way to do this is to use the eyedropper tool. If there is any part of the image that is supposed to be “white”, simply take the eyedropper tool and select a white pixel and the software will make the selection white and colour-shift all the other colours in the image to read accurately against the new white reference.

Related Questions
How to Set Custom White Balance on a Canon Rebel T6/1300D/X80
There is a specific way to set a custom white balance on a Canon Rebel T6/1300D/X80. For a detailed explanation click here.
How do You Take High-Key Photographs?
These are images that are predominantly bright, often with an abundance of white tones so it’s very important to get the white balance perfectly calibrated. This article explores how you can achieve the result of high-key photographs. These are photos that are typically upbeat and with low contrast. You can read more about this fascinating subject right here on Photography Skool.
What is The Difference Between Saturation And Vibrance in Photo Editing?
Once you have fixed the white balance of an image, you may find that the colours need a little boost but what is the best way to do this in photo editing. It’s useful to know the difference between Saturation and Vibrance when you are editing so you could dive into our comprehensive, illustrated case study which examines the effects of these settings on colours and skin tones, here in Photography Skool.
How do You Take Photos in a LightBox, AmazonBasics Studio?
You should be able to achieve a good white balance in this bright, white, mini studio lightbox with daylight temperature LEDs. Check out our illustrated guide right here in Photography Skool.
What’s the Best Time for Newborn Photos?
White balance is important in any kind of portrait photography, not least in the correct representation of Newborns. To learn more about the best time to take Newborn photos and other helpful tips, see our guide, here on Photography Skool.