Your DSLR camera and some mirrorless cameras can record your images in two different formats; Jpeg and RAW. One produces compressed, edited useable and printable images, the other produces large, uncompressed, unedited, flat, dull-looking images. So, why would you opt for the latter?
RAW files in photography record all of the data captured by a camera’s sensor without any compression and minimal processing. The huge 12-14 bit resolution (68 Billion colours+) allows fine details and colours to be revealed in post-processing to create a very high dynamic range image.

Photo by Oscar J Harper
RAW files are very large files being 2 – 6 times bigger than a Jpeg. They have some great advantages and a few downsides. Why should you use them in photography over the more convenient Jpeg? Keep reading to discover a detailed explanation of RAW files and how they compare to Jpegs.
Guide to RAW Files in Photography
RAW File Size Compared to Jpeg
RAW files are very large compared to Jpeg because they have not been processed or compressed at the time of storing on the memory card. Sometimes they are up to 2 to 6 times larger than a Jpeg file. This makes then very cumbersome and they can soon fill up the storage especially if you are shooting bursts of images.
Jpegs are usually 8 bit resolution which means they can store 256 variations of tone or colour. When this is combined with the three colour channels it means they can store over 16 million colours.
RAW files are usually 12 to 14 bit resolution and can, therefore, record 4096 tonal values which is a massive range of over 68 billion different colours over the three colour channels.
Advantages of Using Raw Files in Photography
None of The Image Data is Lost
The RAW file format records everything that the sensor sees including all the details that may be indistinct in the darkest shadows and brightest highlights. It records these faint details because of the massive availability of billions of colour tones. All of this information, this raw, unprocessed data is available to you to work with.
You can open the RAW files in special software, like “Lightroom” or “Photoshop Camera Raw”, that can read the files. This software is capable of reading the huge amounts of data and using the controls you can vastly improve the appearance of the darkest shadows and the brightest highlights. You have the power to recover details and colours that appeared lost in the high contrast areas of the image with little reduction in image quality.
You can alter the exposure to produce a more balanced, visible, high dynamic range image. You get to make the decisions that the camera would normally make but you can make them more precisely and with more time and creative flair. The massive range of tones that are available means that “Posterization” (the appearance of abrupt steps in shaded graduation areas) is eliminated or minimised. The transformations possible in post-processing can be remarkable with RAW files.
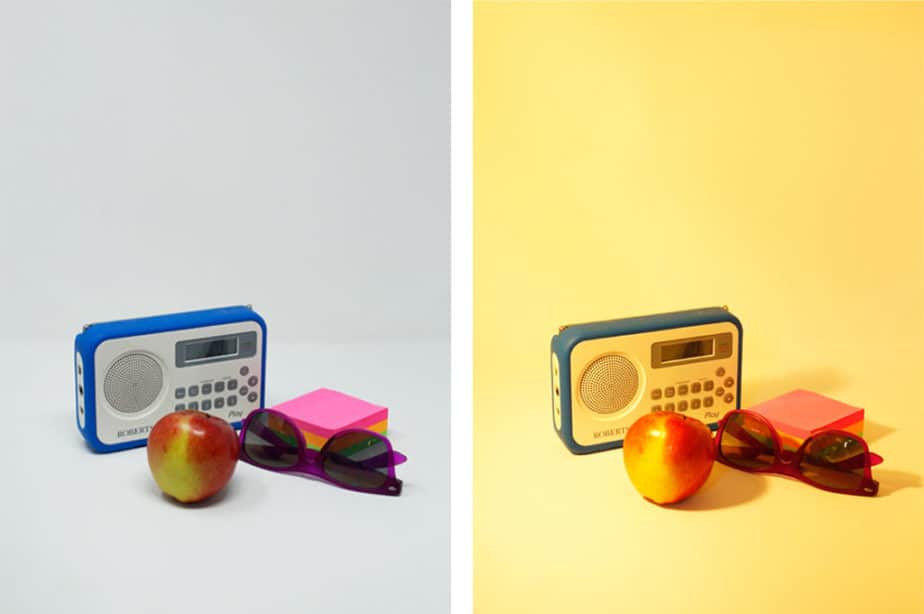
White Balance in RAW File is Easy to Correct
Different types of light sources have different colour temperatures, ranging from the warm oranges through to the cooler blues; between 1,000 and 10,000 Kelvins. If the camera or you get the white balance wrong in the setup, you may end up with an unwanted colour cast in your images. This could be disastrous but if you have shot your images in RAW it is relatively easy to recover the image and get a nice neutral white with the other colours shifting in the correct directions to create a well colour-balanced photograph.
This is because there is such a massive colour tone range within the pixels that there is room for manipulation of the overall colour cast. This can easily be carried out in RAW editors like Adobe “Lightroom” or “Photoshop Camera Raw”. It’s just a matter of adjusting the WB sliders.

More simply, you can use the WB eyedropper tool to select a pixel on the image that should look white and the software will correct the whole image to a natural-looking scene.

You Can Extract Finer Details
The abundant amount of data available in a RAW file means that you can improve the detail in the images. You can do this in post-processing using Lightroom by adjusting the “Presence” sliders where you can change the “texture”, “clarity” and “dehaze”. There is also the option of improving the image detail further by adjusting the “sharpening” and “noise reduction” tools.

You Can’t Ruin The Original RAW File
RAW files are are what are known as Lossless files because none of the data is lost when they are created. The editing of a RAW file is also non-destructive as you are not actually changing any of the original data of the file.
The process of editing a RAW file is simply creating a set of instructions to be applied when you convert it to a useable file like a Jpeg. You can undo any of the editing that has been performed on the original RAW file without loss of image quality. You can come back to the file at any time in the future reset it then re-edit it. The data will never change.
Batch Process Raw Images
Programs like Adobe “Lightroom” are designed to assist your workflow. It is very happy to handle and batch process multiple RAW files. It can help speed this work up as you can apply the same settings to a group of similar images once you have established a Preset list of editing instructions.
Disadvantages of Using RAW Files in Photography
Given all these positive advantages and the amazing results that can be achieved using RAW files, are there any reasons to avoid them?
RAW Files Need to be Processed
Straight out of the box, RAW image files appear flat and dull compared to a Jpeg of the same scene. This is because the Jpeg has had some editing applied to it by an “image profile” algorithm to give it a little punch by boosting the vibrance, saturation, contrast and sharpness plus compression. The RAW file, so far, is untouched; it’s like an unpolished piece of stone waiting for all the potential to be revealed by honing the surface.

RAW files always require more work before they will look acceptable. You can’t just press the camera shutter, download and email it on. They can’t be printed, viewed or shared without some processing. So, if spending hours editing your images is not your bag, then you should probably stick to shooting in Jpeg because an unedited RAW picture will look worse than a ready-to-go Jpeg.
RAW Files Are Much Bigger
The massive amount of data that RAW files are capable of storing makes them very large files. This means you can take fewer pictures on a shoot as your memory card will fill up fast. Be sure to bring spare memory cards if you are out on an all-day shoot. Some cameras allow you to record photos in two types of file at the same time; RAW and Jpeg. This gives you the convenience of a compressed, edited file that you can share straight away as well as your data-packed RAW file.

It does mean that you are using up even more of your precious memory card though. Memory is getting cheaper so it is not such a big issue as it used to be. RAW files will take longer to transfer from your camera to your backup storage especially if you are downloading hundreds of images at one time.
Continuous Shooting Mode Could be Slowed Down
If you want to catch some continuously moving action in a burst sequence, the large files could fill the memory buffer up as it will take more time to write the large files to the memory card. The camera will still shoot at the same frame-rate with Raw or Jpeg but if the buffer is filled there may be a pause as it writes to the main storage.
If the capture of fast sequences is essential for you, make sure you have the fastest type of memory card or invest in a camera with a larger, faster buffer memory. Otherwise, you should switch back to Jpeg shooting in order to avoid missing any of the action.
Can’t be Shared Straight From The Field
If you are a field photographer or photojournalist, you may have urgent delivery deadlines for critical images. In this case, it would be better to choose a Jpeg format as these can be shared instantly online without any further editing or compression. You can select different degrees of image quality for Jpeg output on your camera so go ahead and select an appropriate Jpeg quality that would suit the medium that it will be used in.
You always have the option of storing two versions of a photograph with most DSLRs: a RAW version and a Jpeg. This gives the best options for instant sharing and post-processing later.
Lack of Standardization Across The Industry
Each different camera manufacturer has their own version of the RAW file type. For Canon the file suffix is .CR2 and for Nikon it is .NEF. For companies that produce RAW editing software like Adobe, they have to pay to licence special software that allows them to decode the files for editing. This lack of standardization could create problems in the future as certain RAW file types become obsolete and software to edit them is discontinued.
Adobe tried to introduce a standard file type known as a Digital Negative (DNG) to eliminate this problem but so far manufacturers have not bought into it. In Adobe Lightroom you can convert your RAW files to the .DNG format to guarantee the future accessibility of your archive of RAW files and they should remain as sharp and true as the moment you captured them.
Advantages of Using Jpeg Files In Photography
Jpeg is a universally recognised file format with no proprietary restrictions. They can be opened on virtually every device, PC, Apple Mac, smartphones and tablets. It can be shared and opened on all the online platforms.
It is a compressed form of file and therefore much smaller than a RAW file. There is some loss of quality but it is a necessary compromise to make it a manageable size for sharing, printing and storing in large quantities. There are varying degrees of compression for a Jpeg file that can be employed for different outcomes.
High compression could be used for fast uploading to online platforms and to prevent the slow loading of websites that could damage the SEO (Search Engine Optimization) in search engine results. Lower compression for high-quality prints and PowerPoint presentations etc.
Disadvantages of Using Jpeg in Photography
Once a Jpeg file has been through its compression a great deal of the useful detail information has been lost forever. That’s why it’s known as a “Lossy” process. This is unrecoverable and it’s why Jpegs have much less flexibility when editing them. There are also some blemishes created during the compression and these are known as Artefacts and can compromise the appearance of the image.
Most Jpegs will probably need some degree of editing before final release which is harder to achieve than with a RAW file, so that adds time. They also lose some data when you open, edit and resave them.
A Jpeg file can have 4 or 5 times less data than a RAW file. It is an 8-bit format so the colour tonal potential of a Jpeg is only 16 million shades whereas for a RAW file it is between 68 Billion and several trillion. When the compression is done in-camera it also applies some stylistic processes to inject a little radiance into the image.
These are very hard to reverse if they are not quite to your taste. The White balance in a Jpeg is hardwired into the data and much harder to correct because most of the colour tone data has been discarded.
Post Processing of RAW Image Files
The post-processing of RAW images is actually quite easy if you have access to A RAW editing program such as Adobe Lightroom or Adobe Photoshop. Photoshop needs to have the “Camera Raw” plugin that allows it to open and read the RAW files. Open the software and import the required RAW files. Now, open them up from the library tab. You are now free to adjust the exposure, white balance, sharpness and noise reduction to your own preferences.


Photo by Oscar J Harper
Shooting in RAW may seem a little daunting at first especially since they look so flat and dull before processing. The results can be staggering though, almost magical. You may be able to transform a photo that you thought was going to be “one for the bin”, into a worthwhile keeper.
Related Questions
What Are The File Types in Digital Cameras?
There are three main types of file used by digital cameras. They all have different attributes. To discover more about them click here.
What is The Difference Between Saturation And Vibrance in Photo Editing?
Editing your images in RAW is the most effective way to pull out lost details but what is the best tool to enhance and optimise the colours? It’s useful to know the difference between Saturation and Vibrance when you are editing so you could dive into our comprehensive, illustrated case study which examines the effects of these settings on colours and skin tones, here in Photography Skool.