We’ve all seen those strange photographs that look like they are pictures of tiny models. They have an unreal, plastic quality that is hard to define. They are actually photos of real places or things made to look like miniature worlds using a clever camera lens, sometimes with special software or in-camera on some DSLRs. Also known as “Tilt-Shift” or “Diorama Effect” photography they are very intriguing and always make you look twice.
To take Fake Miniature photos (Tilt-Shift) you need to take the photo from above and at an angle. You need a tilt-shift lens and use the tilt mechanism. You need a horizontal narrow band in focus. The foreground and background should be out of focus. You can also achieve the effect in photoshop.

These types of photographs look very cool and can lift a mundane scene to another level. It’s not a difficult process if you have the right equipment or software but there are some things that you need to know to perfect the method. The following article will take you through three methods with steps to improve your chances of achieving a memorable fake miniature photograph.
What Are Suitable Subjects For Fake Miniature Photography?
Let’s consider what would make a great subject for a fake miniature photograph. The goal is to create a photo that looks like a handmade tiny model. Models, being small, are always photographed from above and usually at an angle. Photographing from directly above would eliminate any sense of perspective. There would be no discernable foreground and background. The scene would remain flat and two dimensional. So, we must photograph from an angle. The angle you can achieve will depend on where you can take the photograph from.

You need to get high up so you can look down on the scene. It might be possible to get access to a tall building in a city. It might be your own home if you live in a tower, which will make it easy to practice taking photos from a high viewpoint. It might be a friends home or a public building. A view from a bridge, structure or even a cable car could work. Sitting by the window in an aircraft just after taking off or just before landing offers great opportunities for high-level pictures of cities and villages. Not too high though as the buildings, people and cars should be small but distinct.

If you have a drone and can use it legally, you could get great candidate photos for later manipulation (I doubt if any drone camera would have a tilt-shift lens though). You might be out hiking up the side of a valley, hill or mountain. Start to think about the subjects that would make a suitable study; that little village by a lake in the hills or a local train winding its way along a cutting in a gorge.
The scene should contain some objects that appear small such as vehicles, people and buildings. Don’t zoom in too close, it will spoil the illusion. Models are typically quite crude and undetailed so we want to maintain that low level of detail by remaining removed from the perfect reality. Try not to include very large objects that loom in the foreground; they will appear blurred in the final image but they may unsettle the scale and perspective. Simple scenes seem to work best. Choose a small cluster of houses or sheds over a whole cityscape.

The scene will naturally emphasise the ground as we’re looking down so the presence of the sky may be minimised. Landscapes could work but there should be recognisable objects or people to give a sense of scale.
What Are The Methods of Achieving Great Fake Miniature Photographs?
One of the methods is quite expensive but will achieve the best quality results. Another is relatively simple and quick if you have the correct software. The third is achieved with a feature you already might have in your existing DSLR camera.
01 – Tilt Shift Lens Method
These lenses are very expensive, specialised pieces of kit. They are often used by professional photographers, particularly architectural photographers. Using the “Shift” mechanism they are better able to photograph tall buildings without that characteristic “lean” that amateur photographers achieve with standard lenses. Notwithstanding the expense, I will explain how they work when taking fake miniature photographs. For this technique, you will need to use the “tilt” mechanism and sometimes the shift mechanism also.
Comparison to a Standard Lens
On a camera with a normal non-tilting lens, all the glass lens elements are exactly parallel to the “Plane of Focus” within the scene as well as the “Image Plane” where the sensor sits. The centre line of the lens elements is exactly perpendicular to the plane of the sensor and would strike the sensor centrally. All of the gathered light from the scene is collected through the lens and is focussed on the sensor in the same plane, So, provided that you have a good exposure the image will be mostly sharp within the depth of field of the chosen Aperture opening.

Diagram by Oscar J Harper

The Possibilities of a Tilt-Shift Lens
With a Tilt-Shift lens, it is possible, using the “Tilt” mechanism to rotate the lens up, down, (and left or right after rotating the lens by 90 degrees) so that it is no longer parallel to the “Image Plane”. Tilting the lens up or down can produce two very different but extraordinary results.
Tilting The Tilt-Shift Lens Downwards
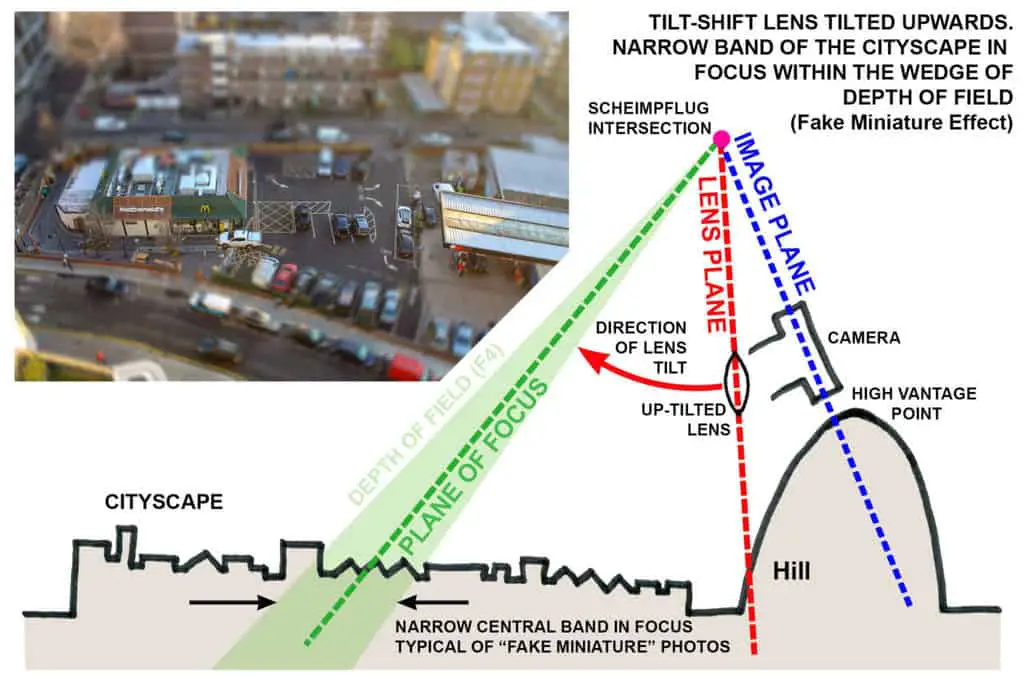
From a high vantage point, if you tilt the lens down towards a horizontal landscape scene, the “Lens Plane” and the “Plane of Focus” start to tilt around a notional pivot point known as the “Scheimpflug Intersection” located somewhere beneath the position of the camera. This pivot point also correlates with the “Image Plane”.
The result can be that the “Plane of Focus” can align with the horizontal landscape subject and render the whole scene into sharp focus. This can also be achieved without the need for a tiny aperture opening to increase the depth of field. This in turn means that you can select faster shutter speeds to stop motion-blur occurring.
This describes the opposite of what we want to achieve in “Fake Miniature” photography but it helps you to understand what is happening when you tilt the lens in different directions. The degree of tilt for the 3 planes is a non-linear geometric relationship as shown in the following diagram:

Diagram by Oscar J Harper
Tilting The Tilt-Shift Lens Upwards (Fake Miniature)
Again, from a high vantage point, if you now tilt the lens upwards in relation to the “Image Plane”, the “Scheimpflug Intersection” switches location and becomes a notional pivot point, somewhere above the camera. The result of this switch is that the “Plane of Focus” now doesn’t align with the horizontal subject plane but instead cuts through it at a steep oblique angle. This has the effect of only rendering a very shallow section of the scene in focus leaving the foreground and background increasingly blurred.

Diagram by Oscar J Harper
In both cases, the Depth-of-Field is a wedge shape with the apex occurring at the intersection point. At this point, the depth of field is zero while increasing either side of the “Plane of Focus” as you get further away from the camera. The wedge shape Depth-of-Field gets wider as you decrease the size of the Aperture opening and therefore creates a wider band of the scene that is in focus.
In the case of this image, the foreground and background would appear to be blurred while a narrow band, somewhere in the midground, would remain sharp and gently fade to the blurred areas above and below. You can experiment with the degree of tilt to change the width of the focussed band. You could also now use the “shift” mechanism to move the focussed band up or down the scene to find the perfect location for the “Fake Miniature” effect.
These layers of (blur – sharp – blur) create the “Fake Miniature” model aesthetic. You have full control over the degree and location of focussed areas and blurred areas. The effect really is like taking a close-up photo with a macro lens of a tiny model. These macro lenses have such a narrow depth of field that the foreground and background are always out of focus. We are used to seeing that in model photography and expect it when photographing tiny objects. That is probably why “Fake Miniature” photography looks so convincing.

02 – Photoshop Method
If a tilt-shift lens is slightly out of your budget; they can cost well over $1000, there is a much cheaper option that can produce similar results. That is, to use photoshop. The Adobe Photographic package of software is relatively affordable to subscribe to and includes:
- Photoshop
- Lightroom
- Lightroom Classic
- Premiere Rush is included too (A simple video editing program)
It is extremely simple to use and will produce plausible “Fake Miniature” images. The settings are easy to manipulate and very powerful giving you full control of the location, width and gradient of the focus band.
Once you have a suitable, well exposed and sharp subject photographed with a normal lens, open it up in Photoshop. Now find the “Filter” drop-down menu and select “Blur Gallery” then select the “Tilt-Shift” option. This will open up the editing tools and place an edit zone on the image. You can move and rotate the zone by clicking on it and dragging it around. You can drag the solid zone lines up and down to change the width of the focussed zone.
You can also push and pull the dotted lines to change the band of blur gradient that transitions between the focussed band and the blurred edges. You can also control the degree of blur by adjusting the “Blur” slider or by rotating the “Blur Circle” on the image screen. The results can be quite convincing if you have the right subject matter to start with.

Models often look a little unreal so while you are in photoshop you could experiment with cranking up the saturation and contrast to make them appear more toy-like.

03 – DSLR In-Camera Method
Some modern DSLR cameras allow you to simulate the effect in-camera after you have taken the normal photo of a suitable subject. The process is to take the photo then open it up on the reviewing screen. Now press the quick menu button or equivalent to open up a menu of options for manipulating the image. There should be a creative filters option where you will find actions like Fish-Eye Effect, Toy Camera Effect and the one we want, the Miniature Effect.

Select this and a shallow rectangle will be displayed over the image. This will be the zone that remains in focus. With the arrow keys, you will be able to move the rectangular zone up and down the image to change the focus zone. You can also rotate the focus zone to a vertical position and move it left or right. This probably would not look correct for “Fake Miniature” photos though because the focus gradient would lead you from left to right instead of front to back.

Other Creative Photographic Techniques
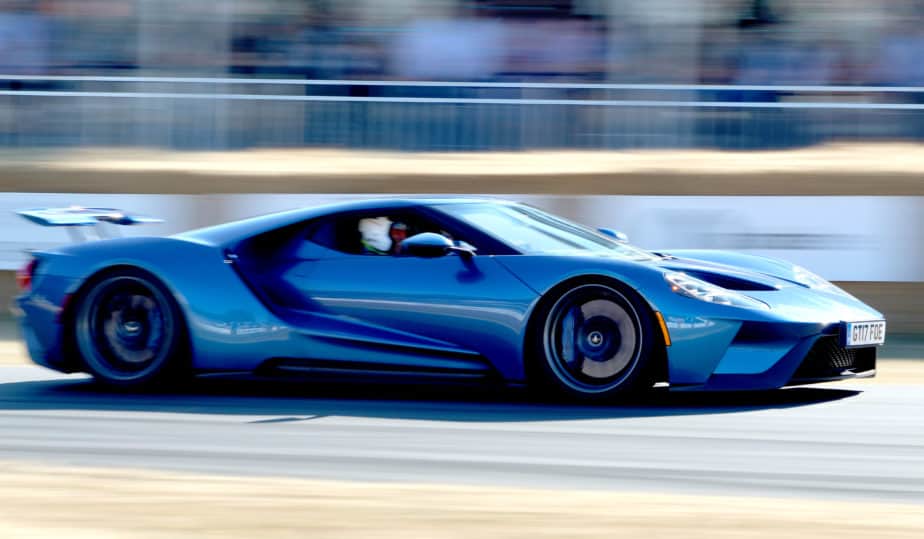
How to Freeze Moving Objects While Blurring The Background
This is a very satisfying technique when you get it just right. It can add a real sense of movement and speed to your photographs. It requires a little practice but it’s worth the effort. It’s all explained in our illustrated guide that you can find within this website, here.
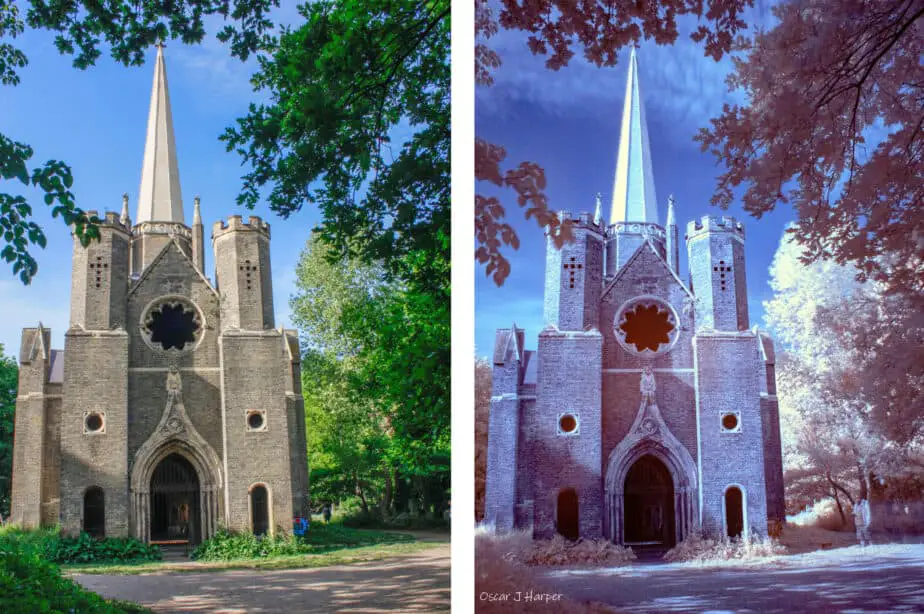
How Do You Get Lens Flare in Photography?
This can sometimes spoil a photograph but it can be exploited to give your photographs a dream-like, cinematic quality. We guide you through the process to achieve great Lens Flare in our article that you can find here.
How do You Blur The Foreground With a DSLR?
Fake miniatures naturally have an extremely blurred foreground (and blurred background) when you use a tilt-shift lens. It is also possible to achieve a blurred foreground with standard lenses on your camera. For a fully illustrated guide on blurring the foreground see our article here in Photography Skool.